

After completing the software installation and creating certificates in the first two parts of this GoldenGate 19c Microservices series, it’s now time to move into the most important phase: configuring the Microservices Architecture (MA) deployment.
This step is where your GoldenGate environment becomes functional. Using the Oracle GoldenGate Configuration Assistant (oggca.sh), you define the Service Manager, deployment details, directories, security options, ports, and more—everything the MA framework needs to operate securely and efficiently.

In this guide, we walk through each configuration step, explain why it’s important, and provide best practices to help you build a clean, stable GoldenGate MA deployment.
Introduction to oggca.sh
Once the Oracle GoldenGate MA software is installed, you must configure the environment using the oggca.sh wizard. This utility:
- Configures the Service Manager
- Sets up your first GoldenGate deployment
- Creates mandatory directories
- Configures environment variables
- Applies SSL/TLS settings (if secure deployment)
- Defines server ports and monitoring
- Generates response files for scripted deployments
Oracle recommends launching the Service Manager as a system service/daemon so the MA components automatically start when the system boots.
You can run
oggca.shfrom anywhere in your environment if$OGG_HOME/binis added to your PATH.
2. Step 1 – Service Manager Details
The first screen asks for details needed to configure the Service Manager, which is the “control center” of your MA architecture.
You will specify:
- Service Manager Deployment Home
Example:/u01/app/oracle/ogg/oggma_deploy - Hostname or IP address of the host running MA
- Port number for the Service Manager (default: 9001)
- Whether to register as system daemon

Registering the Service Manager as a daemon is recommended because it ensures all MA services—Admin Server, Distribution Server, Receiver Server, and Performance Metrics Server—start automatically.
3. Step 2 – Deployment Configuration Option
In this step, you decide whether to:
- Add a new deployment
- Remove an existing deployment
Since this is your first deployment, you will choose Add new GoldenGate deployment.

For future scaling or migrations, this same tool can remove or reconfigure deployments.
4. Step 3 – Deployment Details
Provide your deployment name and specify the software home.
- Deployment Name
Example:amer - Software Home
/u01/app/oracle/ogg/oggma
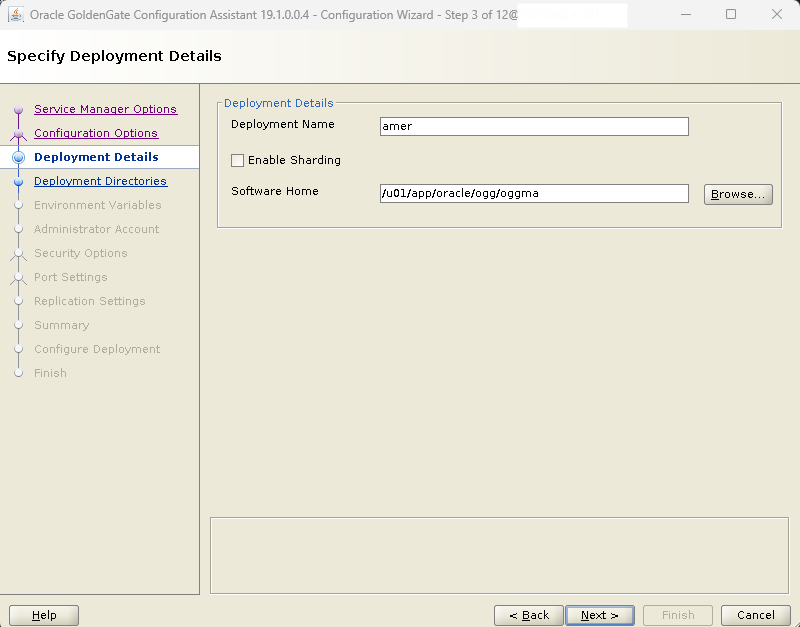
Oracle also allows you to enable Sharded Replication, which is optional and only applicable for sharded database environments.
5. Step 4 – Deployment Directories
In this screen, you define the directory where GoldenGate will store all its:
- Registry files
- Configuration files
- Bootstrap and process parameter files
- Runtime logs
- Trail data
Example directory:
/u01/app/oracle/ogg/amer

Oracle recommends keeping your directories outside OGG_HOME to simplify upgrades and ensure clean separation between binaries and data.
6. Step 5 – Environment Variables
GoldenGate automatically populates common environment variables such as:
- OGG_HOME – installation location
- ORACLE_HOME – database home
- LD_LIBRARY_PATH – shared library paths
- TNS_ADMIN – network admin directory
- ORACLE_SID – database SID
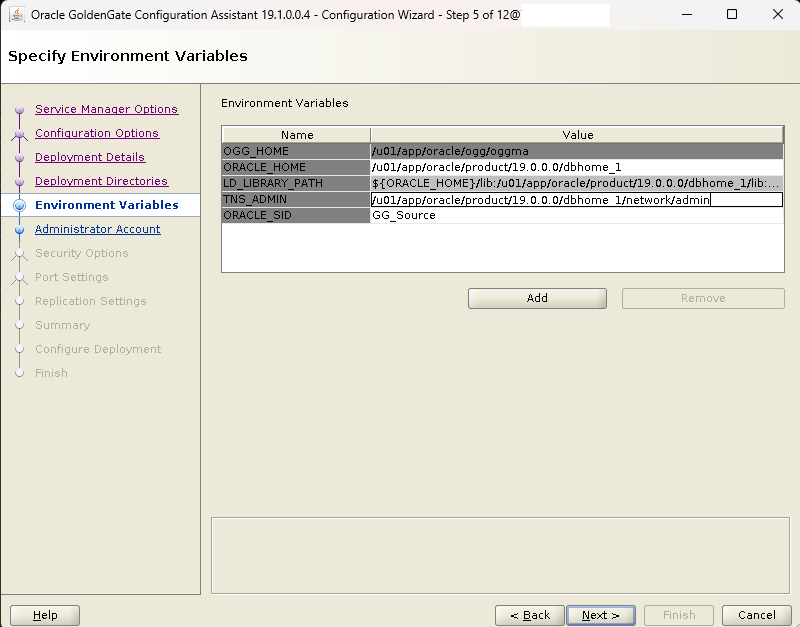
If you want to change character sets or enable additional features, this is where you can add custom variables like:
ENV_LC_ALL=zh_CN.UTF-8
For secured deployments, GoldenGate may require:
OGG_CLIENT_TLS_CIPHER=
(Used for specifying advanced TLS cipher suites.)
7. Step 6 – Administrator Account
This creates the MA login user who will access the web UI and administer GoldenGate services. This is not an Oracle database account.
The password must follow GoldenGate’s strong password policy:
- At least one lowercase letter
- At least one uppercase letter
- One digit
- One special character
- 8 to 30 characters

Keep these credentials safe—they are required for all future access.
8. Step 7 – SSL/TLS Security Options
If you’re configuring secure communication, this is where you specify:
- Wallet files
- Certificates
- Private keys
- Passphrases
Since you completed certificate creation in Part 2, you can reference those wallets here.
GoldenGate supports:
✔ Secure deployment (TLS enabled)
✔ Non-secure deployment (not recommended for production)

TLS governs all communication between:
- Admin Server
- Receiver Server
- Distribution Server
- Remote deployments
9. Step 8 – Cryptography Protocols
GoldenGate MA supports:
- TLS 1.1
- TLS 1.2 (default and recommended)
When security is enabled, you can choose which cipher suites are allowed. TLS 1.2 provides improved handshake security and is future-proofed for modern architectures.
10. Step 9 – Server & Monitoring Configuration
Here you specify ports for each MA service:
- Admin Server (default: 9002)
- Distribution Server (default: 9003)
- Receiver Server (default: 9004)
- Performance Metrics Server (default: 9005)
You also select the datastore type for metrics:
- BDB (Berkeley DB) – recommended
- LMDB (Lightning Memory-Mapped Database)

Choose whichever aligns with your environment, but BDB is typically ideal for tracking MA metrics.
11. Step 10 – Replication Schema
GoldenGate requires a dedicated schema for replication. This schema will be referenced in the GLOBALS file.
Example:
C##OGG_ADMIN

After deployment, GoldenGate automatically creates GLOBALS with the correct GGS schema path.
12. Step 11 – Save Response File (Optional)
GoldenGate allows you to save your configuration as a response file, which is extremely useful for:
- Automation
- Multi-node deployments
- DR environments
- CI/CD pipelines

Passwords are not saved for security reasons; you must re-enter them manually.
13. Step 12 – Execute Configuration Scripts
GoldenGate generates a script you must run as root, such as:
#/u01/app/oracle/ogg/oggma_deploy/bin/registerServiceManager.sh
Copyright (c) 2017, Oracle and/or its affiliates. All rights reserved.
----------------------------------------------------
     Oracle GoldenGate Install As Service Script
----------------------------------------------------
OGG_HOME=/u01/app/oracle/ogg/oggma
OGG_CONF_HOME=/u01/app/oracle/ogg/oggma_deploy/etc/conf
OGG_VAR_HOME=/u01/app/oracle/ogg/oggma_deploy/var
OGG_USER=oracle
Running OracleGoldenGateInstall.sh...
Created symlink from /etc/systemd/system/multi-user.target.wants/OracleGoldenGate.service to /etc/systemd/system/OracleGoldenGate.service.
This registers the Service Manager as a system service.

14. Step 13 – Close Installation & Verify in Browser
After finishing, open GoldenGate Service Manager in a browser:
http://<hostname>:9001
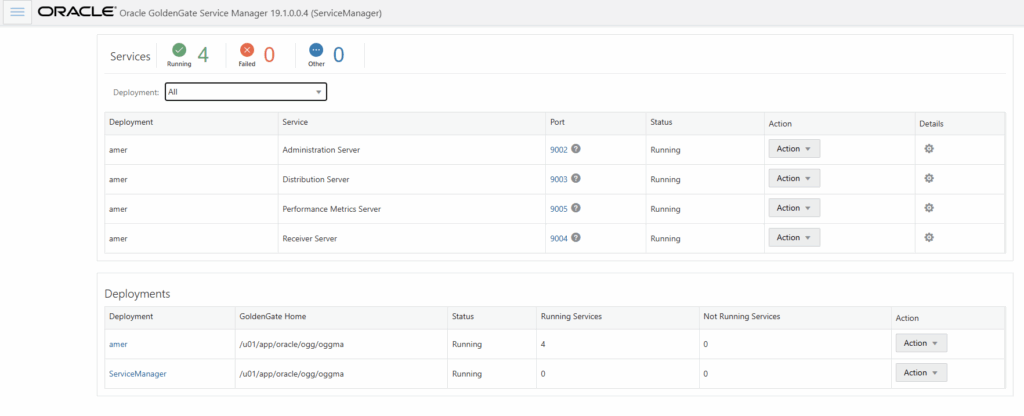
Enter your admin credentials, and you should see:
- Admin Server running
- Distribution Server running
- Receiver Server running
- Metrics Server running
This confirms that your MA deployment is correctly configured.
Final Thoughts
Configuring GoldenGate MA using oggca.sh transforms your installation into a fully operational replication platform. With Service Manager controlling all MA processes, SSL/TLS providing secure communication, and structured directory layouts supporting growth, your GoldenGate environment is now ready for Extract, Replicat, and advanced real-time data integration.
Related Blog Posts
- What Is Oracle GoldenGate? A Beginner-Friendly Introduction
- Oracle GoldenGate 19c Microservices Architecture (MA) – Software Installation Guide
- Oracle GoldenGate 19c Microservices Architecture – Creating Certificates
- Oracle GoldenGate 19c Microservices Architecture – Configuring MA Deployment Using oggca.sh
- How to Create an Extract in Oracle GoldenGate MA (Microservices Architecture)
- Oracle GoldenGate 19c MA Distribution Server: A Complete Beginner-Friendly Guide



Comments 4