

Install Oracle 19c on Red Hat Enterprise Linux 9 with this complete step-by-step guide designed for beginners and DBAs. In this tutorial, we’ll walk through all the prerequisites, environment setup, and the actual installation process of Oracle Database 19c on RHEL 9. Along the way, you’ll also see example screenshots and best practices to make the installation smooth and error-free.
Why Oracle 19c and RHEL 9?
Oracle 19c is the long-term support release for the Oracle Database family, offering stability, security, and performance improvements. Meanwhile, Red Hat Enterprise Linux 9 provides an enterprise-grade operating system with robust security and lifecycle support. Pairing these two technologies ensures a solid foundation for mission-critical applications.


Prerequisites
Before diving into the installation, ensure your environment is ready.
a) Hardware Requirements
- Memory (RAM): Minimum 8 GB (16 GB recommended).
- Swap Space: 8 GB (if RAM is 8 GB); 16 GB if RAM is more than 16 GB.
- Disk Space:
- Oracle Home: ~20 GB
- Data files: Allocate based on project needs (start with 50–100 GB).
b) Software Requirements
- OS: Red Hat Enterprise Linux 9 (x86_64).
- Packages:
Install essential libraries required by Oracle:
sudo dnf install binutils gcc gcc-c++ glibc glibc-devel ksh libaio \
libaio-devel libXrender libX11 libXau libXi libXtst libXrender-devel \
make sysstat smartmontools unzip
c) User and Groups
Oracle recommends dedicated users and groups for database management:
sudo groupadd oinstall
sudo groupadd dba
sudo useradd -g oinstall -G dba oracle
sudo passwd oracle
d) Directory Structure
Create Oracle directories with proper permissions:
sudo mkdir -p /u01/app/oracle/product/19.0.0/dbhome_1
sudo mkdir -p /u01/app/oraInventory
sudo chown -R oracle:oinstall /u01
sudo chmod -R 775 /u01
Preparing the Environment
a) Kernel Parameters
Edit /etc/sysctl.conf and add:
fs.aio-max-nr = 1048576
fs.file-max = 6815744
kernel.shmall = 2097152
kernel.shmmax = 8589934592
kernel.shmmni = 4096
kernel.sem = 250 32000 100 128
net.ipv4.ip_local_port_range = 9000 65500
net.core.rmem_default = 262144
net.core.rmem_max = 4194304
net.core.wmem_default = 262144
net.core.wmem_max = 1048576
Apply changes:
sudo sysctl -p
b) Limits for Oracle User
Add limits in /etc/security/limits.conf:
oracle   soft   nproc    2047
oracle   hard   nproc    16384
oracle   soft   nofile   1024
oracle   hard   nofile   65536
oracle   soft   stack    10240
c) Disable SELinux and Firewall (optional in lab setups)
sudo setenforce 0
sudo systemctl stop firewalld
sudo systemctl disable firewalld
Downloading Oracle 19c
Head to Oracle’s official site and download the Linux x86-64 zip file for 19c.
Move the file to the Oracle user’s home:
su - oracle
mkdir -p ~/stage
mv LINUX.X64_193000_db_home.zip ~/stage/
cd ~/stage
unzip LINUX.X64_193000_db_home.zip -d /u01/app/oracle/product/19.0.0/dbhome_1/
Running the Installer
Switch to the Oracle user:
su - oracle
export CV_ASSUME_DISTID=OL8
cd /u01/app/oracle/product/19.0.0/dbhome_1
./runInstaller
his launches the Oracle Universal Installer (OUI) GUI. Here’s what you’ll see:
Step 1: Installation Option – Choose Create and configure a single instance database.

Step 2: System Class – Select Server Class.

Step 3: Installetion Location – Set Oracle Base

Step 4: Installetion Location – Set Oracle Base

Step 5: Select configuration type as General Purpose / Transaction Processing.

Step 6: Database Identifiers – Enter Database name

Step 7: Configuration Options

Step 8: Enter database file location

Step 9: Management Options – Registration options for Enterprice Manager

Step 10: Enable Archivelog mode option for database
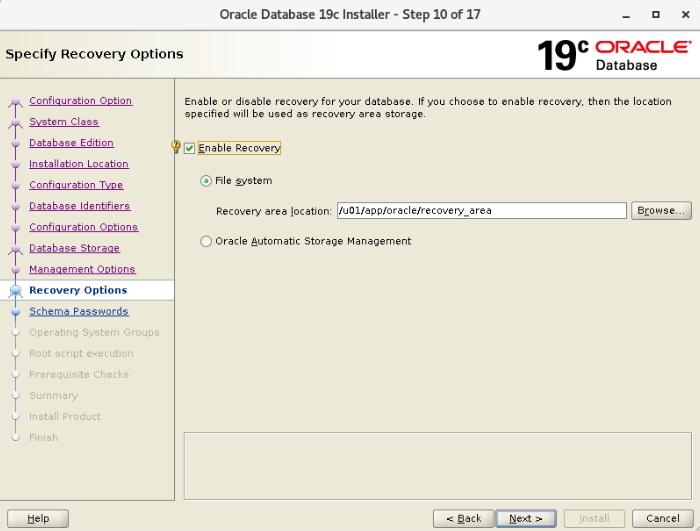
Step 11: Enter SYS and SYSTEM user password

Step 12: Check OS groups for installation

Step 13: Root Script Execution Configuration

Step 14: Check Prerequisite checks for 19c database installation

Step 15: Check Summary

Step 16: Installetion

Step 17: Run root.sh and Orainventory scripts
Near the end, OUI prompts you to run root scripts as root:
sudo /u01/app/oraInventory/orainstRoot.sh
sudo /u01/app/oracle/product/19.0.0/dbhome_1/root.sh
Verifying the Installation
Login with SQL*Plus:
su - oracle
. oraenv   # choose db name
sqlplus / as sysdba
Check status:
SELECT instance_name, status FROM v$instance;
After Oracle 19c is installed and running, it’s important to keep track of storage and performance. One key task for every DBA is monitoring tablespace usage to prevent unexpected outages. You can learn more in our detailed guide on how to monitor Oracle tablespace usage
Conclusion
Installing Oracle 19c on RHEL 9 requires preparation but is a straightforward process when you break it down. By ensuring prerequisites are met, configuring your environment correctly, and carefully stepping through the installer, you can have a robust database setup ready to support enterprise workloads.
This blog, along with the suggested screenshots, provides a step-by-step narrative that both beginners and experienced DBAs will find helpful. With your Oracle 19c instance now running, you’re ready to dive into managing schemas, tuning performance, and exploring advanced features.



Comments 8