

Introduction
Oracle Grid Infrastructure 19c Restart Installation is essential for setting up high availability on a standalone database environment. Oracle Restart automatically monitors and restarts database components such as ASM, listeners, and services after an unexpected system reboot. This ensures that database services are always available without manual intervention.
This article presents a step-by-step installation walkthrough of Oracle Grid Infrastructure 19c for a Standalone Server (Oracle Restart) with real installation screenshots captured on a Linux environment. By the end, you’ll have a fully configured grid home ready to manage ASM instances and improve operational resilience.


For a detailed guide on installing Oracle 19c Database on RHEL 9, check out this article
Prerequisites and Environment Setup
Before starting the installation, ensure the following environment configuration:
- Operating System: Oracle Linux 7/8 or equivalent RHEL version.
- Users and Groups:
groupadd asmadmin
groupadd asmdba
groupadd asmoper
useradd -g oinstall -G asmadmin,asmdba,asmoper grid
- Directories:
mkdir -p /u01/app/19c/grid
mkdir -p /u01/app/grid
chown -R grid:oinstall /u01
chmod -R 775 /u01
- Packages: Ensure
oracle-database-preinstall-19cor equivalent dependencies are installed. - Once the base environment is set, log in as the
griduser to begin the graphical installation.
Step 1 – Launch the Installer
Navigate to the Grid Infrastructure software directory and execute:
./gridSetup.sh
Screenshot 1: Select Configuration Option

Choose the option “Configure Oracle Grid Infrastructure for a Standalone Server (Oracle Restart)”.
Click Next to proceed.
Step 2 – Create ASM Disk Group
Screenshot 2: Create ASM Disk Group

Enter:
- Disk Group Name: DATA
- Redundancy: External (for single disk configuration)
- Allocation Unit Size: 4 MB
Select your ASM candidate disk (e.g., /dev/sdb1) and click Next.
This disk group will store Oracle-managed files and serve as the base for database datafiles.
Step 3 – Specify ASM Password
Screenshot 3: ASM Password Screen
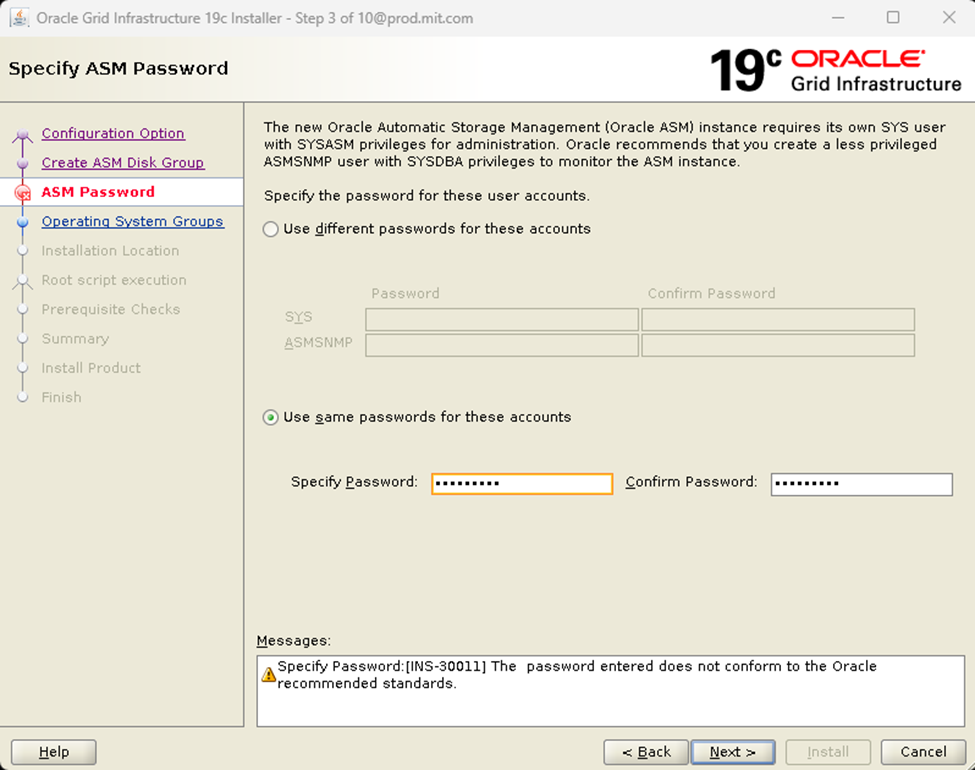
Provide a secure password for the SYS and ASMSNMP users managing the ASM instance.
Oracle enforces password complexity; ensure it meets the standard (uppercase, lowercase, digit, and special character).
Step 4 – Management Options
Screenshot 4: Specify Management Options

You may choose to register with Enterprise Manager (EM) Cloud Control if centralized monitoring is required.
For most standalone configurations, this can be skipped. Click Next.
Step 5 – Privileged Operating System Groups
Screenshot 5: Privileged OS Groups
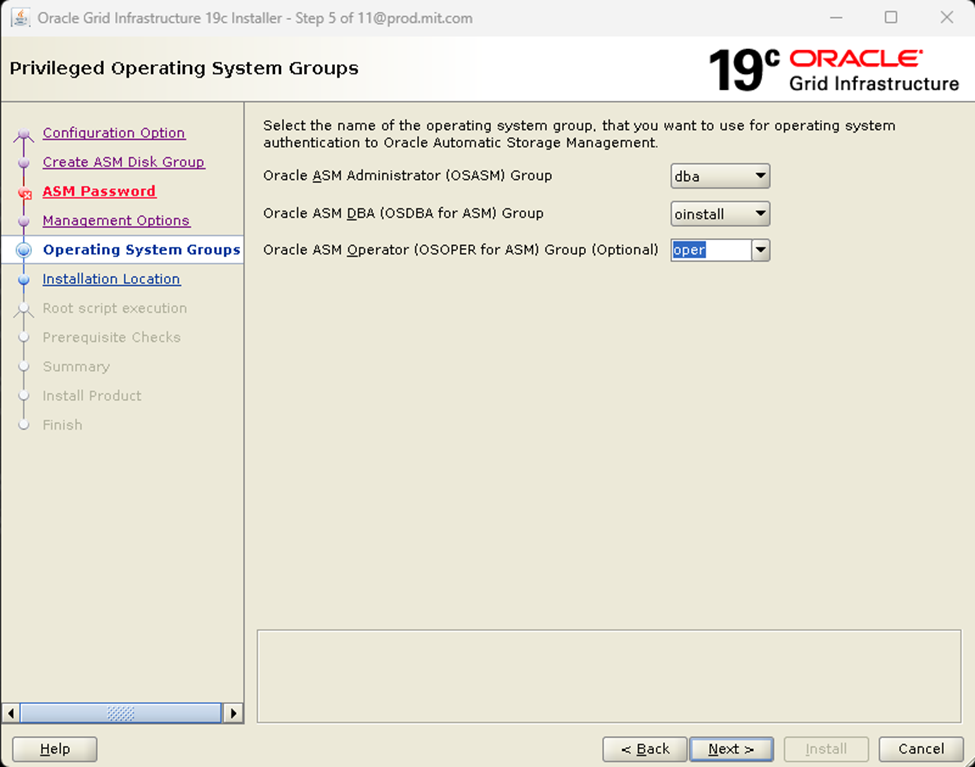
Assign appropriate operating system groups:
- OSASM Group: dba
- OSDBA for ASM: oinstall
- OSOPER for ASM (optional): oper
This configuration controls which users can administer ASM and database instances.
Step 6 – Specify Installation Location
Screenshot 6: Installation Location
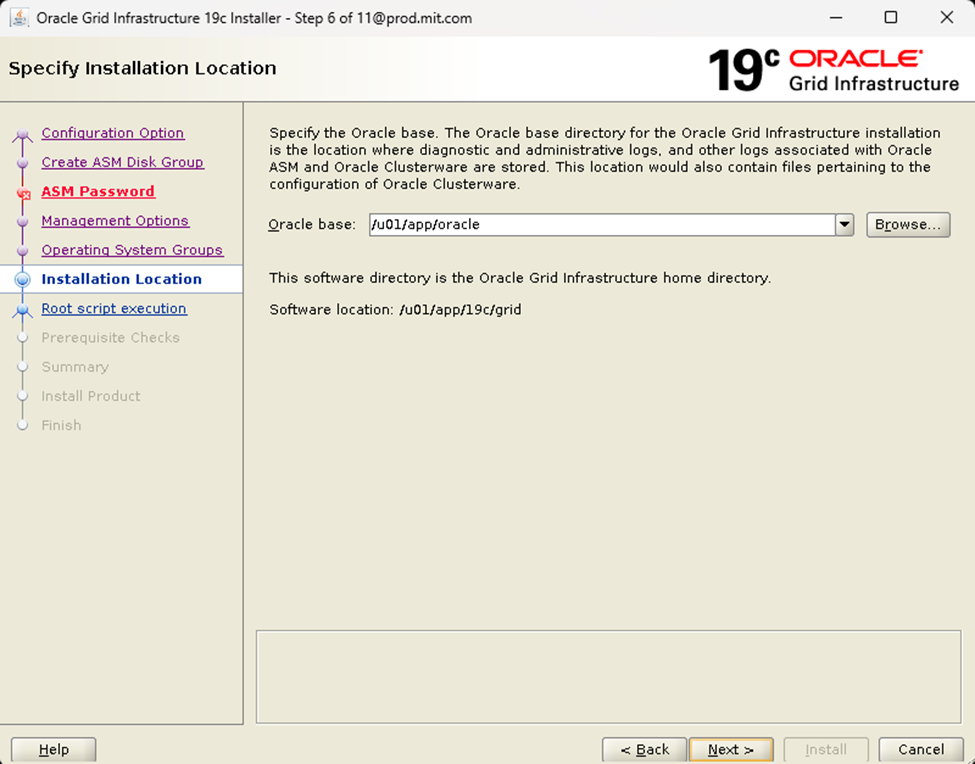
Specify:
- Oracle Base:
/u01/app/oracle - Software Location:
/u01/app/19c/grid
Click Next to continue.
Step 7 – Root Script Execution Configuration
Screenshot 7: Root Script Execution

You can allow automatic execution by providing root credentials or opt for manual execution.
For production security, manual execution is preferred.
Step 8 – Perform Prerequisite Checks
Screenshot 8: Prerequisite Check Progress

The installer will validate all system requirements including kernel parameters, user limits, and available packages.
Resolve any warnings before proceeding.
Step 9 – Review Summary
Screenshot 9: Installation Summary

Review all parameters:
- ASM Disk Group:
DATA - Redundancy:
EXTERNAL - Oracle Base:
/u01/app/oracle - Grid Home:
/u01/app/19c/grid
Click Install to begin the installation.
Step 10 – Execute Root Scripts
Screenshot 10: Execute Configuration Scripts

During this step, you will be prompted to execute a root script manually:
/u01/app/19c/grid/root.sh
The script will perform Oracle Restart service configuration and add necessary entries in /etc/oratab.
Sample Root Script Output:
/u01/app/19c/grid/root.sh
Performing root user operation.

The following environment variables are set as:
    ORACLE_OWNER= oracle
    ORACLE_HOME=  /u01/app/19c/grid

Enter the full pathname of the local bin directory: [/usr/local/bin]:
The contents of "dbhome" have not changed. No need to overwrite.
The contents of "oraenv" have not changed. No need to overwrite.
The contents of "coraenv" have not changed. No need to overwrite.

Entries will be added to the /etc/oratab file as needed by
Database Configuration Assistant when a database is created
Finished running generic part of root script.
Now product-specific root actions will be performed.
Using configuration parameter file: /u01/app/19c/grid/crs/install/crsconfig_params
The log of current session can be found at:
  /u01/app/oracle/crsdata/prod/crsconfig/roothas_2025-10-23_12-29-17AM.log
2025/10/23 12:29:22 CLSRSC-363: User ignored prerequisites during installation
LOCAL ADD MODE
Creating OCR keys for user 'oracle', privgrp 'oinstall'..
Operation successful.
LOCAL ONLY MODE
Successfully accumulated necessary OCR keys.
Creating OCR keys for user 'root', privgrp 'root'..
Operation successful.
CRS-4664: Node prod successfully pinned.
2025/10/23 12:29:31 CLSRSC-330: Adding Clusterware entries to file 'oracle-ohasd.service'

prod     2025/10/23 12:30:41     /u01/app/oracle/crsdata/prod/olr/backup_20251023_123041.olr     724960844
2025/10/23 12:30:42 CLSRSC-327: Successfully configured Oracle Restart for a standalone server
This confirms the successful setup of Oracle Restart and Automatic Storage Management (ASM).
Post-Installation Verification
After completing installation:
crsctl check has
crsctl status resource -t
Expected output should show:
--------------------------------------------------------------------------------
Name           Target  State        Server                   State details
--------------------------------------------------------------------------------
Local Resources
--------------------------------------------------------------------------------
ora.DATA.dg
               ONLINE  ONLINE       prod                     STABLE
ora.LISTENER.lsnr
               ONLINE  ONLINE       prod                     STABLE
ora.asm
               ONLINE  ONLINE       prod                     Started,STABLE
ora.ons
               OFFLINE OFFLINE      prod                     STABLE
--------------------------------------------------------------------------------
Cluster Resources
--------------------------------------------------------------------------------
ora.cssd
      1        ONLINE  ONLINE       prod                     STABLE
ora.diskmon
      1        OFFLINE OFFLINE                               STABLE
ora.evmd
      1        ONLINE  ONLINE       prod                     STABLE
--------------------------------------------------------------------------------
You can now register your database under Oracle Restart:
srvctl add database -db orcl -oraclehome /u01/app/oracle/product/19c/dbhome_1
srvctl add listener
srvctl start has
Troubleshooting Tips
- Ensure ASM disks are correctly discovered (
/dev/sd*) and owned by thegriduser. - If password complexity fails (
INS-30011), recreate the password following Oracle’s recommended standard. - Review installation logs located under:
/u01/app/19c/grid/cfgtoollogs/
/u01/app/oracle/crsdata/
Conclusion
The installation of Oracle Grid Infrastructure 19c Restart Home provides a robust and automated management layer for standalone databases.
By leveraging ASM and Oracle Restart, DBAs ensure higher uptime, simplified maintenance, and automated service recovery after system restarts.
Whether used for enterprise environments or single-instance deployments, Oracle Restart remains a best practice for ensuring database resilience and operational efficiency.
Always perform this installation in a controlled environment and maintain consistent patch levels between Oracle Grid and database homes to avoid version conflicts.



Comments 3