

Oracle Enterprise Manager 24ai (OEM 24ai) is Oracle’s latest, AI-powered management platform designed to simplify database and IT infrastructure monitoring. It brings advanced automation, observability, and AI-driven insights that can significantly reduce operational overhead. In this guide, we’ll walk you through the step-by-step process to install Oracle Enterprise Manager 24ai on Oracle Database 19c running on Red Hat Enterprise Linux (RHEL).
Why OEM 24ai?
Before jumping into the installation, here’s why you should care:
- AI-driven monitoring: Detect anomalies faster with built-in AI models.
- Improved security: Works seamlessly with the latest Critical Patch Updates.
- Performance optimization: Recommendations to tune Oracle 19c workloads.
- Hybrid ready: Unified management for on-premise and cloud workloads.
With that in mind, let’s start the installation.
Step 1: Prepare Your Oracle 19c Database
First, confirm your Oracle 19c database is patched and supported by OEM 24ai. The current release supports Oracle Database 19.22 and higher
Database Templates for Installing Oracle Enterprise Manager 24ai Release 1 (24.1.0.0.0)
Note: You can use the following DB templates only with EM 24.1.0.0.0 release. Refer to the EM 24.1.0.0.0 Installation guide to learn how to use these DB templates to setup database that will house the EM repository. The EM 24.1.0.0.0 DB templates are only for the 19.22 version of the Oracle database with configurations Single Instance (SI) and Pluggable Database (PDB).
DB templates Download URL: https://edelivery.oracle.com/osdc/faces/SoftwareDelivery
Instructions for downloading Database Templates from edelivery site:
- In the search box enter ‘Database Template for Installing Enterprise Manager’
- Select ‘REL: Database Template for Installing Enterprise Manager 19.22.0.0.0’
- Click on ‘REL: Database Template for Installing Enterprise Manager 19.22.0.0.0’ and it will be added to Download Queue
- Click on ‘View Items’ to view the database templates in the Download Queue.
- In the Download Queue page select the platform from the drop-down option (e.g Linux x86-64) and download the database templates for Enterprise Manager 24.1 installation.
Copy file to /u01/app/oracle/product/19.0.0/dbhome_1/assistants/dbca/templates
 unzip DB19_22_SIDB_Template_for_EM24_1_0_0_0_Linux_x64.zip -d /Oracle-OEM/app/oracle/product/19.0.0/dbhome_1/assistants/dbca/templates
Archive:  DB19_22_SIDB_Template_for_EM24_1_0_0_0_Linux_x64.zip
  inflating: /Oracle-OEM/app/oracle/product/19.0.0/dbhome_1/assistants/dbca/templates/set_repo_param_19_22_0_0_0_Database_SQL_for_EM24_1_0_0_0_Large_deployment.sql
  inflating: /Oracle-OEM/app/oracle/product/19.0.0/dbhome_1/assistants/dbca/templates/set_repo_param_19_22_0_0_0_Database_SQL_for_EM24_1_0_0_0_Medium_deployment.sql
  inflating: /Oracle-OEM/app/oracle/product/19.0.0/dbhome_1/assistants/dbca/templates/set_repo_param_19_22_0_0_0_Database_SQL_for_EM24_1_0_0_0_Small_deployment.sql
  inflating: /Oracle-OEM/app/oracle/product/19.0.0/dbhome_1/assistants/dbca/templates/shpool_19_22_0_0_0_Database_SQL_for_EM24_1_0_0_0.sql
  inflating: /Oracle-OEM/app/oracle/product/19.0.0/dbhome_1/assistants/dbca/templates/19_22_0_0_0_Database_Template_for_EM24_1_0_0_0_Large_deployment.dbc
  inflating: /Oracle-OEM/app/oracle/product/19.0.0/dbhome_1/assistants/dbca/templates/19_22_0_0_0_Database_Template_for_EM24_1_0_0_0_Medium_deployment.dbc
  inflating: /Oracle-OEM/app/oracle/product/19.0.0/dbhome_1/assistants/dbca/templates/19_22_0_0_0_Database_Template_for_EM24_1_0_0_0_Small_deployment.dbc
  inflating: /Oracle-OEM/app/oracle/product/19.0.0/dbhome_1/assistants/dbca/templates/19_22_0_0_0_Database_Template_for_EM24_1_0_0_0.dfb
  inflating: /Oracle-OEM/app/oracle/product/19.0.0/dbhome_1/assistants/dbca/templates/19_22_0_0_0_Database_Template_for_EM24_1_0_0_0.ctl
Run a quick health check in SQL*Plus:
set lines 200 pages 200
select name, open_mode, log_mode, database_role from v$database;
Also check redo log configuration:
col member for a70
select group#, members, bytes/1024/1024 "Size in MB" from v$log;
select group#, member from v$logfile;
Added larger redo logs (300 MB each).
Datafile Resize Operations Slowing Installation
During the installation, the alert log showed multiple datafile resize operations, causing the process to take much longer than expected:
2025-04-28T20:07:56.644938+05:30
Resize operation completed for file# 3, fname /u01/oradata/data/OEM/sysaux01.dbf, old size 880640K, new size 890880K
2025-04-28T20:08:05.292709+05:30
Resize operation completed for file# 1, fname /u01/oradata/data/OEM/system01.dbf, old size 1464320K, new size 1474560K
Since the datafiles were already in AUTOEXTEND mode, OEM kept resizing files gradually instead of allocating enough upfront space.
To avoid repeated auto-extension during installation:Resize datafiles manually to a larger size.
Already have Oracle 19c installed? To check or install Oracle 19c on RHEL 9, please refer to this detailed guide: Install Oracle 19c Database on RHEL 9
Step 2: Verify and Tune Database Parameters
OEM 24ai requires certain parameters to be set properly. Run the following commands to check current values:
show parameter _allow_insert_with_update_check;
show parameter session_cached_cursors;
show parameter shared_pool_size;
show parameter processes;
show parameter sga_max_size;
show parameter sga_target;
show parameter pga_aggregate_target;
If needed, adjust them to meet OEM 24ai requirements:
alter system set "_allow_insert_with_update_check"=true scope=both;
alter system set session_cached_cursors=500 scope=spfile;
alter system set shared_pool_size=1600M scope=spfile;
alter system set processes=600 scope=spfile;
alter system set sga_max_size=8G scope=spfile;
alter system set sga_target=8G scope=spfile;
alter system set pga_aggregate_target=1G scope=spfile;

alter system reset "_optimizer_nlj_hj_adaptive_join" scope=both sid='*';
alter system reset "_optimizer_strans_adaptive_pruning" scope=both sid='*';
alter system reset "_px_adaptive_dist_method" scope=both sid='*';
alter system reset "_sql_plan_directive_mgmt_control" scope=both sid='*';
alter system reset "_optimizer_dsdir_usage_control" scope=both sid='*';
alter system reset "_optimizer_use_feedback" scope=both sid='*';
alter system reset "_optimizer_gather_feedback" scope=both sid='*';
alter system reset "_optimizer_performance_feedback" scope=both sid='*';
Important: Restart the database after these parameter changes.
Step 3: Patch the Database (Pre-requisite)
Before you install OEM 24ai, ensure your Oracle 19c home is patched with the latest Release Update (RU) and OJVM patches.
Typical patching flow:
- Download patches from Oracle Support.
- Update OPatch to the latest version.
- Run conflict checks.
- Shutdown the database and listener.
- Apply the RU/OJVM patches using
opatch apply. - Restart services and run datapatch -verbose.
- Verify with:
select ACTION_TIME,ACTION,STATUS,SOURCE_VERSION,TARGET_VERSION from dba_registry_sqlpatch
If you’re looking to patch your Oracle 19c database before installing OEM 24ai, use this guide: Oracle 19c Release Update 19.28 on RHEL – Step-by-Step Guide
Step 4: Install OEM 24ai Binaries
Once your database is prepared and patched:
Unzip the EM 24ai binaries into your chosen staging directory.
[oracle@em-24ai ~]$ cd setup/
[oracle@em-24ai setup]$ ls -ltr
-r--r--r-- 1 oracle oinstall 1532547277 Dec  5 15:50 em24100_linux64-2.zip
-r--r--r-- 1 oracle oinstall 1921746092 Dec  5 15:50 em24100_linux64-3.zip
-r--r--r-- 1 oracle oinstall 1679195212 Dec  5 15:51 em24100_linux64-4.zip
-r--r--r-- 1 oracle oinstall 1669545724 Dec  5 15:52 em24100_linux64-5.zip
-r-xr-xr-x 1 oracle oinstall 1624325096 Dec  5 15:53 em24100_linux64.bin
Run the installer script (./em24100_linux64.bin) and follow the prompts.
./em24100_linux64.bin
Launcher log file is /tmp/OraInstall2025-04-11_05-42-52PM/launcher2025-04-11_05-42-52PM.log.
Extracting the installer . . . . . . . . . . . . . . . . . . . . . . . . . . . . . . . . . . . . . . . . . . . . . Done
Checking monitor: must be configured to display at least 256 colors.   Actual 16777216    Passed
Checking swap space: must be greater than 512 MB.   Actual 8083 MB    Passed
Checking if this platform requires a 64-bit JVM.   Actual 64    Passed (-d64 flag is not required)
Preparing to launch the Oracle Universal Installer from /tmp/OraInstall2025-04-11_05-42-52PM

......
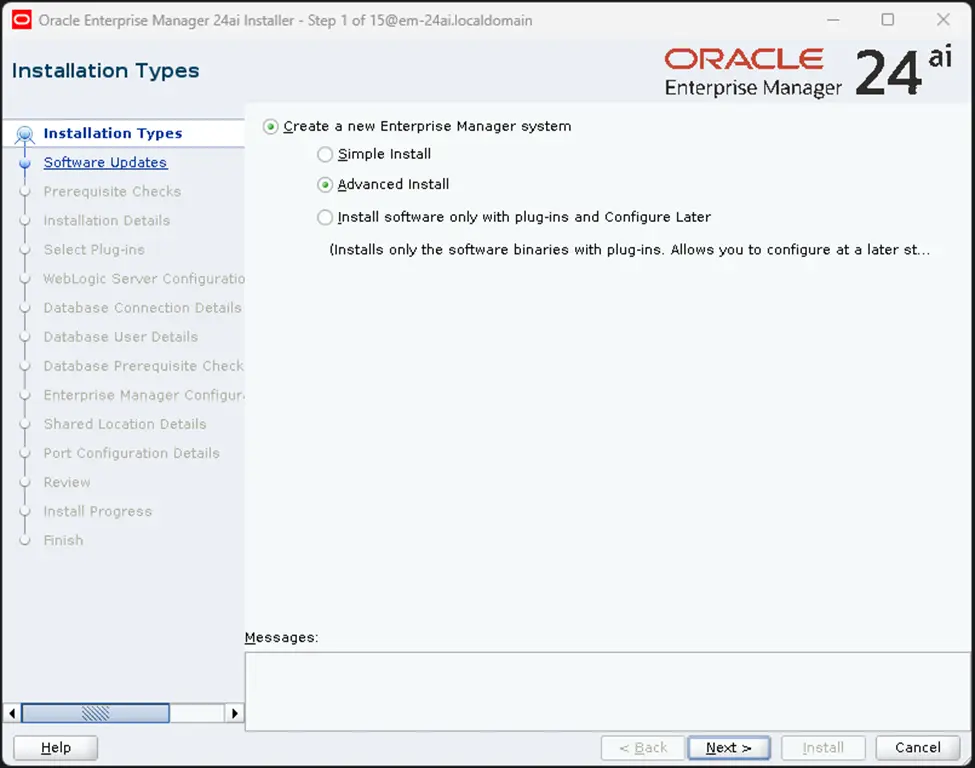
Choose deployment size (small, medium, or large) depending on your workload and server resources
Options you’ll see:
- Simple Installation
- Best for test environments or small labs.
- Installer will automatically create and configure most components with minimal user input.
- Good if you just want to quickly spin up OEM 24ai to evaluate features.
- Limitations: Not suitable for large enterprises, since it does not allow fine-grained control over repository placement, tablespace sizing, or advanced parameters.
- Advanced Installation
- Recommended for production deployments.
- Provides full control:
- Repository database configuration (CDB/PDB setup, parameters, tablespaces).
- Middleware home location.
- OMS instance base location.
- Port configurations.
- Deployment size (Small, Medium, Large).
- This option ensures OEM is tailored to your enterprise workload and scales properly.
Best Practice:
Use Advanced Installation in all serious deployments so you can meet performance, HA, and compliance needs.
Use Simple Installation only in test labs or when learning OEM.
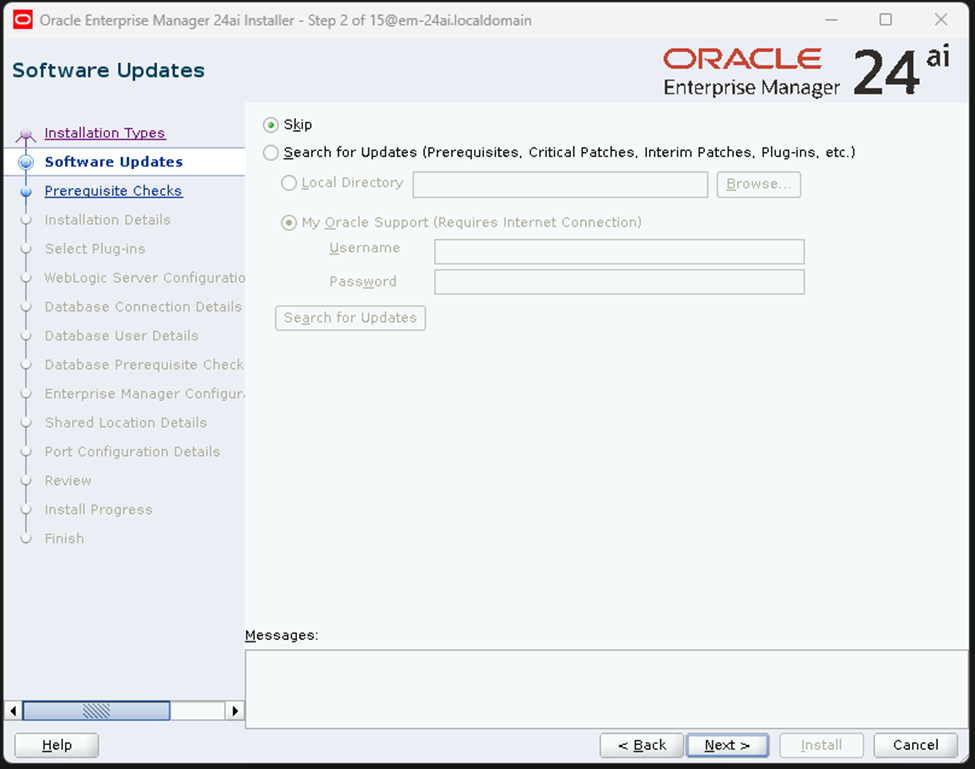
Software Updates
Tip: If your server doesn’t have internet access, skip here and patch manually later.
Lets you connect to My Oracle Support (MOS) to check for the latest patches during installation.
Options:
Use My Oracle Support credentials (recommended in production).
Skip software updates (common in labs/test).
Prerequisite Checks

Middleware Home Location
Tip: Keep it separate from your database ORACLE_HOME.
You need to specify the Middleware Home directory where OEM binaries will be installed.
Typical path:
/u01/app/oracle/middleware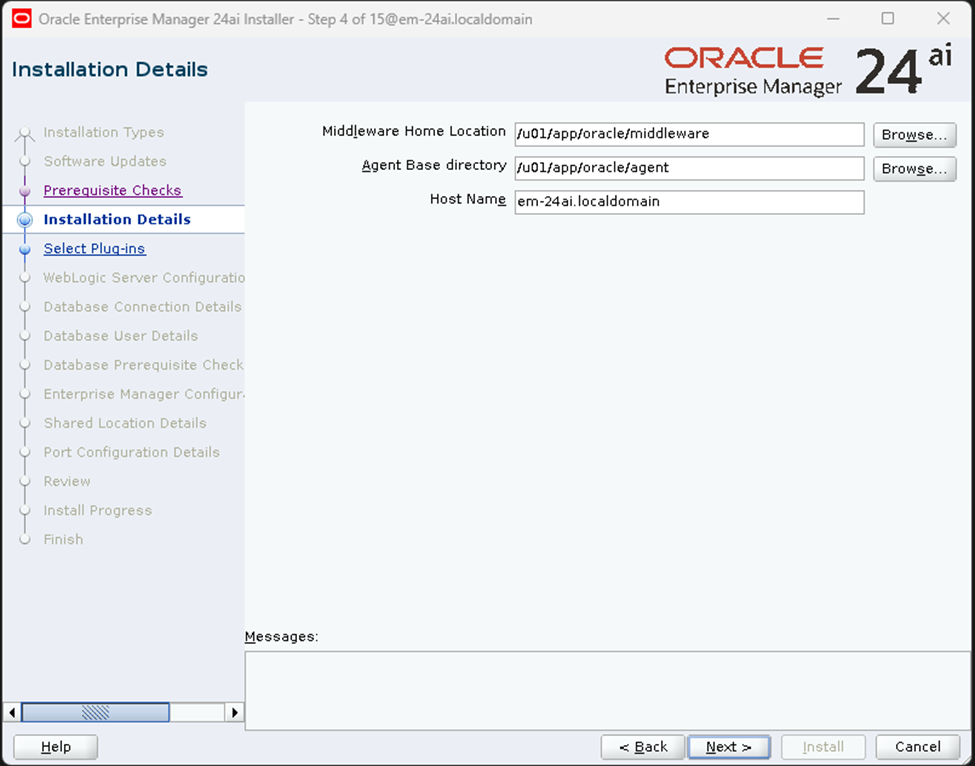
Select Plug-ins Window
OEM 24ai is modular. Instead of installing every feature by default, it lets you select which management plug-ins to install. Plug-ins extend the core OMS to support databases, middleware, engineered systems, and even cloud targets.

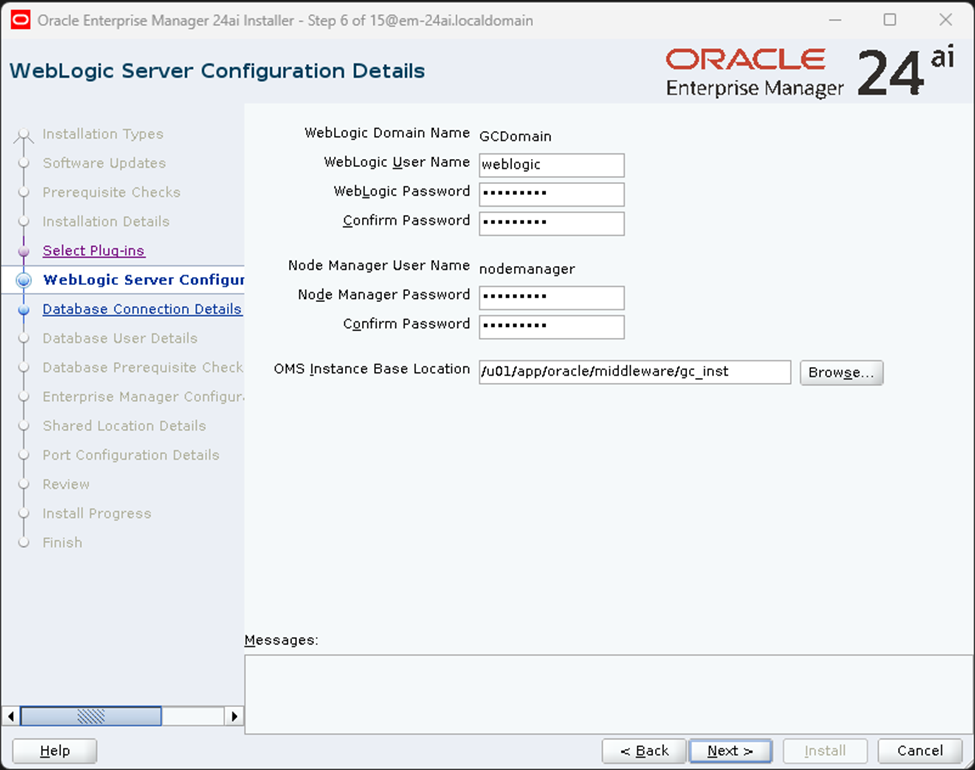
WebLogic Server Configuration Window
This window sets up the WebLogic Administration Server and Managed Servers that host the OMS application inside Oracle Enterprise Manager.
Repository Database Details
Here you connect OEM 24ai to an Oracle 19c database that will hold the OEM Repository.
Required fields:
- Hostname
- Port (default 1521)
- Service name / SID
- SYS or SYSDBA user credentials
The installer checks if the database meets parameter and patch prerequisites.
Tip: This is where the earlier parameter tuning (SGA, PGA, etc.) comes into play.

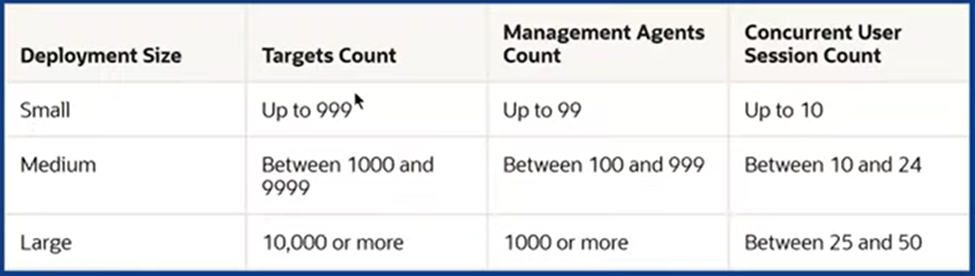
Deployment Size Selection
You’ll choose the deployment size:
- Small – for labs/testing (fewer targets).
- Medium – typical enterprise setup.
- Large – for environments managing thousands of targets.
This choice dictates memory, processes, and tablespace requirements.
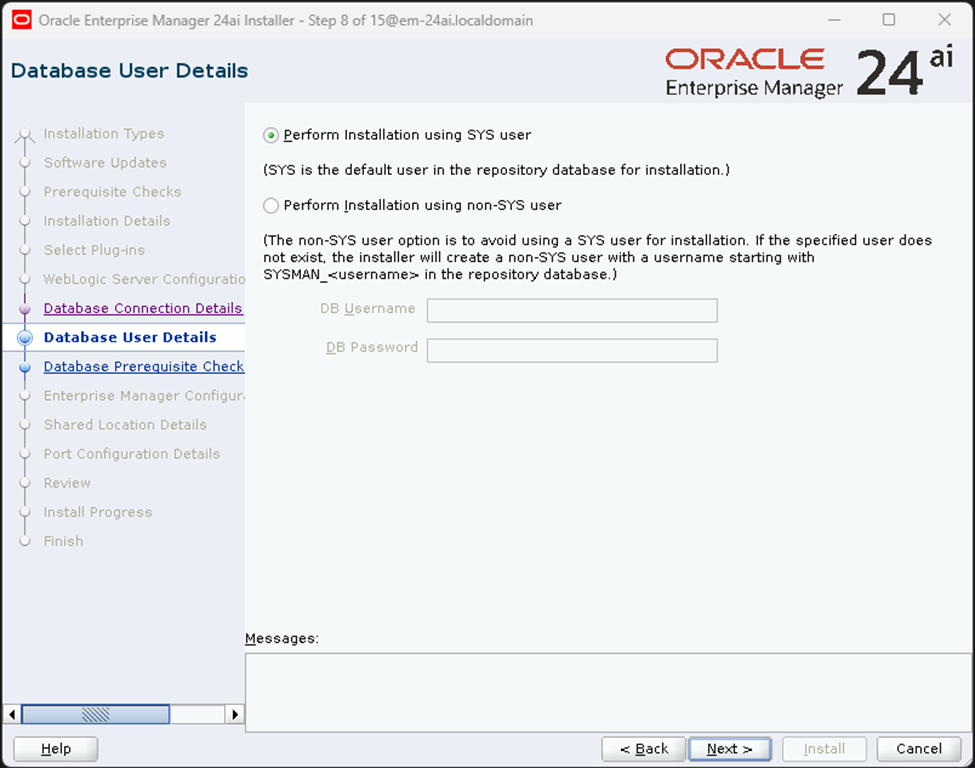
Database User Details
Prerequisite Checks

Enterprice Manager Configuration Details

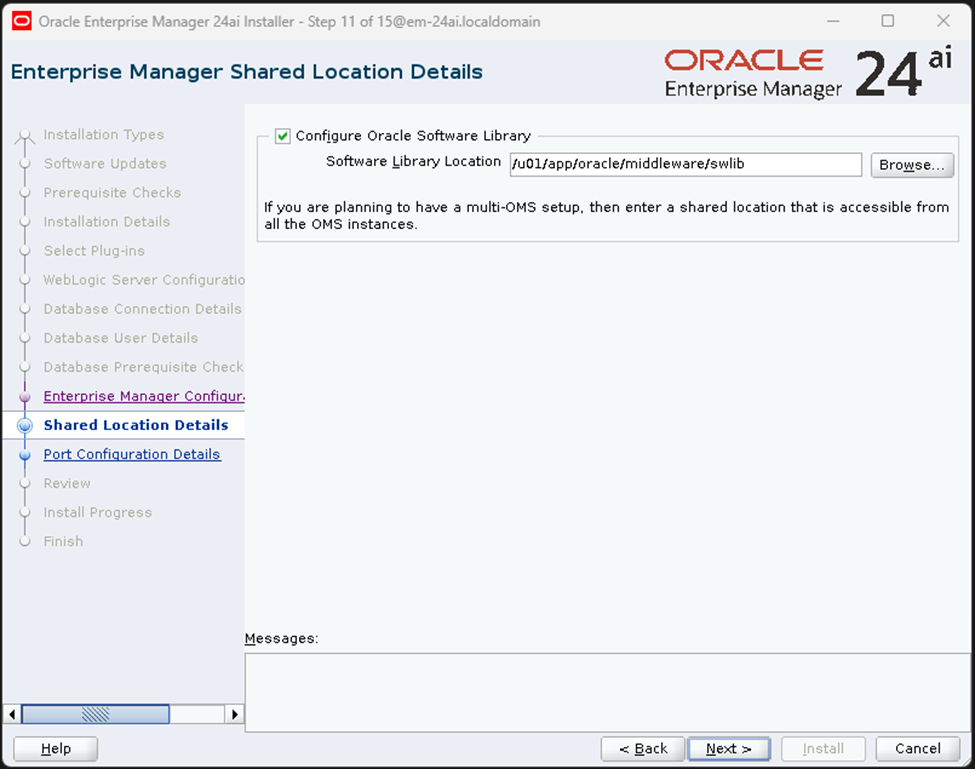
Enterprise Manager Shared Location Details
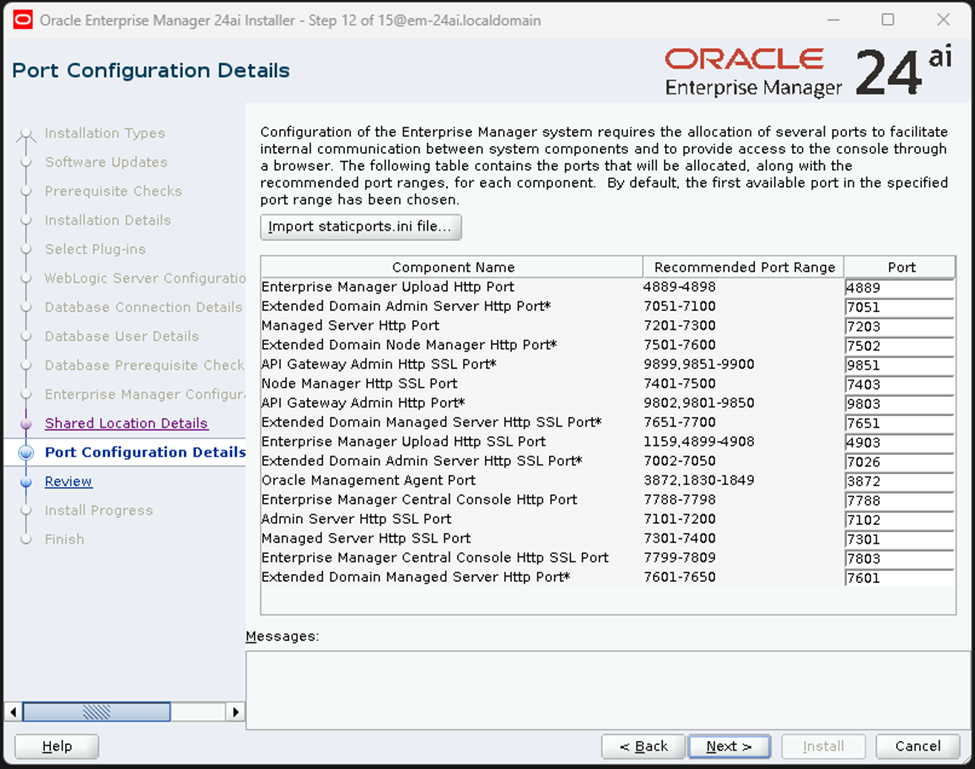
Port Configuration
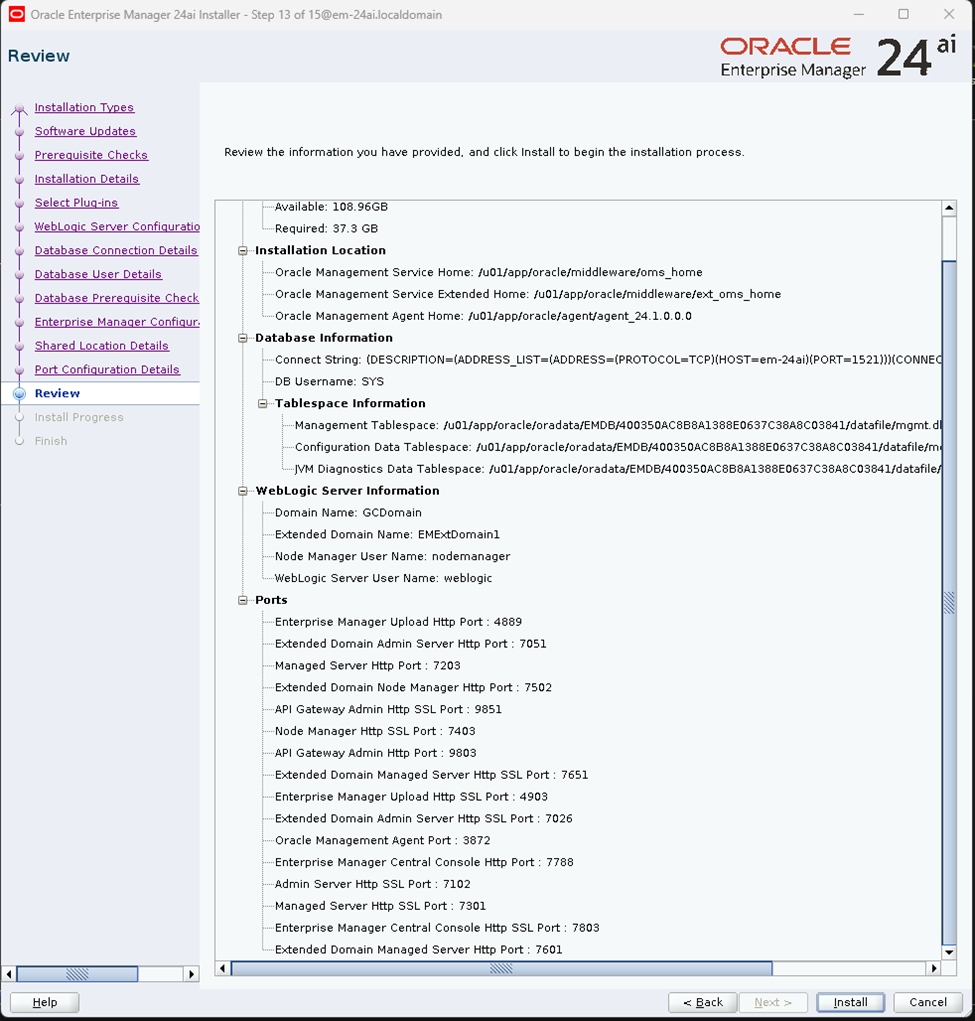
Summary Screen
Displays a complete installation plan.
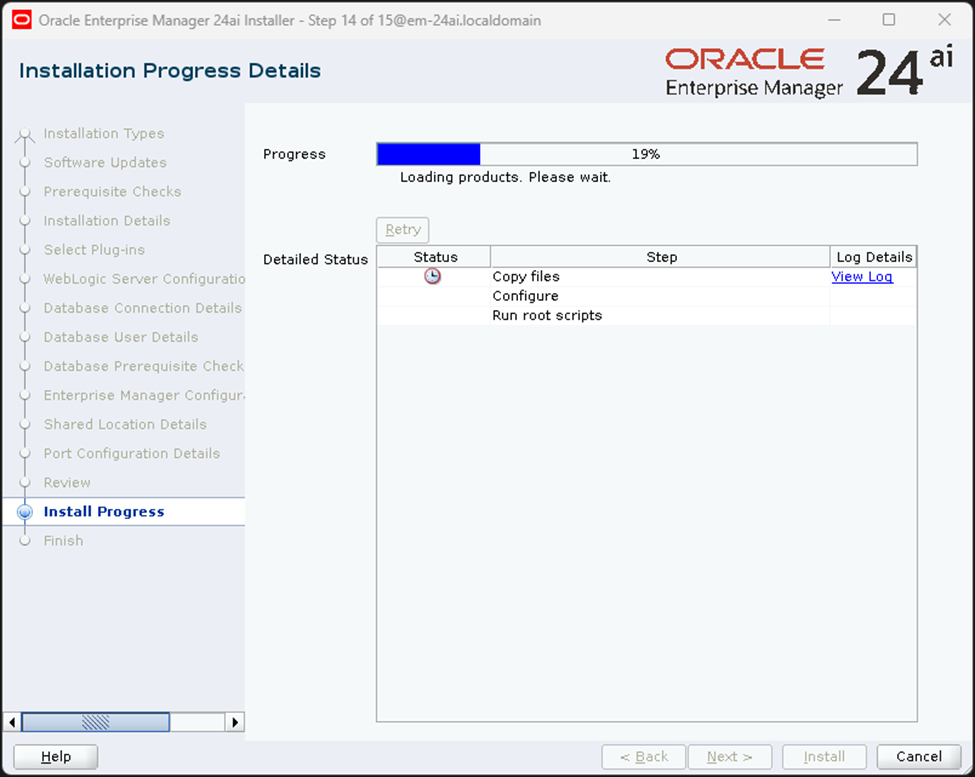
Installation Progress
Shows step-by-step installation progress:
- Copying files
- Configuring middleware
- Setting up repository schema
- Starting OMS services
You can monitor logs in $ORACLE_HOME/cfgtoollogs.

Root Scripts
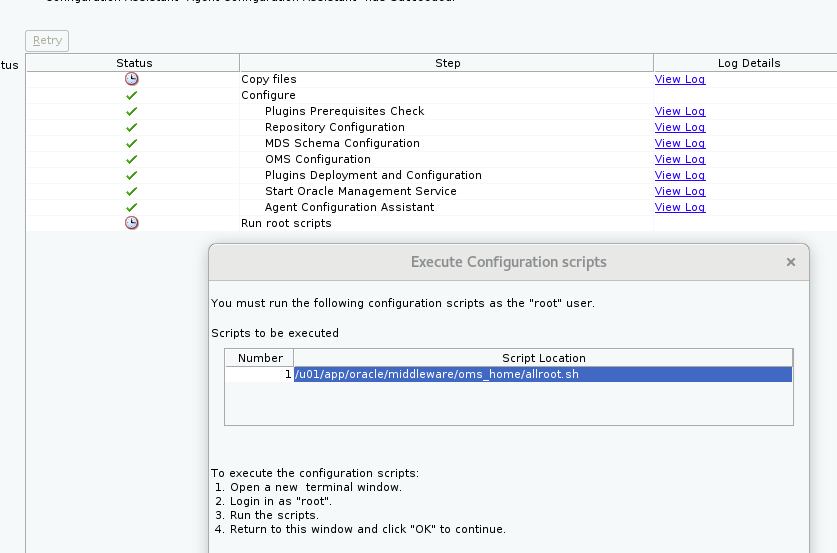
/u01/app/oracle/middleware/oms_home/allroot.shFinish Screen
Confirms successful installation.
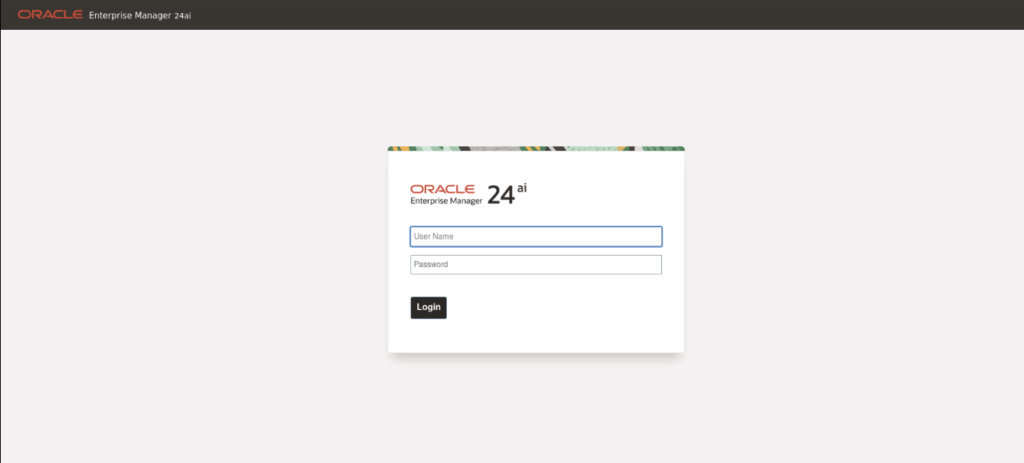
Provides URLs to access OEM 24ai console, e.g.:
https://<hostname>:7803/em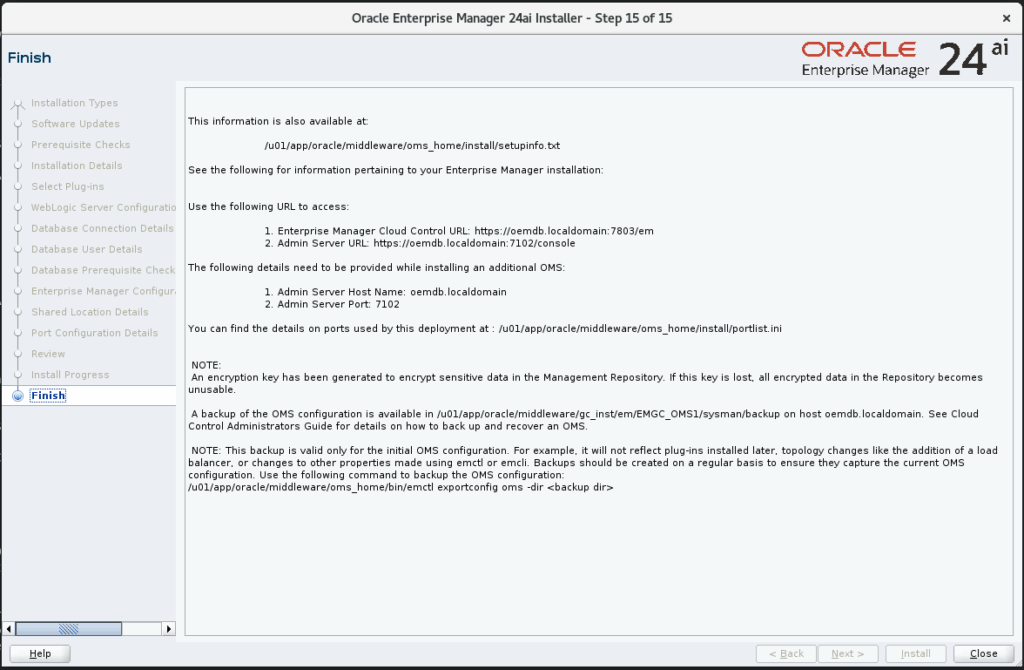
OEM 24ai console
Conclusion
Installing Oracle Enterprise Manager 24ai on Oracle 19c (RHEL) ensures you’re ready for the next generation of database and IT management. By applying the latest patches, tuning your parameters, and following the step-by-step installation, you can unlock AI-driven observability and optimization for your environment.
Whether you’re running mission-critical databases on-prem or in the cloud, OEM 24ai provides the intelligence and automation you need to stay ahead.









Thanks designed for sharing such a fastidious thought, paragraph is good, thats why i have read it completely