

Installing Oracle Grid Infrastructure (GI) 26ai in Restart mode is a mandatory and foundational step before deploying Oracle AI Database 26ai on a single server. Oracle Restart provides ASM, clusterware services, and automatic database startup without the complexity of a full RAC environment.
This guide walks through the entire Oracle Grid Infrastructure 26ai Restart installation lifecycle—from preparing the Grid Home, running the installer, configuring ASM, executing root scripts, and validating a successful setup—using real installer screens and command outputs.


This is written from a DBA’s perspective, focusing on what to select, why it matters, and what to verify.
Why Oracle Grid Infrastructure 26ai Restart?
Oracle Restart is designed for standalone servers and provides:
- Automatic startup and restart of databases, ASM, and listeners
- ASM for enterprise-grade storage management
- CRS stack without RAC overhead
- Faster recovery after OS reboots
- Clean separation between Grid and Database homes
For Oracle AI Database 26ai, Oracle Restart is the recommended and supported architecture for single-node environments.
Environment Overview (Example)
- OS: Linux x86_64
- Grid Base:
/u01/app/oracle - Grid Home:
/u01/app/grid - ASM Disk:
/dev/sdb1 - Installation Type: Standalone Server (Oracle Restart)
Step 1: Prepare Oracle Grid Home (Pre-Installation)
Before launching the installer, the Grid home directory must be created manually.
Create Grid Home Directory
mkdir -p /u01/app/grid
👉 Best Practice:
Always keep Grid Home separate from Database Home. This simplifies patching, upgrades, and troubleshooting.
Create OS Groups
Run the following commands as the root user:
groupadd -g 54321 oinstall
groupadd -g 54327 asmdba
groupadd -g 54329 asmadmin
groupadd -g 54330 racdba
👉 Best Practice:
- Use consistent GIDs across servers
- Avoid conflicts with existing system groups
- These GIDs are examples—adjust to your environment if required
Create the Grid User
The grid user owns the Grid Infrastructure home and manages ASM and Oracle Restart services.
Create the user with the correct primary and secondary groups:
useradd -u 54331 -g oinstall \
-G asmdba,asmadmin,racdba \
-d /home/grid -m grid
Set the password:
passwd grid
Verify Grid User and Group Membership
After creation, verify using:
id grid
Expected output:
$ id grid
uid=54331(grid) gid=54321(oinstall) \
groups=54321(oinstall),54327(asmdba),54329(asmadmin),54330(racdba)
✔ This confirms:
- Correct UID
- Correct primary group (
oinstall) - All required ASM and RAC-related groups assigned
Step 2: Extract Oracle Grid Infrastructure 26ai Software
Switch to the oracle user and unzip the Grid Infrastructure software into the Grid Home.
cd /path/to/install
unzip LINUX.X64_2326100_grid_home.zip -d /u01/app/grid/
During extraction, Oracle creates directories such as:
- OPatch
- Perl runtime
- CRS binaries
- ASM utilities
This confirms a software-only installation, which is Oracle’s recommended method.
Step 3: Launch Oracle Grid Infrastructure 26ai Installer
Navigate to the Grid Home and launch the installer:
cd /u01/app/grid
./gridSetup.sh
You will see the Oracle Grid Infrastructure 26ai splash screen, confirming the correct version.
Step 4: Select Configuration Option
On the Select Configuration Option screen, choose:

✅ Configure Oracle Grid Infrastructure for a Standalone Server (Oracle Restart)
Do not select:
- New Cluster
- Upgrade
- Software Only (unless you plan silent configuration later)
👉 Why this matters:
Oracle Restart installs ASM and CRS services without RAC complexity—ideal for AI and single-node workloads.
Step 5: Create ASM Disk Group
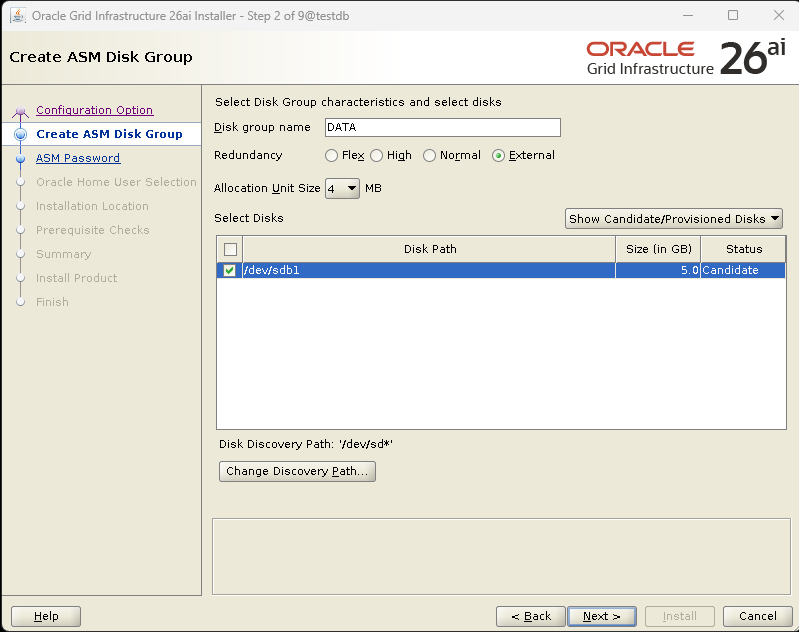
On the Create ASM Disk Group screen:
- Disk Group Name:
DATA - Redundancy:
EXTERNAL - Allocation Unit Size:
4 MB - Disk Selected:
/dev/sdb1
👉 Explanation:
- External redundancy is ideal when storage-level redundancy exists
- 4 MB AU size is a balanced default for most workloads
📌 Ensure the disk is clean and not formatted.
Step 6: Specify ASM Password
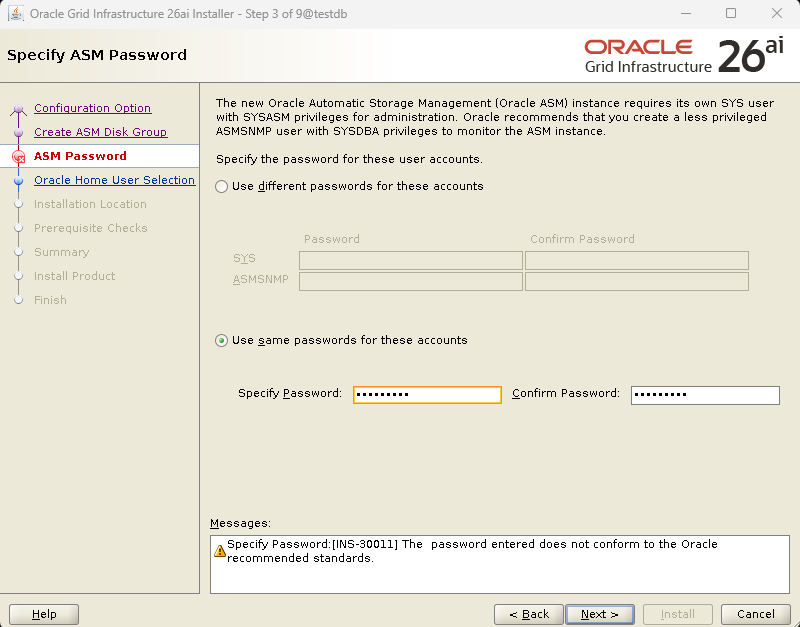
ASM requires SYS-level credentials.
Select:
✅ Use same passwords for these accounts
Enter and confirm the password.
You may see a warning:
INS-30011: The password entered does not conform to Oracle recommended standards
This is a warning, not a blocker.
👉 Production Tip:
Use strong passwords that meet Oracle’s complexity rules in real environments.
Step 7: Specify Management Options
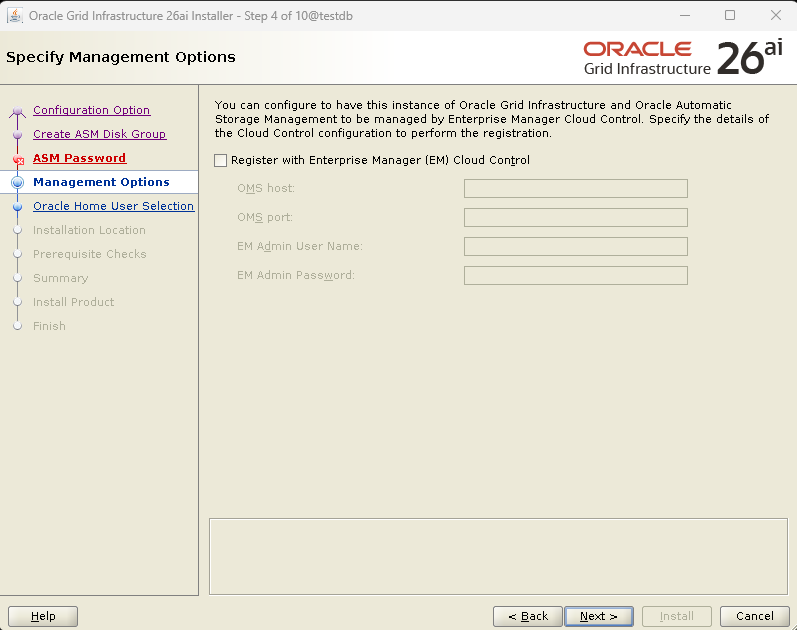
On the Management Options screen:
- Leave Register with Enterprise Manager (EM) Cloud Control unchecked
👉 Most DBAs register Grid Infrastructure after installation, not during setup.
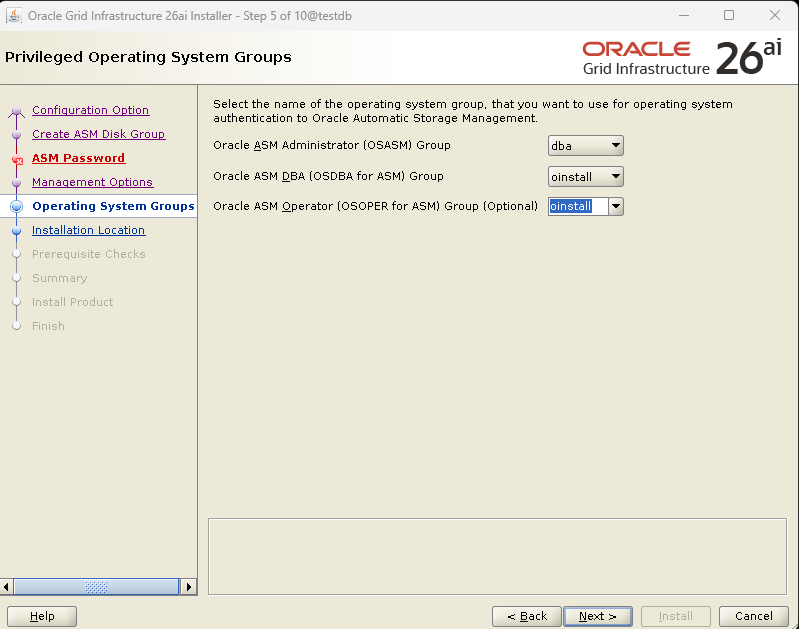
Step 8: Privileged Operating System Groups
Configure OS groups as follows:
- ASM Administrator (OSASM):
dba - ASM DBA (OSDBA):
oinstall - ASM Operator (OSOPER):
oinstall
👉 This setup balances simplicity and security.
Step 9: Specify Installation Location
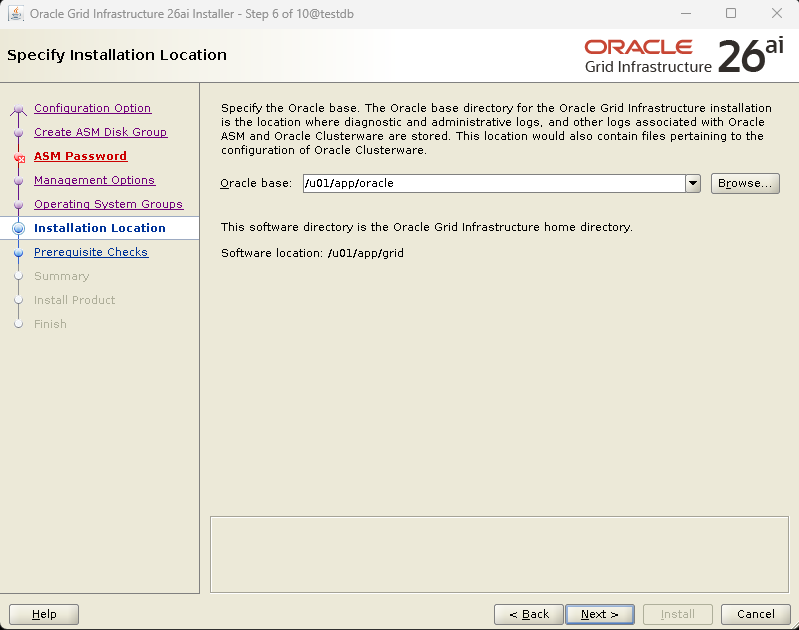
On the Installation Location screen:
- Oracle Base:
/u01/app/oracle - Software Location (Grid Home):
/u01/app/grid
This location stores:
- CRS metadata
- ASM logs
- Oracle Restart configuration
Step 10: Root Script Configuration
Choose how root scripts are executed.
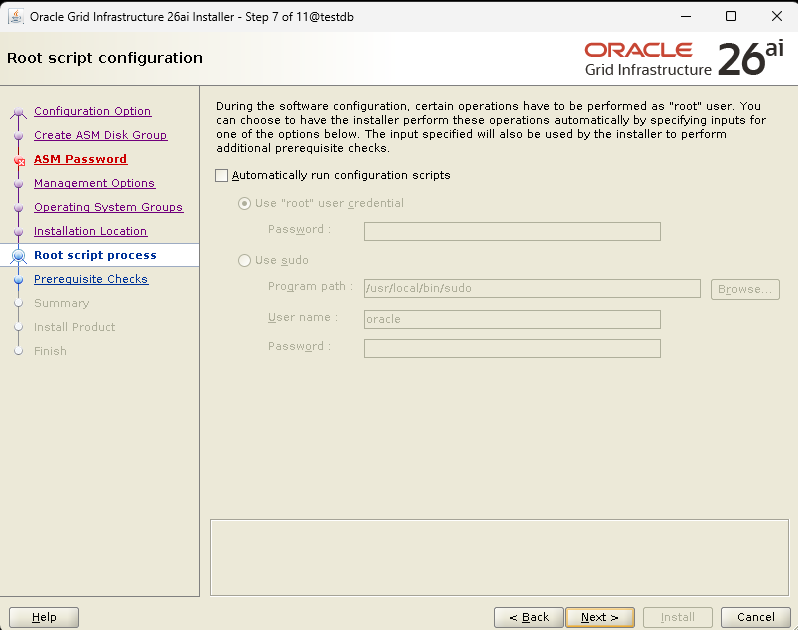
Recommended option:
✅ Automatically run configuration scripts
Use:
rootuser- Or
sudoif required by security policy
👉 Automatic execution reduces manual errors during CRS configuration.
Step 11: Perform Prerequisite Checks
The installer runs system checks.
Example warning:
- Swap Size
- Expected: 16 GB
- Actual: 12 GB
This is non-blocking.

👉 DBA Judgment:
Acceptable for test and light workloads. For production AI workloads, increase swap.
Step 12: Summary Review
The Summary screen shows:
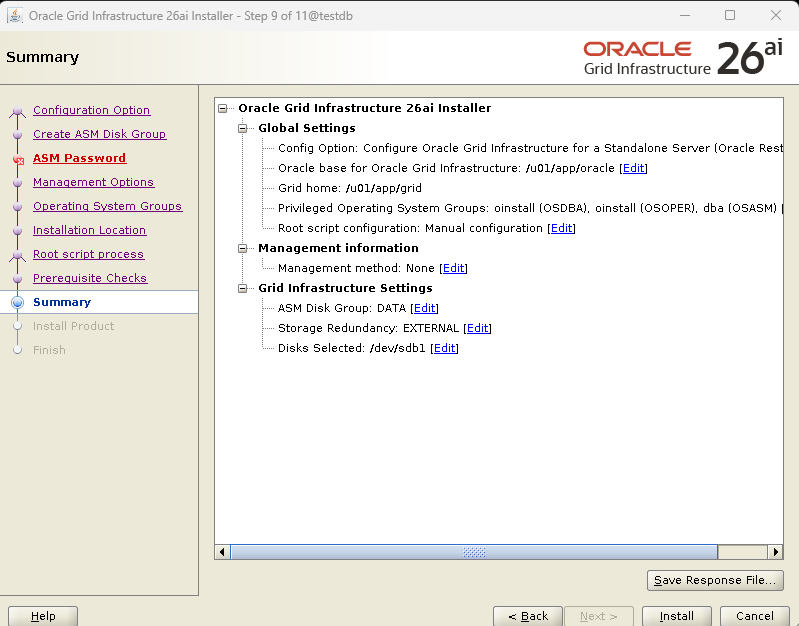
- Standalone Oracle Restart configuration
- ASM Disk Group: DATA
- External redundancy
- OS group mappings
- Grid Home location
👉 Review carefully—mistakes here require reinstallation.
Click Install.
Step 13: Install Product Phase
During installation, Oracle performs:
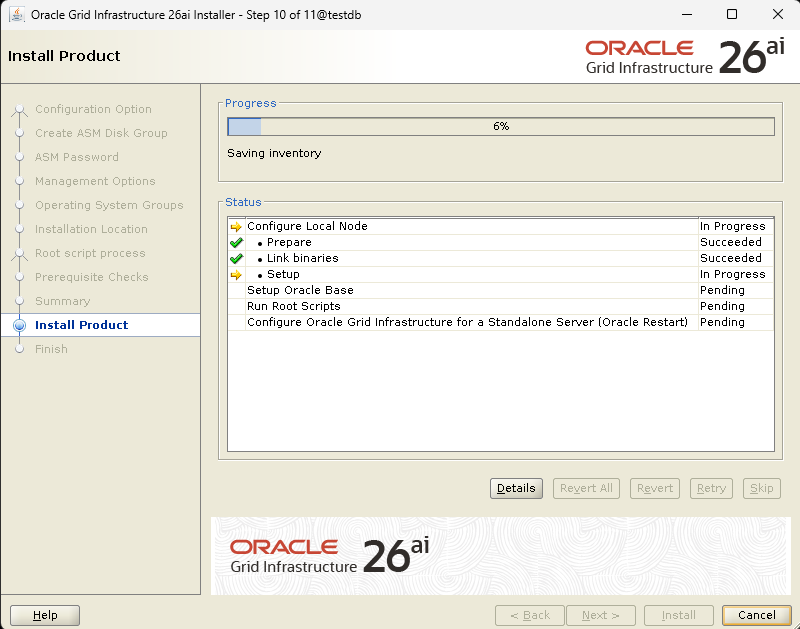
- Binary linking
- Oracle Base setup
- Local node configuration
- Oracle Restart framework initialization
Progress messages show each step completing successfully.
Step 14: Execute root.sh (Critical Step)
The installer prompts to run the root script:
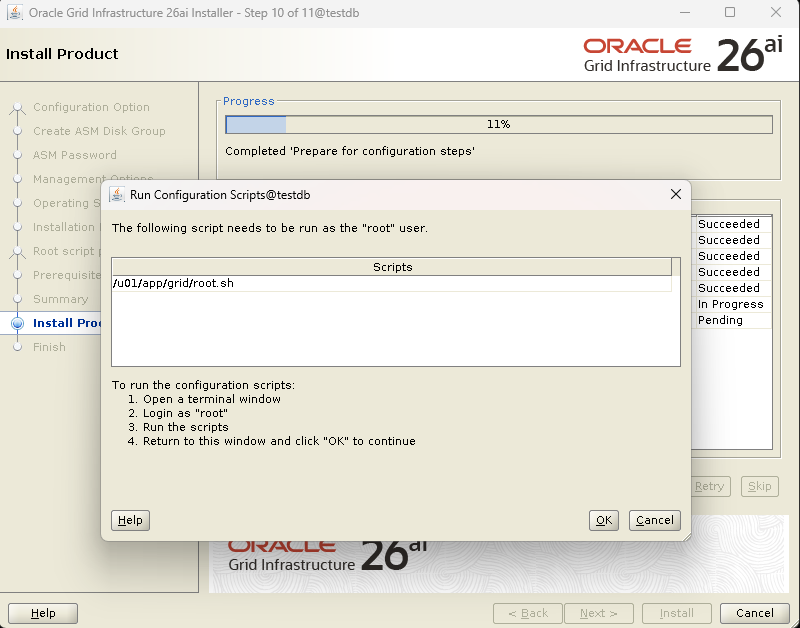
/u01/app/grid/root.sh
Run as root:
su -
/u01/app/grid/root.sh
What root.sh Does Internally
- Updates
/etc/oratab - Configures Oracle Restart services
- Creates OCR and OLR
- Registers CRS services with systemd
- Enables automatic startup
Key output confirmation:
/u01/app/grid/root.sh
Performing root user operation.

The following environment variables are set as:
    ORACLE_OWNER= oracle
    ORACLE_HOME=  /u01/app/grid

Enter the full pathname of the local bin directory: [/usr/local/bin]:
The contents of "dbhome" have not changed. No need to overwrite.
The contents of "oraenv" have not changed. No need to overwrite.
The contents of "coraenv" have not changed. No need to overwrite.

Entries will be added to the /etc/oratab file as needed by
Database Configuration Assistant when a database is created
Finished running generic part of root script.
Now product-specific root actions will be performed.
Executing command '/u01/app/grid/perl/bin/perl -I/u01/app/grid/perl/lib -I/u01/app/grid/crs/install /u01/app/grid/crs/install/roothas.pl '
Using configuration parameter file: /u01/app/grid/crs/install/crsconfig_params
The log of current session can be found at:
  /u01/app/oracle/crsdata/testdb/crsconfig/roothas_2026-01-28_10-31-13AM.log
Redirecting to /bin/systemctl restart rsyslog.service
LOCAL ADD MODE
Creating OCR keys for user 'oracle', privgrp 'oinstall'..
Operation successful.
2026/01/28 10:31:49 CLSRSC-330: Adding Clusterware entries to file 'oracle-ohasd.service'

testdb     2026/01/28 10:32:18     /u01/app/oracle/crsdata/testdb/olr/backup_20260128_103218.olr     2107015493
2026/01/28 10:32:19 CLSRSC-327: Successfully configured Oracle Restart for a standalone server
👉 This line confirms Oracle Restart is fully operational.
Step 15: Configuration Assistants
After root.sh, the installer completes:
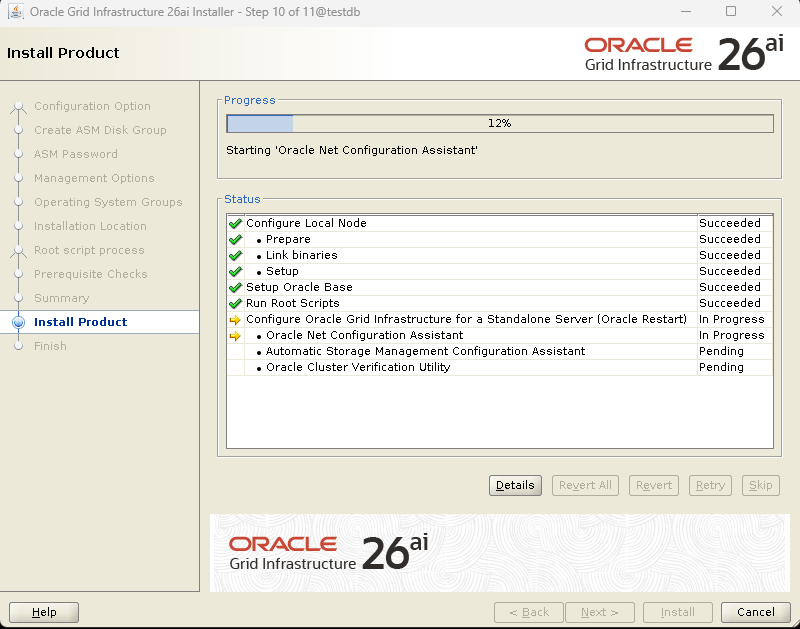
- Oracle Net Configuration Assistant
- ASM Configuration Assistant
- Oracle Cluster Verification Utility (CVU)
All components should show Succeeded status.
Step 16: Finish – Installation Successful 🎉
The final screen confirms:
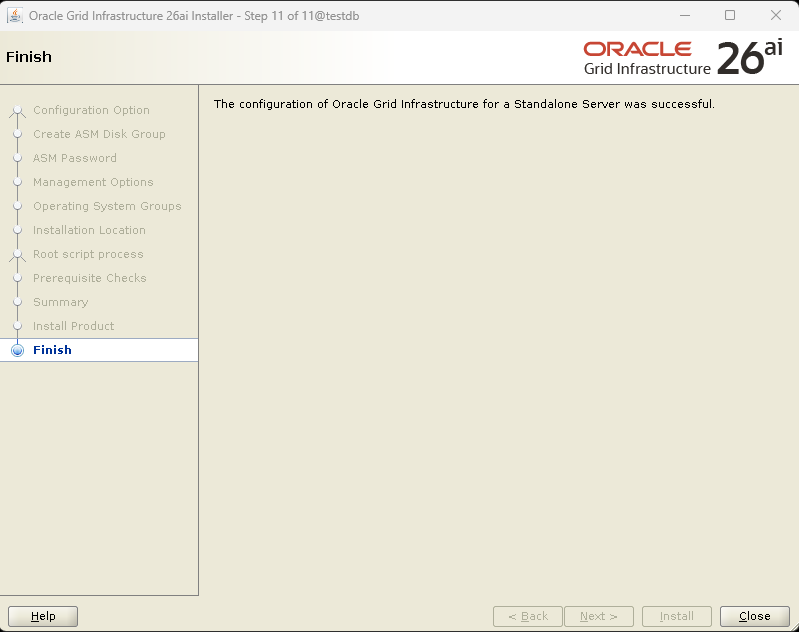
The configuration of Oracle Grid Infrastructure for a Standalone Server was successful.
At this point, Oracle Grid Infrastructure 26ai Restart is fully installed.
Post-Installation Validation (Mandatory)
Verify CRS status:
crsctl check has

crsctl check has
CRS-4638: Oracle High Availability Services is online
Verify ASM disk groups:
asmcmd lsdg

State    Type    Rebal  Sector  Logical_Sector  Block       AU  Total_MB  Free_MB  Req_mir_free_MB  Usable_file_MB  Offline_disks  Voting_files  Name
MOUNTED  EXTERN  N         512             512   4096  4194304      5116     5012                0            5012              0             N  DATA/
Ensure:
- CRS is online
- ASM disk group
DATAis mounted
crsctl stat res -t
--------------------------------------------------------------------------------
Name           Target  State        Server                   State details
--------------------------------------------------------------------------------
Local Resources
--------------------------------------------------------------------------------
ora.DATA.dg
               ONLINE  ONLINE       testdb                   STABLE
ora.LISTENER.lsnr
               ONLINE  ONLINE       testdb                   STABLE
ora.asm
               ONLINE  ONLINE       testdb                   Started,STABLE
ora.ons
               OFFLINE OFFLINE      testdb                   STABLE
--------------------------------------------------------------------------------
Cluster Resources
--------------------------------------------------------------------------------
ora.cssd
      1        ONLINE  ONLINE       testdb                   STABLE
ora.diskmon
      1        OFFLINE OFFLINE                               STABLE
ora.evmd
      1        ONLINE  ONLINE       testdb                   STABLE
--------------------------------------------------------------------------------
What’s Next?
You now have a fully functional Oracle Grid Infrastructure 26ai Restart environment, providing:
✅ ASM storage management
✅ Oracle Restart service control
✅ Clean base for Oracle AI Database 26ai
✅ Supported and patchable architecture
Final DBA Notes
- Always patch Grid Infrastructure before Database Home
- Keep Grid and DB homes separate
- Validate CRS and ASM before DB creation
- Take a system snapshot at this stage

