
Installing MySQL on Red Hat Enterprise Linux 9 or Oracle Linux 9 can be done using the official MySQL RPM Bundle. In this guide, we will install MySQL Community Server 8.4.11 using RPM packages, initialize the database, start the MySQL service, secure the installation, and verify connectivity.
This article is based on a practical installation of MySQL 8.4.11 on an EL9-based server.
Environment
- Operating System: Red Hat Enterprise Linux 9 / Oracle Linux 9
- Architecture: x86_64
- MySQL Version: 8.4.11
- Installation Method: RPM Bundle
- Database Port: 3306
- MySQL Socket:
/var/lib/mysql/mysql.sock
1. Download the MySQL RPM Bundle
Download the MySQL 8.4.11 RPM Bundle from the official MySQL download page:Download MySQL
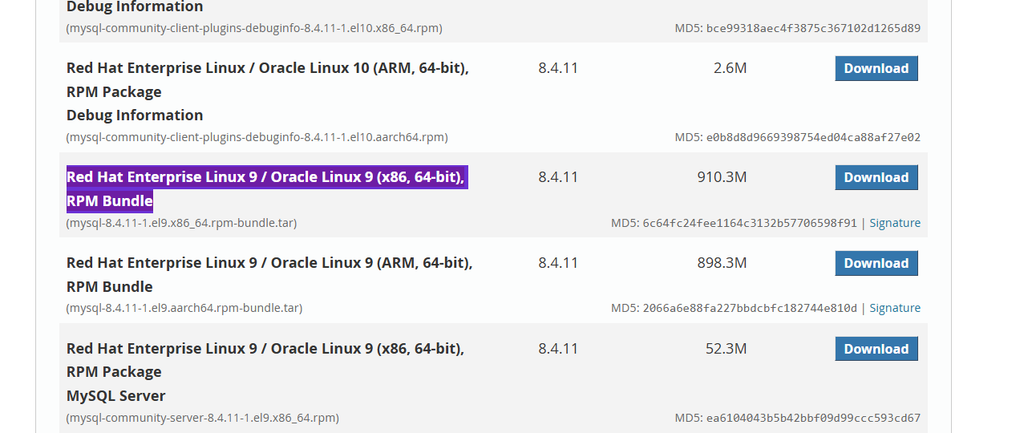
Red Hat Enterprise Linux 9 / Oracle Linux 9 (x86, 64-bit), RPM Bundle
The downloaded file will be similar to:
mysql-8.4.11-1.el9.x86_64.rpm-bundle.tar2. Extract the RPM Bundle
After downloading the bundle, extract it using tar:
tar -xvf mysql-8.4.11-1.el9.x86_64.rpm-bundle.tarThis extracts the MySQL RPM packages.
The bundle contains several packages, including:
mysql-community-client-8.4.11-1.el9.x86_64.rpm
mysql-community-client-plugins-8.4.11-1.el9.x86_64.rpm
mysql-community-common-8.4.11-1.el9.x86_64.rpm
mysql-community-icu-data-files-8.4.11-1.el9.x86_64.rpm
mysql-community-libs-8.4.11-1.el9.x86_64.rpm
mysql-community-libs-compat-8.4.11-1.el9.x86_64.rpm
mysql-community-server-8.4.11-1.el9.x86_64.rpm
There are also debug, development, and test packages.
For a standard MySQL Server installation, you generally do not need to install all of the debug and test RPMs.
3. Install the Required RPM Packages
For a basic MySQL Server installation, install the packages in dependency order.
Install MySQL Common
rpm -ivh mysql-community-common-8.4.11-1.el9.x86_64.rpmExample output:
Verifying...                          ################################# [100%]
Preparing...                          ################################# [100%]
Updating / installing...
   1:mysql-community-common-8.4.11-1.e################################# [100%]
Install ICU Data Files
rpm -ivh mysql-community-icu-data-files-8.4.11-1.el9.x86_64.rpmInstall Client Plugins
rpm -ivh mysql-community-client-plugins-8.4.11-1.el9.x86_64.rpmInstall MySQL Libraries
rpm -ivh mysql-community-libs-8.4.11-1.el9.x86_64.rpmInstall MySQL Client
rpm -ivh mysql-community-client-8.4.11-1.el9.x86_64.rpmInstall MySQL Server
Finally, install the MySQL Server package:
rpm -ivh mysql-community-server-8.4.11-1.el9.x86_64.rpmAt this point, the MySQL Server software has been installed.
4. Verify the MySQL Systemd Service
Check the MySQL service:
systemctl status mysqldInitially, the service may show:
mysqld.service - MySQL Server
Active: inactive (dead)
This means the software is installed but the MySQL service is not currently running.
5. Enable MySQL at System Startup
Enable the service so MySQL automatically starts after the operating system boots:
systemctl enable mysqldYou can verify the enabled state using:
systemctl is-enabled mysqldExpected output:
enabled6. Start MySQL Server
Start MySQL:
systemctl start mysqldThen verify:
systemctl status mysqldYou should see:
Active: active (running)7. Check the MySQL Initialization Log
After the first initialization, MySQL generates a temporary password for the root@localhost account.
You can check the MySQL log:
tail -300f /var/log/mysqld.logA successful initialization contains messages similar to:
MySQL Server Initialization - start.
InnoDB initialization has started.
InnoDB initialization has ended.
A temporary password is generated for root@localhost
MySQL Server Initialization - end.
For example:
2026-10-02T07:45:35.705380Z 6 [Note] [MY-010454] [Server] A temporary password is generated for root@localhost: <TEMPORARY_PASSWORD>Important: The temporary root password should be treated as sensitive information. Do not publish an actual production password in documentation, screenshots, or blog posts.
8. Verify MySQL Is Listening
The MySQL startup log should eventually show:
/usr/sbin/mysqld: ready for connections.
Version: '8.4.11'
socket: '/var/lib/mysql/mysql.sock'
port: 3306
MySQL Community Server - GPL
This confirms that MySQL is accepting connections on TCP port 3306.
MySQL X Plugin may also be enabled:
X Plugin ready for connections.
Bind-address: '::'
port: 33060
The traditional MySQL client connection uses port 3306.
9. Log In to MySQL
Connect using the MySQL client:
mysql -u root -pEnter the temporary root password obtained from the MySQL error log.
A successful connection displays:
Welcome to the MySQL monitor.
Commands end with ; or \g.

Your MySQL connection id is 11
Server version: 8.4.11 MySQL Community Server - GPL
You can verify the server version:
SELECT VERSION();Example:
+-----------+
| VERSION() |
+-----------+
| 8.4.11    |
+-----------+
10. Secure the MySQL Installation
MySQL provides the mysql_secure_installation utility:
mysql_secure_installationThe utility walks through several security-related configuration options.
During the installation, you may be asked to:
- Change the root password
- Remove anonymous users
- Disable remote root login
- Remove the test database
- Reload privilege tables
For a production environment, the recommended approach is generally to remove unnecessary anonymous access, restrict administrative access, and remove unused test objects.
Do not automatically select “No” for all options simply because the installation completed successfully. Review each option according to your security requirements.
11. Change the MySQL Root Password
During the first login, MySQL may report:
The existing password for the user account root has expired.
Please set a new password.
Set a new strong password when prompted.
You can also manage the root account directly from MySQL when required.
For example:
ALTER USER 'root'@'localhost'
IDENTIFIED BY 'Your_Strong_Password';
Use a strong password appropriate for your organization’s password policy.
12. MySQL Linux User
The MySQL RPM installation creates the operating-system mysql account.
You can verify it with:
id mysqlYou may see something similar to:
uid=27(mysql) gid=27(mysql) groups=27(mysql)If the mysql account already exists, do not run useradd again.
If you are creating a custom MySQL installation rather than using the RPM package, an account can be created with:
groupadd mysql
useradd -r -g mysql -s /bin/bash mysql
However, for an RPM-based installation, allow the MySQL package to create and manage the required system account.
13. Changing the MySQL OS User Shell
In some environments, administrators may need the MySQL operating-system account to have a login shell.
For example:
usermod -s /bin/bash mysqlVerify:
getent passwd mysqlExample:
mysql:x:27:27:MySQL Server:/var/lib/mysql:/bin/bashSecurity consideration
A MySQL service account normally does not need interactive login access.
Therefore, changing the shell from:
/bin/falseto:
/bin/bashshould only be done when there is a specific administrative requirement.
For a production database server, keeping the service account non-interactive is generally preferable.
14. Verify the MySQL Service
Run:
systemctl status mysqldYou should see:
Loaded: loaded (/usr/lib/systemd/system/mysqld.service; enabled)
Active: active (running)
You can also check whether MySQL is listening on port 3306:
ss -lntp | grep 3306Example:
LISTEN ... 0.0.0.0:330615. Verify the Database From SQL
Connect:
mysql -u root -pThen run:
SELECT VERSION();

SHOW DATABASES;

SELECT USER, HOST
FROM mysql.user;
You can also check the server status:
SHOW GLOBAL STATUS LIKE 'Threads_connected';16. Important Production Considerations
A successful RPM installation is only the beginning of a production MySQL deployment.
Before putting the database into production, consider the following.
Firewall
If remote applications need to connect to MySQL, allow TCP port 3306 only from trusted application or management networks.
Avoid exposing MySQL directly to the public Internet.
Root Access
Avoid using the MySQL root account for applications.
Create application-specific accounts:
CREATE USER 'app_user'@'10.10.10.%'
IDENTIFIED BY 'StrongPassword';

GRANT SELECT, INSERT, UPDATE, DELETE
ON application_db.*
TO 'app_user'@'10.10.10.%';
Use the minimum privileges required by the application.
Configuration
Review:
/etc/my.cnfand configure parameters based on:
- Available memory
- CPU resources
- Storage performance
- Connection requirements
- Workload
- InnoDB buffer pool requirements
- Binary logging
- Replication requirements
- Backup requirements
Backup
A production database should have a tested backup and recovery strategy.
Possible approaches include:
- MySQL Enterprise Backup
- Logical backups
- Physical backups
- Replication-based recovery strategies
A backup should not be considered reliable until a restore has been successfully tested.
17. Complete Installation Summary
The basic installation sequence can be summarized as:
# Extract bundle
tar -xvf mysql-8.4.11-1.el9.x86_64.rpm-bundle.tar

# Install required packages
rpm -ivh mysql-community-common-8.4.11-1.el9.x86_64.rpm
rpm -ivh mysql-community-icu-data-files-8.4.11-1.el9.x86_64.rpm
rpm -ivh mysql-community-client-plugins-8.4.11-1.el9.x86_64.rpm
rpm -ivh mysql-community-libs-8.4.11-1.el9.x86_64.rpm
rpm -ivh mysql-community-client-8.4.11-1.el9.x86_64.rpm
rpm -ivh mysql-community-server-8.4.11-1.el9.x86_64.rpm

# Enable and start MySQL
systemctl enable mysqld
systemctl start mysqld

# Check status
systemctl status mysqld

# Check initialization log
tail -300 /var/log/mysqld.log

# Secure the installation
mysql_secure_installation

# Connect
mysql -u root -p
Conclusion
Installing MySQL 8.4.11 on RHEL 9 or Oracle Linux 9 using the RPM Bundle is straightforward when the required packages are installed in the correct dependency order.
The key steps are:
- Download the official MySQL 8.4.11 RPM Bundle.
- Extract the RPM packages.
- Install the common, ICU, client plugin, library, client, and server packages.
- Enable and start
mysqld. - Retrieve the temporary root password from the MySQL log.
- Run
mysql_secure_installation. - Change the temporary root password.
- Verify the MySQL version and connectivity.
- Apply appropriate security, firewall, backup, and configuration settings before production use.
This procedure provides a clean foundation for subsequent activities such as MySQL replication, MySQL Enterprise Backup, monitoring, performance tuning, and DR implementation.
MySQL HeatWave, Properly Explained: Architecture, AutoML, and Lakehouse



Comments 1