
A reliable Disaster Recovery (DR) environment is an important part of database administration. For MySQL, one practical approach is to combine a physical backup of the production database with binary-log replication to a standby server.
In this guide, we will walk through a practical MySQL 8.4.11 DR implementation using MySQL Enterprise Backup (MEB).


The process covers:
- Taking a full physical backup of the production MySQL server
- Validating the backup
- Restoring the backup to the DR server
- Creating a replication user
- Configuring binary-log replication
- Starting the replica
- Verifying replication health
1. DR Architecture
The basic architecture used in this implementation is:

The production server acts as the source, while the DR server acts as the replica.
The initial database copy is created using MySQL Enterprise Backup. After the database is restored, replication is configured using the binary-log position captured from the backup.
2. Prerequisites
Before implementing the DR environment, make sure:
- Both servers have compatible MySQL versions.
- MySQL binary logging is enabled on the source.
- The DR server has sufficient storage for the database.
- Network connectivity exists between the source and DR servers.
- The replication account has the required privileges.
- MySQL Enterprise Backup is installed on the server used to perform the backup and restore.
In this example, the environment uses:
MySQL Version : 8.4.11
OS            : Linux
Source        : 192.168.56.151
DR Server     : 192.168.56.152
Data Directory: /var/lib/mysql
Backup Path   : /u01/backup/mysql/
The backup environment reported MySQL 8.4.11 and the production data directory as /var/lib/mysql.
3. Verify Binary Logging on the Source
Binary logging must be enabled on the production server.
Connect to MySQL:
mysql -u root -pCheck the binary-log configuration:
SHOW VARIABLES LIKE 'log_bin';Expected result:
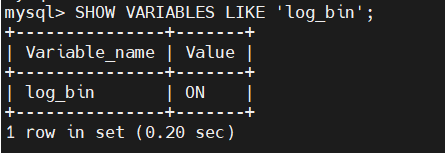
The source server in this implementation had binary logging enabled.
You can also check the current binary-log position:
SHOW BINARY LOG STATUS;Example:
File        : binlog.000005
Position    : 702
The exact file and position will be different in your environment.
4. Take a Full Physical Backup Using MySQL Enterprise Backup
MySQL Enterprise Backup provides a physical backup mechanism suitable for large MySQL databases.
The following command was used to create a timestamped backup directory:
mysqlbackup \
  --user=root \
  --password \
  --backup-dir=/u01/backup/mysql/full_$(date +%Y%m%d_%H%M%S) \
  backup
The backup created a directory similar to:
/u01/backup/mysql/full_20261002_181317The backup process identified the MySQL server as version 8.4.11 and copied InnoDB data, undo files, binary logs, configuration information, and other required database files.
5. Capture the Binary-Log Position
One of the most important parts of using a physical backup to initialize replication is knowing the binary-log position corresponding to the backup consistency point.
During the backup, MySQL Enterprise Backup recorded:
Consistency point binary_log_file     'binlog.000005'
Consistency point binary_log_position 158
It also recorded the InnoDB consistency LSN:
Consistency point InnoDB lsn 19593412The backup completed successfully with:
MySQL binlog position: filename binlog.000005, position 158and:
mysqlbackup completed OK!This information is important because the DR server needs to begin replication from the correct point.
Important: Use the binary-log file and position associated with your actual backup. Do not simply copy the example values from this article.
6. Validate the Backup
A backup should not be considered usable simply because the backup command completed.
MySQL Enterprise Backup provides a validate operation.
Run:
mysqlbackup \
  --backup-dir=/u01/backup/mysql/full_20261002_181317 \
  validate
The validation process checks the backup contents and verifies important InnoDB files.
In this implementation, the following files were successfully validated:
ibdata1
sys/sys_config.ibd
mysql/backup_progress.ibd
mysql.ibd
undo_001
undo_002
The operation completed with:
Validate backup directory operation completed successfully.

mysqlbackup completed OK!
This validation step should be part of the DR build process.
7. Restore the Backup to the DR Server
After transferring or making the backup available on the DR server, use copy-back to restore the database files.
Example:
mysqlbackup \
  --backup-dir=/u01/backup/mysql/full_20261002_181317 \
  copy-back
Before performing the restore, ensure that the target MySQL instance is stopped and that the target data directory is prepared appropriately.
The restore process copies the InnoDB files, undo files, binary logs, MySQL system files, and other database directories back into the MySQL data directory.
In this implementation, the target data directory was:
/var/lib/mysqlThe operation completed with:
Copy-back operation completed successfully.

Finished copying backup files to '/var/lib/mysql'

mysqlbackup completed OK! with 1 warnings
Version compatibility warning
MySQL Enterprise Backup also reported a warning regarding the innodb_data_file_path parameter when restoring to a different MySQL version.
Therefore, the target server should be checked carefully for:
- MySQL version compatibility
innodb_data_file_path- Data directory configuration
- Undo tablespaces
- Binary-log configuration
- Server UUID
- File ownership and permissions
The backup itself contained the relevant configuration metadata.
8. Start MySQL on the DR Server
After the restore is completed, ensure that the files have the correct ownership and permissions.
For example:
chown -R mysql:mysql /var/lib/mysqlThen start MySQL:
systemctl start mysqldCheck the service:
systemctl status mysqldConnect to MySQL:
mysql -u root -pVerify the version:
SELECT VERSION();The restored environment in this implementation used MySQL 8.4.11.
9. Create the Replication User
A dedicated replication account should be created on the source server.
Example:
CREATE USER 'replicator'@'%' IDENTIFIED BY '<REPLICATION_PASSWORD>';

GRANT REPLICATION SLAVE ON *.* TO 'replicator'@'%';
Verify the grants:
SHOW GRANTS FOR 'replicator'@'%';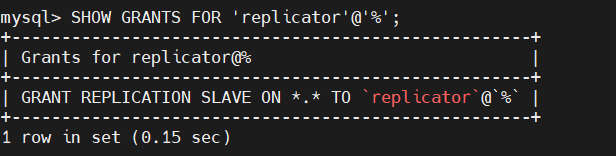
The implementation used a dedicated replicator account with the replication privilege.
Security recommendation
For a production DR environment, avoid putting the password directly into shell history or publicly shared scripts.
Consider:
- Restricting the replication account to the DR server IP where practical
- Using a strong unique password
- Using encrypted replication/TLS
- Protecting MySQL configuration files
- Avoiding passwords in blog posts, screenshots, or scripts
10. Create the Replication User on the DR Server
The implementation also created the replication account on the DR server:
CREATE USER 'replicator'@'%' IDENTIFIED BY '<REPLICATION_PASSWORD>';

GRANT REPLICATION SLAVE ON *.* TO 'replicator'@'%';
The important replication connection is from the DR replica to the production source.
11. Reset Existing Replica Configuration
If the DR server already has replication configuration, stop and reset it before configuring the new source.
STOP REPLICA;Then:
RESET REPLICA;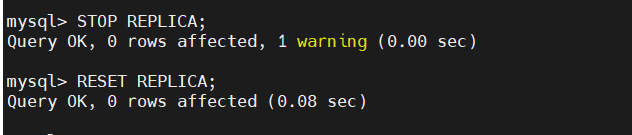
This removes the existing replica configuration and relay-log state.
The DR implementation used these commands before configuring the source connection.
12. Configure the DR Server as a Replica
On the DR server, configure the production server as the replication source.
Example:
CHANGE REPLICATION SOURCE TO
    SOURCE_HOST='192.168.56.151',
    SOURCE_USER='replicator',
    SOURCE_PASSWORD='<REPLICATION_PASSWORD>',
    SOURCE_LOG_FILE='binlog.000005',
    SOURCE_LOG_POS=702,
    GET_SOURCE_PUBLIC_KEY=1;
The source IP, username, password, binary-log filename, and position must match your environment.

In the implementation, the production server was:
192.168.56.151and the replication configuration referenced:
binlog.000005The exact starting position used for the final replication configuration was obtained from the source’s current binary-log status.
Important: When initializing a replica from a physical backup, the source log file and position must correspond to the state of the database backup. Always verify the correct coordinates before starting replication.
13. Start Replication
Start the replica:
START REPLICA;The command should return successfully:
Query OK14. Verify Replication Status
This is one of the most important validation steps.
Run:
SHOW REPLICA STATUS\GImportant fields include:
Replica_IO_Running
Replica_SQL_Running
Seconds_Behind_Source
Last_IO_Error
Last_SQL_Error
Source_Host
Source_Log_File
Read_Source_Log_Pos
Exec_Source_Log_Pos
A healthy replica should show:
Replica_IO_Running: Yes
Replica_SQL_Running: Yes
Seconds_Behind_Source: 0
Last_IO_Error:
Last_SQL_Error:
In the tested implementation, the result showed:
Replica_IO_State: Waiting for source to send event
Replica_IO_Running: Yes
Replica_SQL_Running: Yes
Seconds_Behind_Source: 0
Last_IO_Errno: 0
Last_SQL_Errno: 0
This indicates that the replica had successfully connected to the source and was processing replication normally at the time of the check.
Put the DR Server in Read-Only Mode
For a DR/standby environment, you can configure the replica as read-only to prevent accidental DML changes on the DR database.
First, check the current read-only settings:
SHOW VARIABLES LIKE '%read_only%';You should see variables such as:
read_only
super_read_only
Enable read_only:
SET GLOBAL read_only = ON;Then enable super_read_only:
SET GLOBAL super_read_only = ON;Verify the settings:
SHOW VARIABLES LIKE '%read_only%';The expected configuration is:
read_only        ON
super_read_only  ON
super_read_only provides an additional protection layer by preventing privileged users from performing ordinary data modifications while the DR server is operating as a standby.
Important: These settings should be applied on the DR/Replica server, not on the Production/Source server. Also, ensure that your replication SQL thread continues to operate correctly after enabling the settings.
DR Read-Only Verification
After enabling read-only mode, verify replication:
SHOW REPLICA STATUS\GConfirm that:
Replica_IO_Running: Yes
Replica_SQL_Running: Yes
Seconds_Behind_Source: 0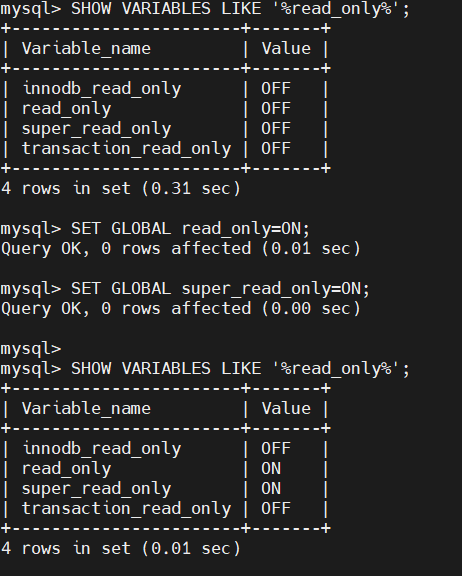
This gives you a DR environment where replication continues from Production → DR while direct application writes to the DR server are restricted.
15. Understanding the Replication Status
The most important values are:
Replica_IO_Running
YesThe I/O thread is connected to the source and receiving binary-log events.
If it shows:
Noinvestigate:
- Network connectivity
- Replication username/password
- Replication privileges
- Source availability
- Firewall rules
- Source binary logs
- Authentication configuration
Replica_SQL_Running
YesThe SQL thread is applying received events on the DR server.
If this shows:
Nocheck:
SHOW REPLICA STATUS\Gand review:
Last_SQL_Errno
Last_SQL_Error
Seconds_Behind_Source
Example:
Seconds_Behind_Source: 0This indicates that the replica was caught up with the source at the time of the status check.
However, this value should not be treated as the only replication health metric.
16. Verify Data Replication
After replication is running, create a test record on the source database.
For example:
CREATE DATABASE dr_test;

USE dr_test;

CREATE TABLE test_table (
    id INT PRIMARY KEY,
    message VARCHAR(100)
);

INSERT INTO test_table
VALUES (1, 'MySQL DR Test');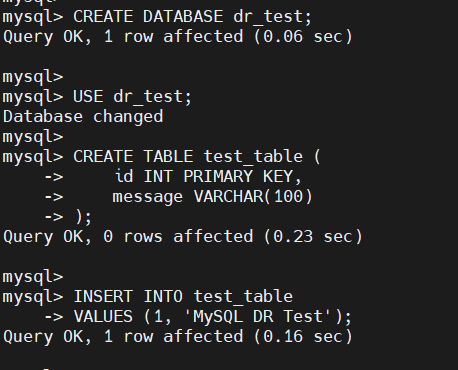
Then check the DR server:
SHOW DATABASES;and:
SELECT * FROM dr_test.test_table;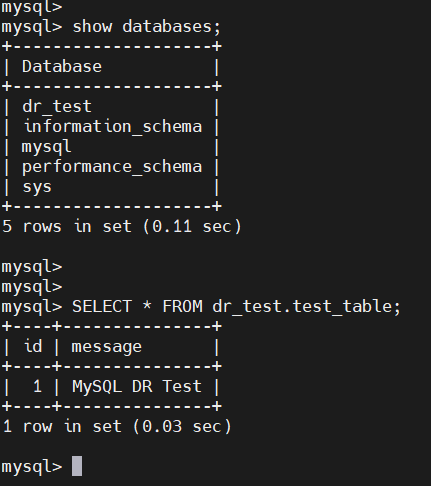
The record should appear on the DR server after the replication event is received and applied.
For a production implementation, use an appropriate controlled validation process rather than modifying production application data unnecessarily.
17. High-Level DR Implementation Flow
The complete process can be summarized as:
       PRODUCTION MYSQL
              |
              |
       Enable Binary Log
              |
              v
      MySQL Enterprise Backup
              |
              v
        Full Physical Backup
              |
              v
       Validate Backup
              |
              v
       Transfer to DR Server
              |
              v
          Copy-Back
              |
              v
        Start MySQL on DR
              |
              v
     Configure Replication
              |
              v
        START REPLICA
              |
              v
     SHOW REPLICA STATUS
              |
              v
      Replication Healthy
18. Important DR Validation Checklist
After completing the implementation, verify the following.
Source Server
SHOW VARIABLES LIKE 'log_bin';

SHOW BINARY LOG STATUS;
Confirm:
- Binary logging is enabled
- Binary logs are being generated
- Replication account exists
- Replication privileges are correct
Backup
Confirm:
mysqlbackup completed OK!Then run:
mysqlbackup \
  --backup-dir=/u01/backup/mysql/<BACKUP_DIRECTORY> \
  validate
The validation should complete successfully.
DR Server
Verify:
SELECT VERSION();Then:
SHOW REPLICA STATUS\GCheck:
Replica_IO_Running: Yes
Replica_SQL_Running: Yes
Last_IO_Error:
Last_SQL_Error:
Seconds_Behind_Source
19. Common Problems During MySQL DR Setup
Access Denied for Replication User
If you see:
Access denied for user 'replicator'check:
SHOW GRANTS FOR 'replicator'@'%';Also verify that the account host definition and password match the replication configuration.
Replica I/O Thread Is Not Running
Check:
SHOW REPLICA STATUS\GPay particular attention to:
Last_IO_Error
Last_IO_Errno
Then verify network connectivity:
nc -zv 192.168.56.151 3306Replica SQL Thread Is Not Running
Check:
Last_SQL_Errno
Last_SQL_Error
The SQL thread may stop because of a replication conflict, incompatible object definition, or another SQL execution error.
Do not blindly skip errors in a production DR environment. Investigate the root cause first.
20. Backup and Replication Are Complementary
A DR architecture should not rely on replication alone.
Replication provides a continuously updated copy of the database, while backups provide a recovery point that can be used for restoration.
A practical DR strategy can therefore combine:
Physical Backup
      +
Binary Log Retention
      +
Replication
      +
Regular DR Testing
This provides multiple recovery options depending on the failure scenario.
For example:
- Hardware failure → fail over to DR
- Database corruption → restore from an appropriate backup
- Accidental data modification → recover using an earlier recovery point
- Source server failure → use the DR replica
- DR server failure → rebuild from backup
21. Final Thoughts
Creating a MySQL DR environment does not end with restoring a backup.
The complete process should include:
- Creating a consistent physical backup
- Validating the backup
- Restoring the backup to the DR server
- Capturing the correct replication coordinates
- Configuring binary-log replication
- Starting the replica
- Monitoring replication continuously
- Testing the DR recovery procedure regularly
In this implementation, MySQL Enterprise Backup was used to create and validate the physical backup, followed by a restore to the DR server and binary-log replication from the production server.
The final replication status showed both the I/O and SQL threads running successfully with zero reported replication lag at the time of testing.
A DR environment is only truly useful when it can be recovered, verified, and tested. Regular DR drills should therefore be treated as an essential part of database administration rather than a one-time configuration task.
Key Commands at a Glance
Full Backup
mysqlbackup \
  --user=root \
  --password \
  --backup-dir=/u01/backup/mysql/full_$(date +%Y%m%d_%H%M%S) \
  backup
Validate
mysqlbackup \
  --backup-dir=/u01/backup/mysql/<BACKUP_DIRECTORY> \
  validate
Restore
mysqlbackup \
  --backup-dir=/u01/backup/mysql/<BACKUP_DIRECTORY> \
  copy-back
Create Replication User
CREATE USER 'replicator'@'%' IDENTIFIED BY '<REPLICATION_PASSWORD>';

GRANT REPLICATION SLAVE ON *.* TO 'replicator'@'%';
Configure Replication
CHANGE REPLICATION SOURCE TO
    SOURCE_HOST='<SOURCE_IP>',
    SOURCE_USER='replicator',
    SOURCE_PASSWORD='<REPLICATION_PASSWORD>',
    SOURCE_LOG_FILE='<BINLOG_FILE>',
    SOURCE_LOG_POS=<BINLOG_POSITION>,
    GET_SOURCE_PUBLIC_KEY=1;
Start Replication
START REPLICA;Check Replication
SHOW REPLICA STATUS\GNote: Command syntax and operational details should always be tested against the exact MySQL and MySQL Enterprise Backup versions used in your environment before being applied to production.
How to Install MySQL 8.4.11 on RHEL 9 / Oracle Linux 9 Using RPM Bundle

