

Oracle Database 26ai introduces AI-driven capabilities, but the foundation of a stable Real Application Clusters (RAC) environment still depends on a properly configured Grid Infrastructure.
In this Part 1 guide, we’ll walk through the complete Oracle Grid Infrastructure installation for Oracle 26ai RAC, starting from hardware planning to the final cluster setup. This guide is based on real-world installation steps and is suitable for production and enterprise environments.


Why Grid Infrastructure Comes First
Oracle Grid Infrastructure provides:
- Clusterware for node membership and failover
- ASM (Automatic Storage Management) for shared storage
- SCAN and VIP management for high availability
Without a correctly installed Grid Infrastructure, RAC databases cannot function reliably.
Hardware Requirements
Before starting, ensure your environment meets the following minimum requirements:
- Minimum 2 nodes for the RAC cluster
- 16 GB RAM per node (minimum)
- 100 GB disk space for Oracle software
- Shared storage (SAN / NAS) for:
- OCR (Oracle Cluster Registry)
- Voting disks
- Database files
- Private interconnect network
- 1 Gbps minimum
- 10 Gbps recommended
- Public network interface for client access
Network Configuration Requirements
Each RAC node must have properly planned IP addresses:
- Public IP for each node
- Private IP for the interconnect
- Virtual IP (VIP) for each node
- SCAN IPs – Oracle recommends 3 SCAN IPs
Correct network planning avoids cluster instability and installation failures.
Step 1: Operating System Preparation
Perform the following steps on all nodes.
Update the Operating System
sudo dnf update -y
Install Required Packages
sudo dnf install -y oracle-database-preinstall-26c
sudo dnf install -y binutils compat-libstdc++-33 elfutils-libelf \
elfutils-libelf-devel fontconfig-devel glibc glibc-devel \
ksh libaio libaio-devel libX11 libXau libXi libXtst \
libXrender libXrender-devel libgcc libstdc++ libstdc++-devel \
libxcb make smartmontools sysstat net-tools nfs-utils \
python3 python3-configshell python3-rtslib python3-six \
targetcli bc sysstat compat-openssl11 glibc-devel
Disable Avahi Daemon
systemctl status avahi-daemon
systemctl stop avahi-daemon
systemctl disable avahi-daemon
Step 2: Create Required Groups and Users
Create Oracle Groups
sudo groupadd -g 54321 oinstall
sudo groupadd -g 54322 dba
sudo groupadd -g 54323 oper
sudo groupadd -g 54324 backupdba
sudo groupadd -g 54325 dgdba
sudo groupadd -g 54326 kmdba
sudo groupadd -g 54327 asmdba
sudo groupadd -g 54328 asmoper
sudo groupadd -g 54329 asmadmin
sudo groupadd -g 54330 racdba
Create Users
sudo useradd -u 54321 -g oinstall -G dba,oper,backupdba,dgdba,kmdba,asmdba,asmoper,asmadmin,racdba oracle
sudo useradd -u 54331 -g oinstall -G dba,asmadmin,asmdba,asmoper,racdba grid
Set Passwords
sudo passwd oracle
sudo passwd grid
Step 3: Configure Kernel Parameters
Edit /etc/sysctl.conf:
sudo vi /etc/sysctl.conf
Add the following parameters:
fs.file-max = 6815744
kernel.sem = 250 32000 100 128
kernel.shmmni = 4096
kernel.shmall = 1073741824
kernel.shmmax = 4398046511104
kernel.panic_on_oops = 1
net.core.rmem_default = 262144
net.core.rmem_max = 4194304
net.core.wmem_default = 262144
net.core.wmem_max = 1048576
net.ipv4.conf.all.rp_filter = 2
net.ipv4.conf.default.rp_filter = 2
fs.aio-max-nr = 1048576
net.ipv4.ip_local_port_range = 9000 65500
kernel.panic = 2
Apply the changes:
sudo sysctl -p
Step 4: Configure Resource Limits
Edit /etc/security/limits.conf:
sudo vi /etc/security/limits.conf
Add:
oracle soft nofile 1024
oracle hard nofile 65536
oracle soft nproc 16384
oracle hard nproc 16384
oracle soft stack 10240
oracle hard stack 32768
oracle soft memlock 134217728
oracle hard memlock 134217728

grid soft nofile 1024
grid hard nofile 65536
grid soft nproc 16384
grid hard nproc 16384
grid soft stack 10240
grid hard stack 32768
grid soft memlock 134217728
grid hard memlock 134217728
Step 5: Configure Network (/etc/hosts)
Edit /etc/hosts on all nodes:
sudo vi /etc/hosts
Example:
# Public IPs
172.25.199.213   rac-node1   rac-node1
172.25.199.217  rac-node2   rac-node2

# Private IPs (interconnect)
10.10.1.2 	rac-node1-priv   rac-node1-priv
10.10.1.3  	rac-node2-priv  rac-node2-priv

# Virtual IPs
172.25.199.218  rac-node1-vip   rac-node1-vip
172.25.199.219  rac-node2-vip   rac-node2-vip

# SCAN IPs
172.25.199.233   rac-scan   rac-scan
Step 6: Configure Shared Storage (ASM)
Install ASMLib
sudo dnf install -y oracleasm-support oracleasmlib
Configure ASM
sudo /usr/sbin/oracleasm configure -i
sudo /usr/sbin/oracleasm init
Create ASM Disks (One Node Only)
sudo /usr/sbin/oracleasm createdisk OCR /dev/sdb1
sudo /usr/sbin/oracleasm createdisk VOTE /dev/sdc1
sudo /usr/sbin/oracleasm createdisk DATA /dev/sdd1
Scan Disks on Other Nodes
sudo /usr/sbin/oracleasm scandisks
sudo /usr/sbin/oracleasm listdisks
Step 7: Create Directory Structure
sudo mkdir -p /u01/app/26.0.0/grid
sudo mkdir -p /u01/app/grid
sudo mkdir -p /u01/app/oracle
sudo mkdir -p /u01/app/oracle/product/26.0.0/dbhome_1
Set permissions:
sudo chown -R grid:oinstall /u01
sudo chown -R oracle:oinstall /u01/app/oracle
sudo chmod -R 775 /u01
Step 8: Configure Environment Variables
Grid User
export ORACLE_SID=+ASM1
export ORACLE_BASE=/u01/app/grid
export ORACLE_HOME=/u01/app/26.0.0/grid
export PATH=$ORACLE_HOME/bin:$PATH
Oracle User
export ORACLE_SID=orcl1
export ORACLE_BASE=/u01/app/oracle
export ORACLE_HOME=$ORACLE_BASE/product/23.26.0.0/dbhome_1
export PATH=$ORACLE_HOME/bin:$PATH
Step 9: Disable Firewall and SELinux
sudo systemctl stop firewalld
sudo systemctl disable firewalld

sudo setenforce 0
sudo sed -i 's/SELINUX=enforcing/SELINUX=permissive/' /etc/selinux/config
Step 10: Configure SSH Equivalence
As grid user:
ssh-keygen -t rsa
ssh-copy-id rac1
ssh-copy-id rac2
As oracle user:
ssh-keygen -t rsa
ssh-copy-id rac1
ssh-copy-id rac2
Step 11: Install Grid Infrastructure
Run Cluster Verification
./runcluvfy.sh stage -pre crsinst -n rac1,rac2 -verbose
Start Installer (Node 1)
./gridSetup.sh
Step 12: Grid Infrastructure Installation – Install Product Phase
After completing all configuration screens and prerequisite checks, the installer starts the actual Grid Infrastructure deployment across all cluster nodes.
At this stage, the installer performs multiple operations automatically on each node in sequence.
Step 1: Select Configuration Option

Action
Select:
- ✅ Configure Oracle Grid Infrastructure for a New Cluster
Why
- This option is required for a fresh Oracle RAC cluster
- Other options (Standalone, Upgrade, Patch) are not suitable for new RAC setups
Click Next.
Step 2: Select Cluster Configuration

Action
- Select: ✅ Configure cluster to manage Oracle RAC databases
- Leave Extended Cluster unchecked (unless using stretched clusters)
Why
- This enables full RAC database functionality
- Extended clusters are only needed for multi-site deployments
Click Next.
Step 3: Grid Plug and Play Information (SCAN)

Action
- Select: ✅ Create Local SCAN
- Enter:
- Cluster Name:
rac-cluster - SCAN Name:
rac-scan - SCAN Port:
1521
- Cluster Name:
Why
- SCAN provides a single connection endpoint for clients
- Oracle recommends 3 SCAN IPs mapped to the SCAN name in DNS or
/etc/hosts
Click Next.
Step 4: Cluster Node Information

Action
- Verify all cluster nodes are listed:
rac-node1→rac-node1-viprac-node2→rac-node2-vip
- OS Username:
grid - Click SSH Connectivity → Test
Expected Result
- Message:
✅ Passwordless SSH connectivity between the selected nodes already established
Why
- Passwordless SSH is mandatory for:
- Copying binaries
- Executing remote root scripts
Click Next.
Step 5: Specify Network Interface Usage
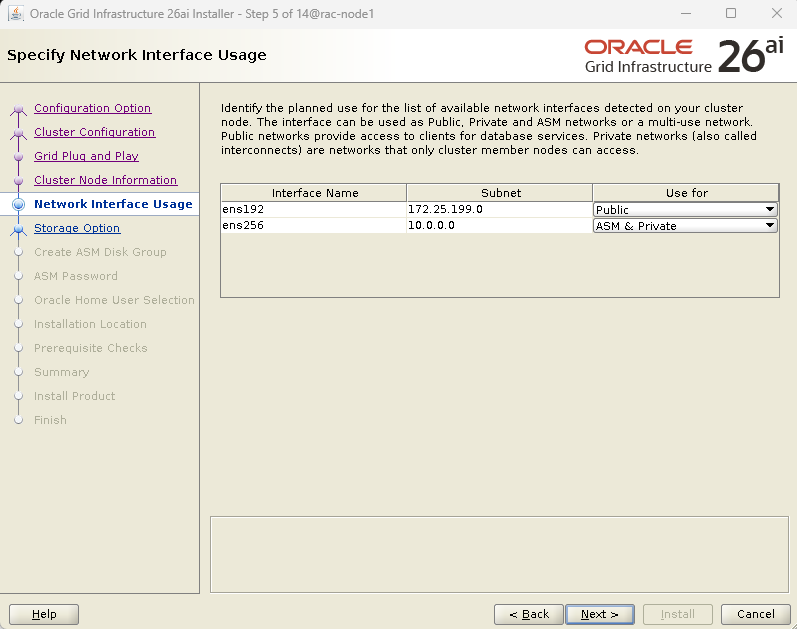
Action
Assign interfaces as follows:
ens192→ Publicens256→ ASM & Private
Why
- Public network handles client traffic
- Private network handles:
- Cluster interconnect
- ASM heartbeat traffic
Click Next.
Step 6: Storage Option Information

Action
Select:
- ✅ Use Oracle Flex ASM for storage
(Optional)
- Leave OCR backup disk group unchecked unless required
Why
- Flex ASM improves scalability and availability
- Recommended for modern RAC deployments
Click Next.
Step 7: Create ASM Disk Group
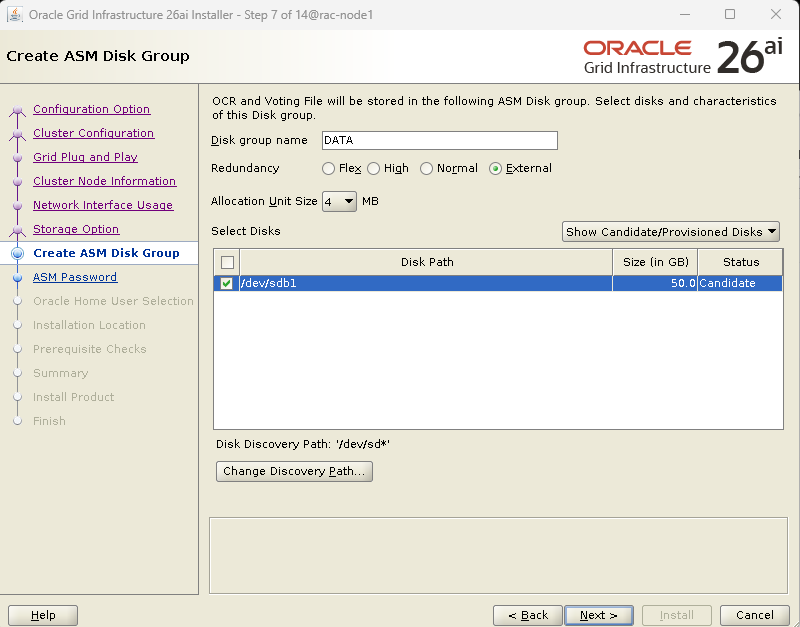
Action
- Disk Group Name:
DATA - Redundancy:
EXTERNAL - Allocation Unit Size:
4 MB - Select ASM disk (example):
/dev/sdb1
Why
- External redundancy is used when storage handles mirroring
- OCR and Voting files will be stored in this disk group
Click Next.
Step 8: Specify ASM Password
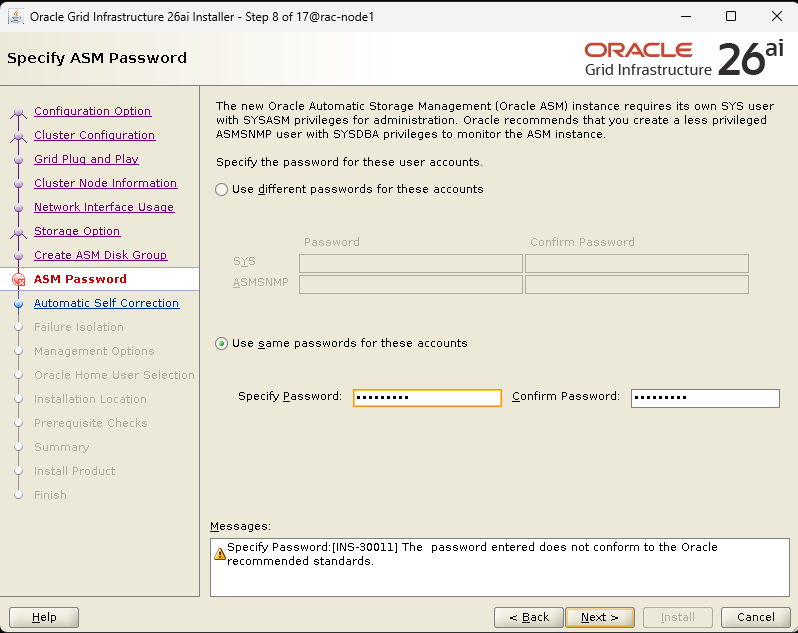
Action
- Select: ✅ Use same passwords for these accounts
- Enter strong password for:
SYSASMSNMP
⚠️ Warning may appear:
Password does not conform to Oracle recommended standards
This is acceptable if password meets internal security rules.
Click Next.
Step 9: Automatic Self Correction

Action
- Keep: ✅ Enable Automatic Self Correction
Why
- Allows Grid Infrastructure to auto-fix known misconfigurations
- Improves long-term cluster stability
Click Next.
Step 10: Failure Isolation Support
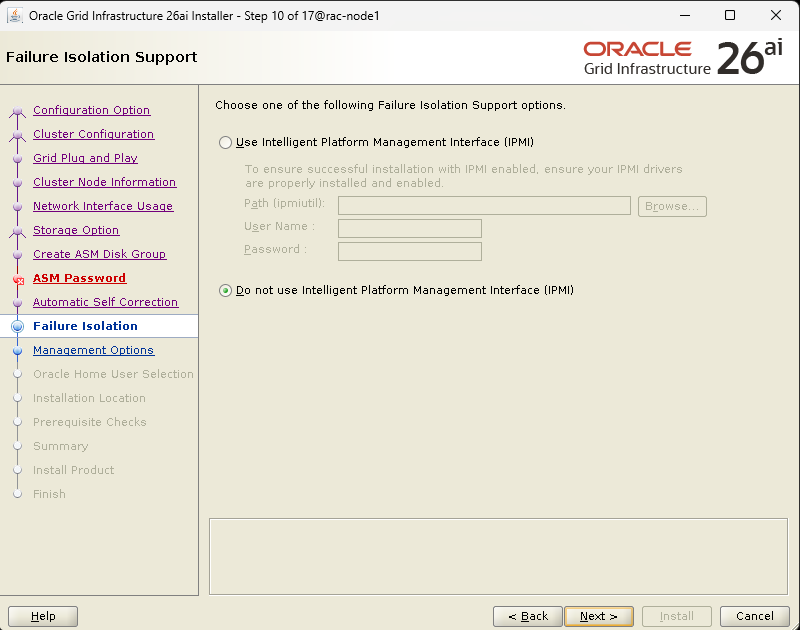
Action
- Select: ✅ Do not use Intelligent Platform Management Interface (IPMI)
Why
- IPMI is optional
- Most environments do not integrate IPMI with Oracle Grid
Click Next.
Step 11: Specify Management Options
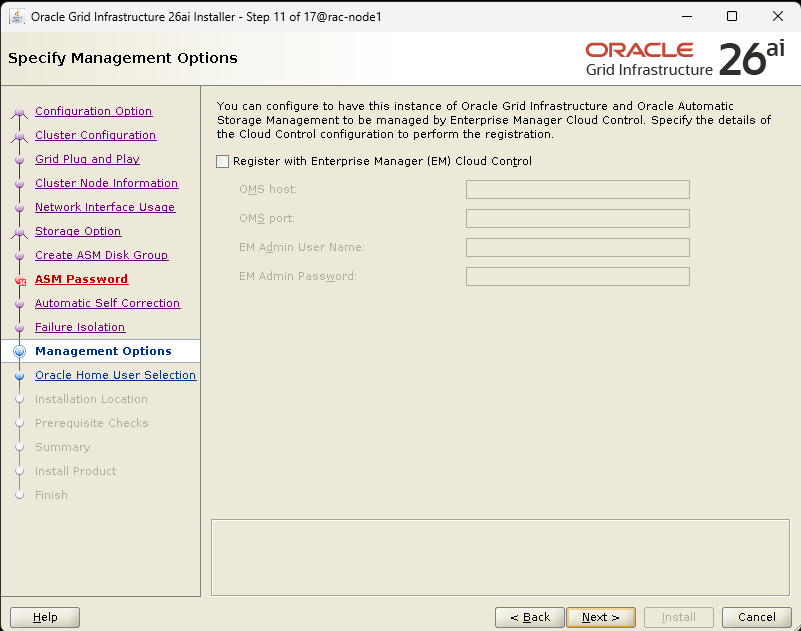
Action
- Leave Register with Enterprise Manager Cloud Control unchecked
Why
- EM Cloud Control can be configured later
- Not required for Grid installation
Click Next.
Step 12: Privileged Operating System Groups
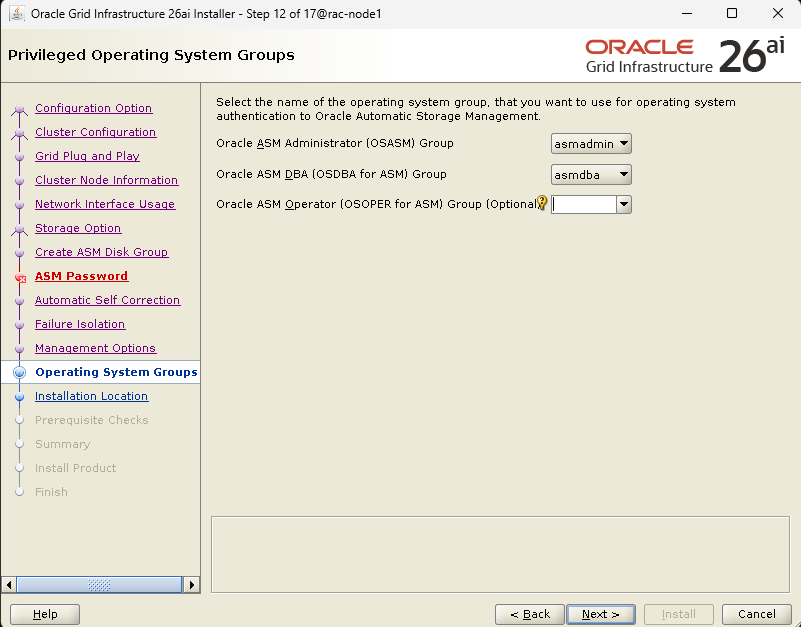
Action
Verify group assignments:
- OSASM:
asmadmin - OSDBA for ASM:
asmdba - OSOPER for ASM: (optional / empty)
Why
- Controls OS-level access to ASM
- Matches Oracle best practices
Click Next.
Step 13: Specify Installation Location
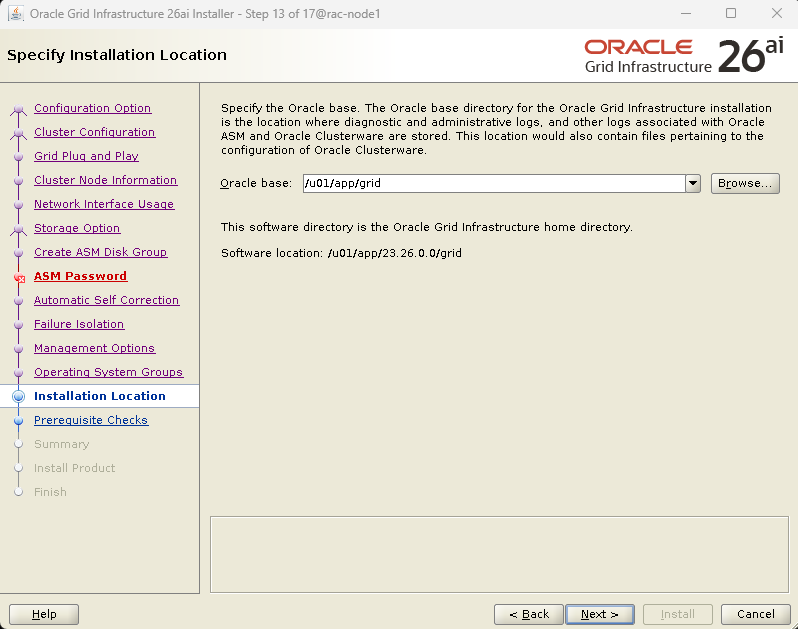
Action
- Oracle Base:
/u01/app/grid - Software Location:
/u01/app/26.0.0/grid
Why
- Clean separation of Grid and DB homes
- Aligns with Oracle OFA standards
Click Next.
Step 14: Create Inventory

Action
- Inventory Directory:
/u01/app/oraInventory - Group Name:
oinstall
Why
- Central inventory tracks all Oracle installations
Click Next.
Step 15: Root Script Configuration
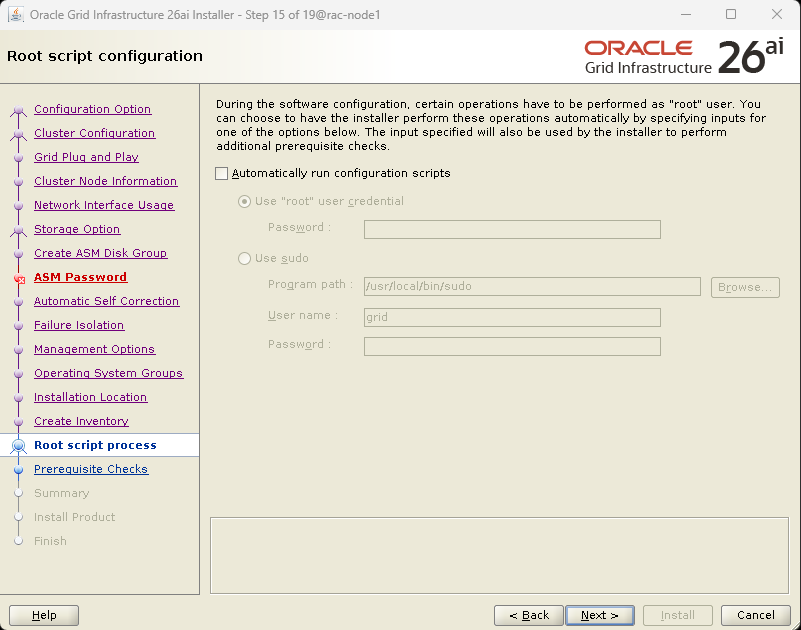
Action
- Select: ❌ Do not run scripts automatically
- Choose Manual execution
Why
- Gives full control
- Preferred in production environments
Click Next.
Step 16: Perform Prerequisite Checks

Action
- Wait until checks reach 100%
- Resolve warnings if any
- Ignore non-critical warnings if approved
Click Next.
Step 17: Summary
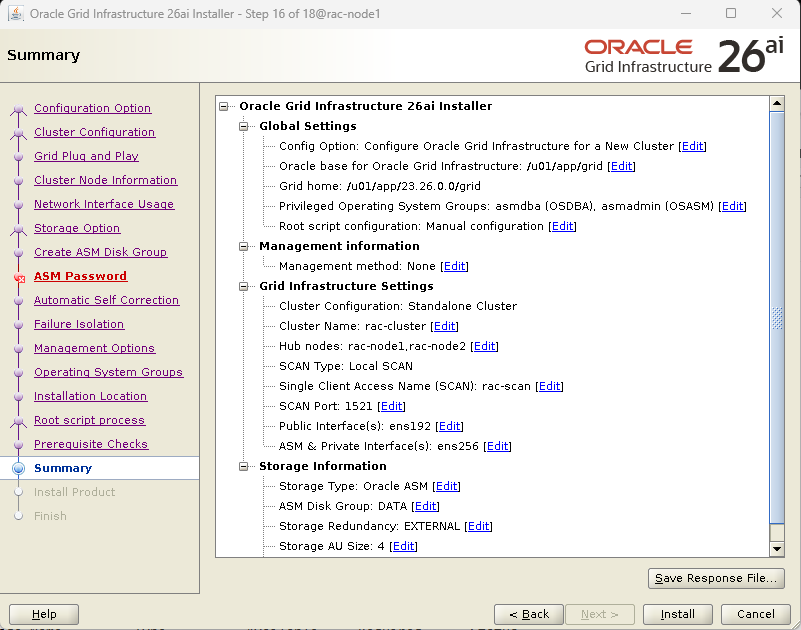
Action
- Review:
- Cluster name
- Nodes
- SCAN
- Network interfaces
- ASM disk group
- Click Install
Tip
You can click Save Response File for automation or audits.
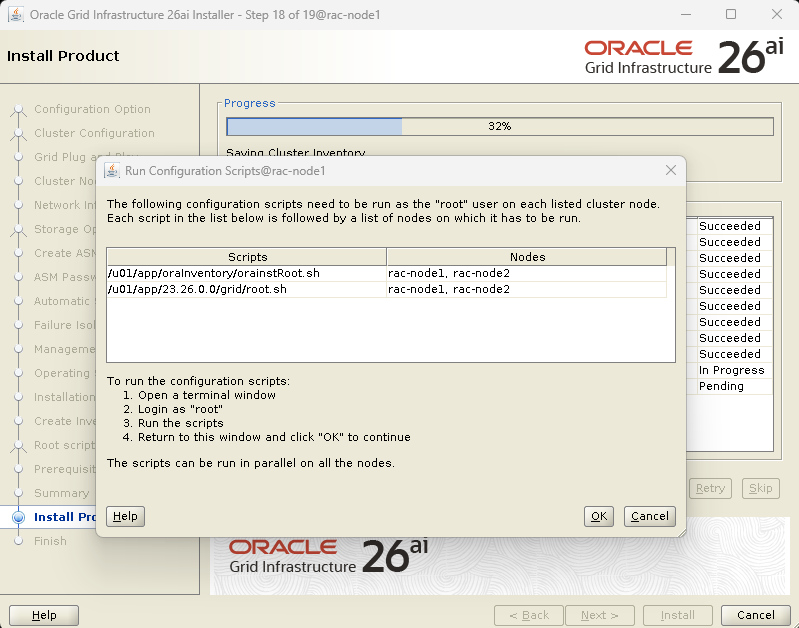
Step 18: Install Product

What Happens
Installer performs:
- Binary linking
- Remote node configuration
- Root script execution
[root@rac-node1 ~]# /u01/app/23.26.0.0/grid/root.sh
Performing root user operation.

The following environment variables are set as:
    ORACLE_OWNER= grid
    ORACLE_HOME=  /u01/app/23.26.0.0/grid

Enter the full pathname of the local bin directory: [/usr/local/bin]:
The contents of "dbhome" have not changed. No need to overwrite.
The contents of "oraenv" have not changed. No need to overwrite.
The contents of "coraenv" have not changed. No need to overwrite.

Entries will be added to the /etc/oratab file as needed by
Database Configuration Assistant when a database is created
Finished running generic part of root script.
Now product-specific root actions will be performed.
RAC option enabled on: Linux
Executing command '/u01/app/23.26.0.0/grid/perl/bin/perl -I/u01/app/23.26.0.0/grid/perl/lib -I/u01/app/23.26.0.0/grid/crs/install /u01/app/23.26.0.0/grid/crs/install/rootcrs.pl '
Using configuration parameter file: /u01/app/23.26.0.0/grid/crs/install/crsconfig_params
The log of current session can be found at:
  /u01/app/grid/crsdata/rac-node1/crsconfig/rootcrs_rac-node1_2026-01-30_02-47-35PM.log
2026/01/30 14:47:44 CLSRSC-594: Executing installation step 1 of 18: 'ValidateEnv'.
2026/01/30 14:47:44 CLSRSC-594: Executing installation step 2 of 18: 'CheckRootCert'.
2026/01/30 14:47:45 CLSRSC-594: Executing installation step 3 of 18: 'GenSiteGUIDs'.
2026/01/30 14:47:47 CLSRSC-594: Executing installation step 4 of 18: 'SetupOSD'.
2026/01/30 14:47:47 CLSRSC-594: Executing installation step 5 of 18: 'CheckCRSConfig'.
2026/01/30 14:47:48 CLSRSC-594: Executing installation step 6 of 18: 'SetupLocalGPNP'.
2026/01/30 14:47:49 CLSRSC-594: Executing installation step 7 of 18: 'CreateRootCert'.
2026/01/30 14:47:50 CLSRSC-594: Executing installation step 8 of 18: 'ConfigOLR'.
2026/01/30 14:47:51 CLSRSC-594: Executing installation step 9 of 18: 'ConfigCHMOS'.
2026/01/30 14:47:51 CLSRSC-594: Executing installation step 10 of 18: 'CreateOHASD'.
2026/01/30 14:47:51 CLSRSC-594: Executing installation step 11 of 18: 'ConfigOHASD'.
2026/01/30 14:48:11 CLSRSC-594: Executing installation step 12 of 18: 'SetupTFA'.
2026/01/30 14:48:11 CLSRSC-594: Executing installation step 13 of 18: 'InstallACFS'.
2026/01/30 14:48:13 CLSRSC-594: Executing installation step 14 of 18: 'CheckFirstNode'.
2026/01/30 14:48:14 CLSRSC-594: Executing installation step 15 of 18: 'InitConfig'.
2026/01/30 14:48:24 CLSRSC-594: Executing installation step 16 of 18: 'StartCluster'.
2026/01/30 14:48:47 CLSRSC-343: Successfully started Oracle Clusterware stack
2026/01/30 14:48:52 CLSRSC-594: Executing installation step 17 of 18: 'ConfigNode'.
clscfg: EXISTING configuration version 23 detected.
Successfully accumulated necessary OCR keys.
Creating OCR keys for user 'root', privgrp 'root'..
Operation successful.
2026/01/30 14:49:33 CLSRSC-594: Executing installation step 18 of 18: 'PostConfig'.
2026/01/30 14:49:43 CLSRSC-4002: Successfully installed Oracle Autonomous Health Framework (AHF).
2026/01/30 14:49:57 CLSRSC-325: Configure Oracle Grid Infrastructure for a Cluster ... succeeded


[root@rac-node2 ~]# /u01/app/23.26.0.0/grid/root.sh
Performing root user operation.

The following environment variables are set as:
    ORACLE_OWNER= grid
    ORACLE_HOME=  /u01/app/23.26.0.0/grid

Enter the full pathname of the local bin directory: [/usr/local/bin]:
   Copying dbhome to /usr/local/bin ...
   Copying oraenv to /usr/local/bin ...
   Copying coraenv to /usr/local/bin ...


Creating /etc/oratab file...
Entries will be added to the /etc/oratab file as needed by
Database Configuration Assistant when a database is created
Finished running generic part of root script.
Now product-specific root actions will be performed.
RAC option enabled on: Linux
Executing command '/u01/app/23.26.0.0/grid/perl/bin/perl -I/u01/app/23.26.0.0/grid/perl/lib -I/u01/app/23.26.0.0/grid/crs/install /u01/app/23.26.0.0/grid/crs/install/rootcrs.pl '
Using configuration parameter file: /u01/app/23.26.0.0/grid/crs/install/crsconfig_params
The log of current session can be found at:
  /u01/app/grid/crsdata/rac-node2/crsconfig/rootcrs_rac-node2_2026-01-30_02-50-27PM.log
2026/01/30 14:50:34 CLSRSC-594: Executing installation step 1 of 18: 'ValidateEnv'.
2026/01/30 14:50:34 CLSRSC-594: Executing installation step 2 of 18: 'CheckRootCert'.
2026/01/30 14:50:34 CLSRSC-594: Executing installation step 3 of 18: 'GenSiteGUIDs'.
2026/01/30 14:50:34 CLSRSC-594: Executing installation step 4 of 18: 'SetupOSD'.
Redirecting to /bin/systemctl restart rsyslog.service
2026/01/30 14:50:35 CLSRSC-594: Executing installation step 5 of 18: 'CheckCRSConfig'.
2026/01/30 14:50:35 CLSRSC-594: Executing installation step 6 of 18: 'SetupLocalGPNP'.
2026/01/30 14:50:35 CLSRSC-594: Executing installation step 7 of 18: 'CreateRootCert'.
2026/01/30 14:50:35 CLSRSC-594: Executing installation step 8 of 18: 'ConfigOLR'.
2026/01/30 14:50:41 CLSRSC-594: Executing installation step 9 of 18: 'ConfigCHMOS'.
2026/01/30 14:50:41 CLSRSC-594: Executing installation step 10 of 18: 'CreateOHASD'.
2026/01/30 14:50:43 CLSRSC-594: Executing installation step 11 of 18: 'ConfigOHASD'.
2026/01/30 14:50:55 CLSRSC-330: Adding Clusterware entries to file 'oracle-ohasd.service'
2026/01/30 14:51:09 CLSRSC-594: Executing installation step 12 of 18: 'SetupTFA'.
2026/01/30 14:51:09 CLSRSC-594: Executing installation step 13 of 18: 'InstallACFS'.
2026/01/30 14:51:11 CLSRSC-4004: Failed to install Oracle Autonomous Health Framework (AHF). Grid Infrastructure operations will continue.
2026/01/30 14:51:11 CLSRSC-594: Executing installation step 14 of 18: 'CheckFirstNode'.
2026/01/30 14:51:12 CLSRSC-594: Executing installation step 15 of 18: 'InitConfig'.
2026/01/30 14:51:18 CLSRSC-594: Executing installation step 16 of 18: 'StartCluster'.
2026/01/30 14:51:38 CLSRSC-343: Successfully started Oracle Clusterware stack
2026/01/30 14:51:38 CLSRSC-594: Executing installation step 17 of 18: 'ConfigNode'.
2026/01/30 14:51:38 CLSRSC-594: Executing installation step 18 of 18: 'PostConfig'.
2026/01/30 14:51:41 CLSRSC-325: Configure Oracle Grid Infrastructure for a Cluster ... succeeded
- ASM configuration
- CVU validation
Monitor progress until completion.
Step 19: Finish

Message Explained
Grid Infrastructure configuration successful, some assistants skipped
✅ This is normal
- Core Grid, ASM, OCR, Voting disks are installed successfully
- Optional assistants (EM, etc.) may be skipped
Click Close.
Step 13: Final Verification (After Installation)
Run as grid user:
crsctl check cluster -all
**************************************************************
rac-node1:
CRS-4537: Cluster Ready Services is online
CRS-4529: Cluster Synchronization Services is online
CRS-4533: Event Manager is online
**************************************************************
rac-node2:
CRS-4537: Cluster Ready Services is online
CRS-4529: Cluster Synchronization Services is online
CRS-4533: Event Manager is online
**************************************************************
crsctl stat res -t
--------------------------------------------------------------------------------
Name           Target  State        Server                   State details
--------------------------------------------------------------------------------
Local Resources
--------------------------------------------------------------------------------
ora.LISTENER.lsnr
               ONLINE  ONLINE       rac-node1                STABLE
               ONLINE  ONLINE       rac-node2                STABLE
ora.chad
               ONLINE  ONLINE       rac-node1                STABLE
               ONLINE  OFFLINE      rac-node2                STABLE
ora.cvuadmin
               OFFLINE OFFLINE      rac-node1                STABLE
               OFFLINE OFFLINE      rac-node2                STABLE
ora.helper
               OFFLINE OFFLINE      rac-node1                STABLE
               OFFLINE OFFLINE      rac-node2                IDLE,STABLE
ora.net1.network
               ONLINE  ONLINE       rac-node1                STABLE
               ONLINE  ONLINE       rac-node2                STABLE
ora.ons
               ONLINE  ONLINE       rac-node1                STABLE
               ONLINE  ONLINE       rac-node2                STABLE
--------------------------------------------------------------------------------
Cluster Resources
--------------------------------------------------------------------------------
ora.ASMNET1LSNR_ASM.lsnr(ora.asmgroup)
      1        ONLINE  ONLINE       rac-node1                STABLE
      2        ONLINE  ONLINE       rac-node2                STABLE
ora.DATA.dg(ora.asmgroup)
      1        ONLINE  ONLINE       rac-node1                STABLE
      2        ONLINE  ONLINE       rac-node2                STABLE
ora.LISTENER_SCAN1.lsnr
      1        ONLINE  ONLINE       rac-node1                STABLE
ora.asm(ora.asmgroup)
      1        ONLINE  ONLINE       rac-node1                Started,STABLE
      2        ONLINE  ONLINE       rac-node2                Started,STABLE
ora.asmnet1.asmnetwork(ora.asmgroup)
      1        ONLINE  ONLINE       rac-node1                STABLE
      2        ONLINE  ONLINE       rac-node2                STABLE
ora.cdp1.cdp
      1        OFFLINE OFFLINE                               STABLE
ora.cvu
      1        ONLINE  ONLINE       rac-node1                STABLE
ora.cvuhelper
      1        OFFLINE OFFLINE                               STABLE
ora.rac-node1.vip
      1        ONLINE  ONLINE       rac-node1                STABLE
ora.rac-node2.vip
      1        ONLINE  ONLINE       rac-node2                STABLE
ora.rhpserver
      1        OFFLINE OFFLINE                               STABLE
ora.scan1.vip
      1        ONLINE  ONLINE       rac-node1                STABLE
--------------------------------------------------------------------------------
asmcmd lsdg
State    Type    Rebal  Sector  Logical_Sector  Block       AU  Total_MB  Free_MB  Req_mir_free_MB  Usable_file_MB  Offline_disks  Voting_files  Name
MOUNTED  EXTERN  N         512             512   4096  4194304     51196    50844                0           50844              0             Y  DATA/
ocrcheck
Status of Oracle Cluster Registry is as follows :
         Version                  :          4
         Total space (kbytes)     :     901284
         Used space (kbytes)      :      84768
         Available space (kbytes) :     816516
         ID                       :  390895031
         Device/File Name         :      +DATA
                                    Device/File integrity check succeeded

                                    Device/File not configured

                                    Device/File not configured

                                    Device/File not configured

                                    Device/File not configured

         Cluster registry integrity check succeeded

         Logical corruption check succeeded
crsctl query css votedisk
##  STATE    File Universal Id                File Name Disk group
--  -----    -----------------                --------- ---------
 1. ONLINE   8ddba00889d64fdbbf4830d0d0206cfb (/dev/sdb1) [DATA]
Located 1 voting disk(s).
All resources should be ONLINE.
Step 14: Finish – Grid Infrastructure Installation Completed
Once all required components are configured, the installer displays the Finish screen.
Important Message Explained
You may see a message similar to:
“The configuration of Oracle Grid Infrastructure for a Cluster was successful, but some configuration assistants failed, were cancelled, or skipped.”
🔹 What This Means
- The core Grid Infrastructure installation is successful
- Clusterware, ASM, OCR, and Voting disks are properly configured
- Some optional assistants (for example EM-related components) may be skipped intentionally or are not required
🔹 This is Common and Usually Safe
In many production environments:
- Enterprise Manager registration is skipped
- Certain optional assistants are not configured
As long as Clusterware and ASM are running, this message does not indicate a failed installation.
Run Root Scripts (When Prompted)
sudo /u01/app/oraInventory/orainstRoot.sh
sudo /u01/app/26.0.0/grid/root.sh
Related Articles
- Installing Oracle Database 26AI on Red Hat Enterprise Linux 9
- Oracle AI Database 26ai – January 2026 Release Update (23.26.1.0.0)
- Oracle Grid Infrastructure 26ai Restart Installation – Complete Step-by-Step Guide
Conclusion
You’ve now successfully completed Oracle Database 26ai RAC – Part 1: Grid Infrastructure Installation.
This setup forms the backbone of a stable, highly available RAC environment.
👉 Next in Part 2: Oracle 26ai RAC Database Software Installation and Database Creation.



Comments 3