

Adding a new node to an existing Oracle RAC 19c environment is a common task when you need additional processing capacity, workload distribution, or higher availability.
In this guide, we will add a new RAC node to an existing Oracle RAC 19c cluster and cover the complete process from preparing the new server to creating the database instance.


The process is divided into three major stages:
- Add the new node to Oracle Grid Infrastructure using
gridSetup.sh - Extend the Oracle Database Home using
addnode.sh - Add the database instance using DBCA
I have also included real Oracle 19c installer screenshots showing the node selection, prerequisite checks, resolv.conf issue, installation progress, root script execution, and successful completion.
Oracle RAC 19c Environment
For this example, we have an existing RAC node and want to add a second node.
Existing RAC node
DBHOST01
DBHOST02
New RAC node
DBHOST03Grid Infrastructure Home
/crsapp/app/oracle/product/19cOracle Database Home
/oracle/app/oracle/product/19.3.0/dbhome_1The screenshots used in this article are from a similar Oracle 19c environment where the hostnames and Oracle Home differ slightly. The procedure is the same; always use the paths and hostnames from your own environment.
RAC Environment Before Adding the Node
Initially, the cluster looks like this:
                Oracle RAC 19c
                      |
          +-----------+-----------+
          |                       |
      DBHOST01                DBHOST02
       Node 1                  Node 2
          |                       |
         CRS                     CRS
          |                       |
         ASM                     ASM
          |                       |
       RACDB1                  RACDB2
          |                       |
          +-----------+-----------+
                      |
                Shared Storage
                      |
                Adding Node 3
                      |
                  DBHOST03
                   Node 3
                      |
                     CRS
                      |
                     ASM
                      |
                   RACDB3
RAC Node Addition Workflow
The complete process can be summarized as:
Existing 2-Node Oracle RAC
          |
          +-- DBHOST01 (Node 1)
          |
          +-- DBHOST02 (Node 2)
          |
          v
     Add DBHOST03
       (Node 3)
          |
          v
Prepare DBHOST03
          |
          v
Configure OS, Network & SSH
          |
          v
Add DBHOST03 to Grid Infrastructure
          |
          | gridSetup.sh
          v
Run & Resolve Prerequisite Checks
          |
          v
Verify 3-Node Grid Infrastructure
          |
          v
Extend Oracle Database Home
          |
          | addnode.sh
          v
Verify Oracle Database Home
          |
          v
Add RAC Database Instance
          |
          | DBCA
          v
Verify RACDB3 on DBHOST03
          |
          v
Final 3-Node RAC Validation
1. Prepare the New RAC Node
Before starting the Oracle installer, the new server must be properly prepared.
For our example:
Existing Node : DBHOST01
New Node      : DBHOST03
The new node should have a configuration compatible with the existing RAC node.
The following should be checked before starting:
- Hostname
- DNS or
/etc/hosts - Public network
- Private RAC interconnect
- VIP configuration
- SSH connectivity
- Operating system packages
- Oracle users and groups
- Kernel parameters
- Resource limits
- Time synchronization
- Shared storage
- Required mount points
- Grid Infrastructure prerequisites
2. Verify the Hostname
On the new server:
hostnameExpected:
DBHOST03You can also run:
hostname -fMake sure the hostname matches the name that will be used by Oracle Clusterware.
3. Check Hostname Resolution
Verify that both nodes can resolve each other.
For example:
getent hosts DBHOST01
getent hosts DBHOST03
You should get the expected IP addresses.
If DNS is not being used, verify the /etc/hosts configuration.
For example:
cat /etc/hostsMake sure the public and private hostnames are correctly configured.
4. Check the RAC Private Interconnect
Oracle RAC uses a private network for cluster communication.
From DBHOST01, test the private IP of DBHOST03:
ping <DBHOST01-private-IP>From DBHOST01, test the private IP of DBHOST03:
ping <DBHOST03-private-IP>The private network should be stable and correctly configured before proceeding.
5. Verify Oracle Users and Groups
The new node should have the required Oracle users and groups.
Check:
id gridand:
id oracleThe group configuration should be consistent with the existing RAC node.
Typical groups may include:
oinstall
dba
oper
asmadmin
asmdba
asmoper
The exact groups depend on your Oracle RAC configuration.
6. Configure SSH Connectivity
Passwordless SSH is required for the RAC installation process.
From the existing node:
su - gridTest:
ssh DBHOST03 hostnameExpected:
DBHOST03Test the reverse connection:
ssh DBHOST03 hostnameExpected:
DBHOST03You should also test using the oracle user where required.
For example:
su - oracle
ssh DBHOST03 hostname
If SSH asks for a password, fix SSH equivalence before continuing.
7. Verify the Existing RAC Cluster
Before making any changes, verify that the existing RAC cluster is healthy.
Log in as the grid user:
su - gridCheck Clusterware:
crsctl check clusterCheck the existing nodes:
olsnodes -nAt this point, you might see:
DBHOST03 1Check the cluster resources:
crsctl stat res -tIt is always better to start a node-add operation from a healthy RAC environment.
Part 1 – Add the New Node to Grid Infrastructure
Now we can begin the first major stage: adding DBHOST03 to Oracle Grid Infrastructure.
8. Start gridSetup.sh
Navigate to the Oracle Grid Infrastructure software directory.
For example:
cd /path/to/grid/softwareRun:
./gridSetup.shThe Oracle Grid Infrastructure 19c installer will open.
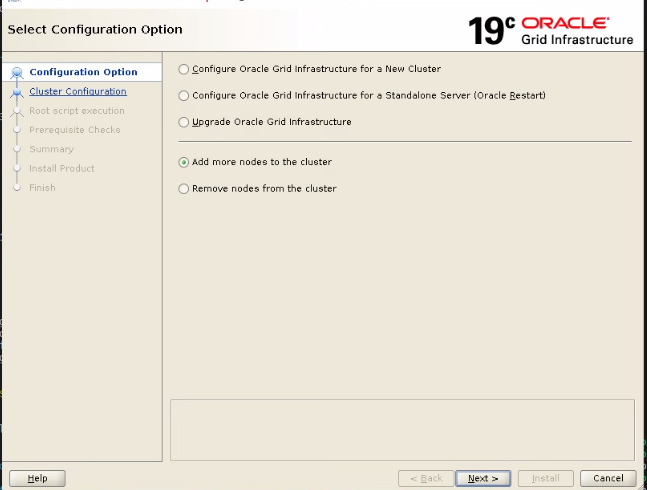
Select:
Add a new node to the clusterThis tells Oracle that we want to extend the existing Grid Infrastructure installation to another server.
9. Cluster Add Node Information
The installer will ask for the information about the new node.
For our example:
Public Hostname:
DBHOST03

Virtual Hostname:
DBHOST03-vip
The exact VIP name depends on your environment.
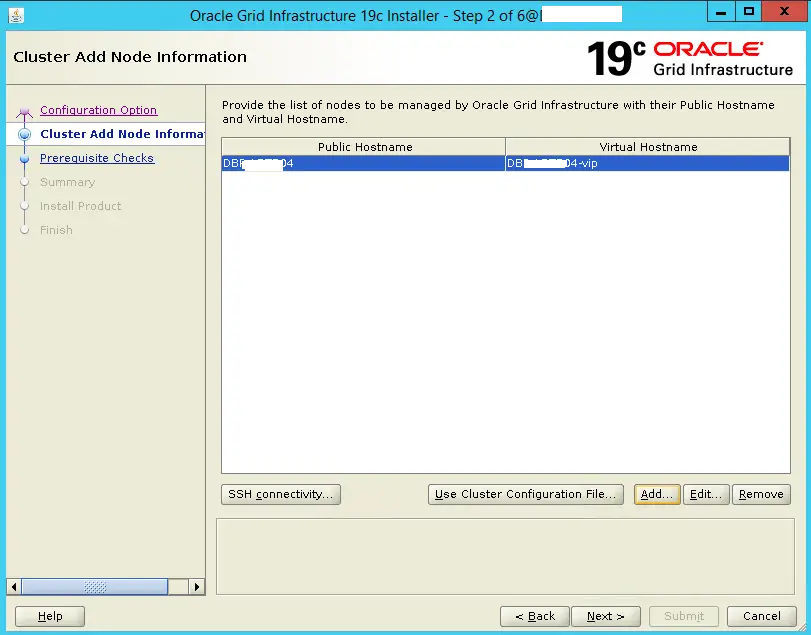
You should also provide the appropriate operating system username:
grid10. Verify Passwordless SSH
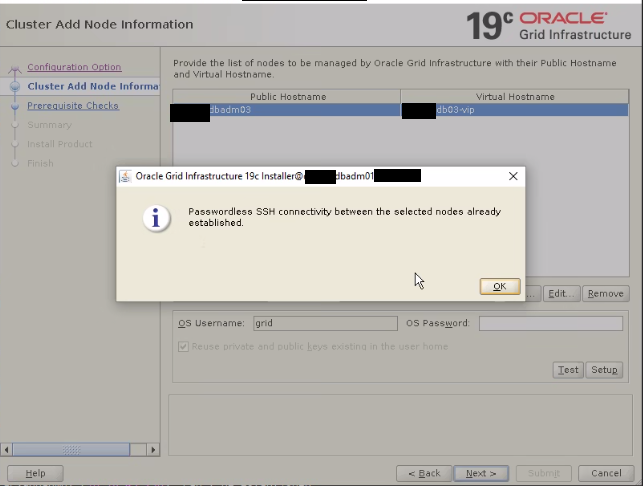
During the installation, Oracle checks SSH connectivity between the nodes.
The installer may display a message similar to:
Passwordless SSH connectivity between the selected nodes already established.
Share
Figure 1 – Passwordless SSH connectivity
This confirms that Oracle can communicate with the selected nodes using the configured SSH keys.
You can manually verify this as well:
ssh DBHOST03 hostnameIf everything is correct:
DBHOST03will be returned.
11. Run Grid Infrastructure Prerequisite Checks
After entering the node information, Oracle performs prerequisite checks.
The installer checks several areas, including:
- Operating system
- Network configuration
- Hostname resolution
- SSH
- OS packages
- Kernel parameters
- Users and groups
- DNS
/etc/resolv.conf- Cluster configuration
This step is important because Oracle can detect configuration problems before the node is added.
12. Example: resolv.conf Integrity Failure
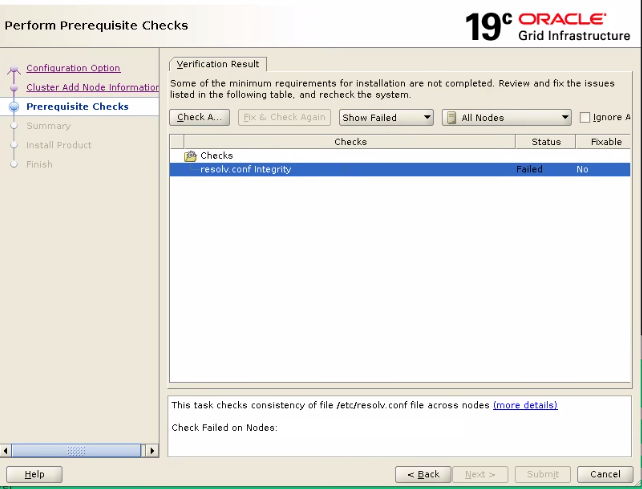
During the installation shown in the screenshots, the following prerequisite failed:
resolv.conf IntegrityThe installer showed:
Status: Failed
Fixable: No
Share
Figure 2 – resolv.conf Integrity check failure
The installer also identifies the nodes where the check failed.
This check is related to the consistency of:
/etc/resolv.confacross the cluster.
13. Troubleshooting resolv.conf Integrity
On the affected nodes, check:
cat /etc/resolv.confCompare the configuration between the RAC servers.
For example:
ssh DBHOST01 cat /etc/resolv.confand:
ssh DBHOST03 cat /etc/resolv.confLook for differences in:
nameserver
search
options
Also verify hostname resolution:
getent hosts DBHOST01
getent hosts DBHOST03
and:
nslookup DBHOST01
nslookup DBHOST03
Fix any DNS or resolver configuration issues according to your environment.
Important: Do not blindly copy
/etc/resolv.conffrom another server. Make sure the DNS configuration is correct for your environment.
After correcting the problem, click Check Again in the installer.
14. Review the Grid Infrastructure Summary
Once the prerequisite checks have passed, Oracle displays a summary of the configuration.
The summary includes information such as:
Grid Home:
 /crsapp/app/oracle/product/19c

Public Host Name:
 DBHOST03

Virtual Host Name:
 DBHOST03-vip

Node Role:
 HUB
The exact values depend on your environment.
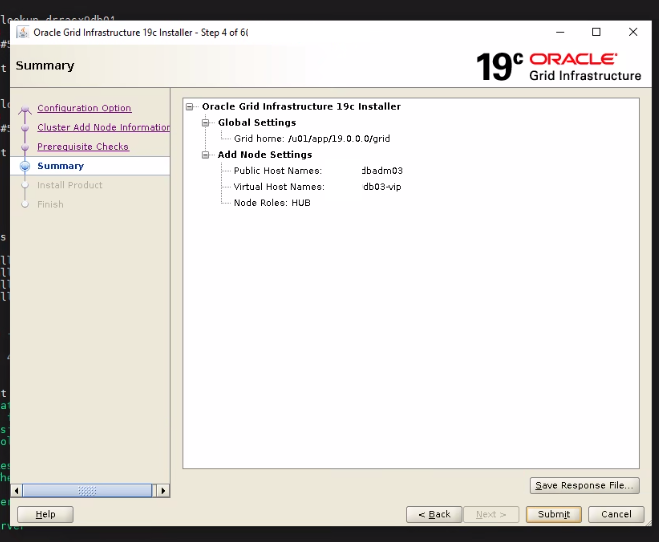
Figure 3 – Grid Infrastructure add-node summary
Before clicking Submit, verify:
- Grid Home
- Public hostname
- Virtual hostname
- Node role
- Network configuration
- Selected node
Once everything is correct, click:
Submit15. Complete the Grid Infrastructure Installation
Oracle will now configure the new node.
The process can be visualized as:
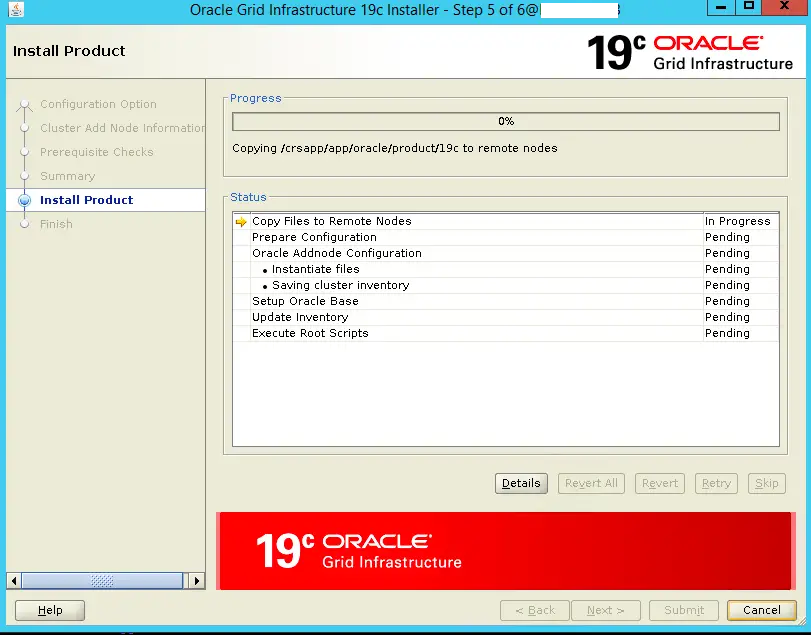
Depending on the configuration, the installer may ask you to run configuration scripts as root.
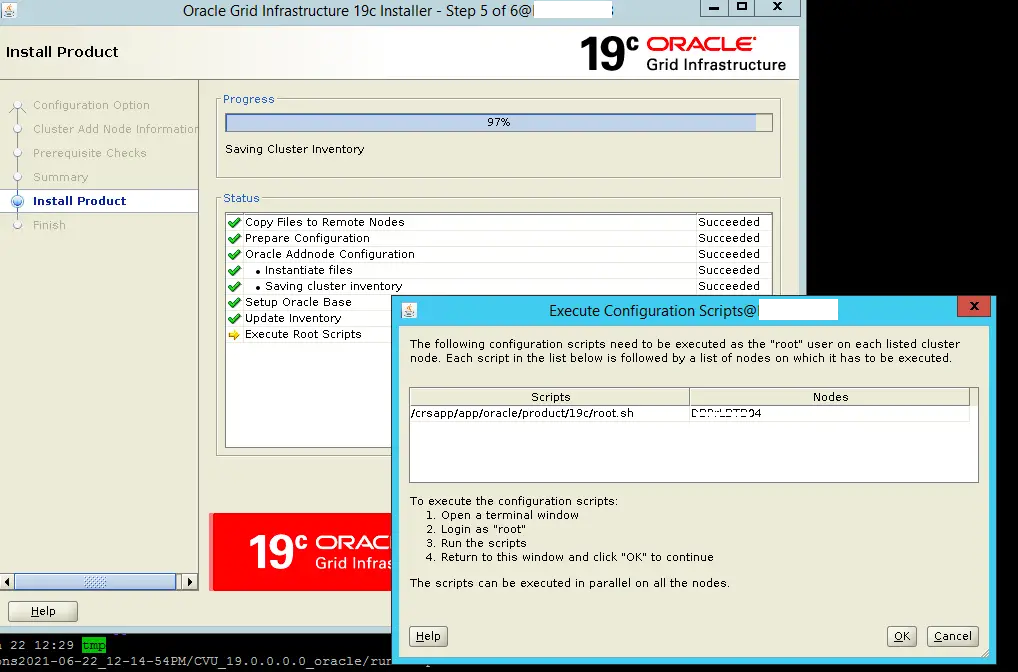
Always use the exact script and path provided by the installer.
./root.sh
Check /u01/app/19.0.0.0/grid/install/root_dbadm03._2026-09-02_13-13-18-466574252.log for the output of root script
[root@drracx9dbadm03 grid]#


[root@drracx9dbadm03 ~]# cat /u01/app/19.0.0.0/grid/install/root_dbadm03._2026-09-02_13-13-18-466574252.log
Performing root user operation.

The following environment variables are set as:
    ORACLE_OWNER= grid
    ORACLE_HOME=  /u01/app/19.0.0.0/grid
   Copying dbhome to /usr/local/bin ...
   Copying oraenv to /usr/local/bin ...
   Copying coraenv to /usr/local/bin ...


Creating /etc/oratab file...
Entries will be added to the /etc/oratab file as needed by
Database Configuration Assistant when a database is created
Finished running generic part of root script.
Now product-specific root actions will be performed.
Relinking oracle with rac_on option
Using configuration parameter file: /u01/app/19.0.0.0/grid/crs/install/crsconfig_params
The log of current session can be found at:
  /u01/app/grid/crsdata/dbadm03/crsconfig/rootcrs_dbadm03_2026-09-02_01-13-22PM.log
2026/09/02 13:13:23 CLSRSC-594: Executing installation step 1 of 19: 'ValidateEnv'.
2026/09/02 13:13:23 CLSRSC-363: User ignored prerequisites during installation
2026/09/02 13:13:23 CLSRSC-594: Executing installation step 2 of 19: 'CheckFirstNode'.
2026/09/02 13:13:24 CLSRSC-594: Executing installation step 3 of 19: 'GenSiteGUIDs'.
2026/09/02 13:13:24 CLSRSC-594: Executing installation step 4 of 19: 'SetupOSD'.
Redirecting to /bin/systemctl restart rsyslog.service
2026/09/02 13:13:25 CLSRSC-594: Executing installation step 5 of 19: 'CheckCRSConfig'.
2026/09/02 13:13:25 CLSRSC-594: Executing installation step 6 of 19: 'SetupLocalGPNP'.
2026/09/02 13:13:26 CLSRSC-594: Executing installation step 7 of 19: 'CreateRootCert'.
2026/09/02 13:13:26 CLSRSC-594: Executing installation step 8 of 19: 'ConfigOLR'.
2026/09/02 13:13:34 CLSRSC-594: Executing installation step 9 of 19: 'ConfigCHMOS'.
2026/09/02 13:13:34 CLSRSC-594: Executing installation step 10 of 19: 'CreateOHASD'.
2026/09/02 13:13:34 CLSRSC-594: Executing installation step 11 of 19: 'ConfigOHASD'.
2026/09/02 13:13:38 CLSRSC-330: Adding Clusterware entries to file 'oracle-ohasd.service'
2026/09/02 13:13:53 CLSRSC-594: Executing installation step 12 of 19: 'SetupTFA'.
2026/09/02 13:13:53 CLSRSC-594: Executing installation step 13 of 19: 'InstallAFD'.
2026/09/02 13:13:53 CLSRSC-594: Executing installation step 14 of 19: 'InstallACFS'.
2026/09/02 13:13:59 CLSRSC-594: Executing installation step 15 of 19: 'InstallKA'.
2026/09/02 13:13:59 CLSRSC-594: Executing installation step 16 of 19: 'InitConfig'.
2026/09/02 13:14:06 CLSRSC-594: Executing installation step 17 of 19: 'StartCluster'.
2026/09/02 13:14:43 CLSRSC-4002: Successfully installed Oracle Trace File Analyzer (TFA) Collector.
2026/09/02 13:16:07 CLSRSC-343: Successfully started Oracle Clusterware stack
2026/09/02 13:16:07 CLSRSC-594: Executing installation step 18 of 19: 'ConfigNode'.
clscfg: EXISTING configuration version 19 detected.
Successfully accumulated necessary OCR keys.
Creating OCR keys for user 'root', privgrp 'root'..
Operation successful.
2026/09/02 13:16:15 CLSRSC-594: Executing installation step 19 of 19: 'PostConfig'.
PRCR-1013 : Failed to start resource ora.LISTENER_DG.lsnr

PRCR-1064 : Failed to start resource ora.LISTENER_DG.lsnr on node dbadm03

CRS-2805: Unable to start 'ora.LISTENER_DG.lsnr' because it has a 'hard' dependency on resource type 'ora.cluster_vip_net2.type' and no resource of that type can satisfy the dependency

CRS-2525: All instances of the resource 'ora.dbadm01_2.vip' are already running; relocate is not allowed because the force option was not specified

CRS-2525: All instances of the resource 'ora.dbadm02_2.vip' are already running; relocate is not allowed because the force option was not specified

2026/09/02 13:16:18 CLSRSC-180: An error occurred while executing the command '/u01/app/19.0.0.0/grid/bin/srvctl start listener -n dbadm03'
2026/09/02 13:16:19 CLSRSC-325: Configure Oracle Grid Infrastructure for a Cluster ... succeeded
16. Verify the Grid Infrastructure Node
After the installation completes, log in as grid.
Run:
olsnodes -nYou should now see:
DBHOST01        1
DBHOST03        3
This confirms that the new node has been added to the cluster.
Also run:
crsctl check clusterand:
crsctl stat res -tCheck ASM:
srvctl status asmAnd the listener:
srvctl status listenerPart 2 – Extend the Oracle Database Home
The Grid Infrastructure node addition is only the first part.
Now we need to make the Oracle Database software available on the new RAC node.
Our Oracle Home is:
/oracle/app/oracle/product/19.3.0/dbhome_1The screenshots in this section show a similar environment using:
/u01/app/oracle/product/19.0.0/dbhome_1The procedure is the same.
17. Run addnode.sh
Log in to the existing RAC node as the oracle user.
Set the Oracle Home:
export ORACLE_HOME=/oracle/app/oracle/product/19.3.0/dbhome_1Go to the addnode directory:
cd $ORACLE_HOME/addnodeCheck the script:
ls -l addnode.shThen run:
./addnode.shThis starts the Oracle Database 19c node-addition process.
18. Select the New Node
The first screen is the Node Selection screen.
Oracle displays the cluster nodes and allows you to select the node where the Oracle Database Home should be installed.
Figure 4 – Oracle Database 19c Node Selection
Select the new node.
The installer also provides:
SSH connectivity...which can be used to verify communication with the selected node.
Once the correct node has been selected, click:
Next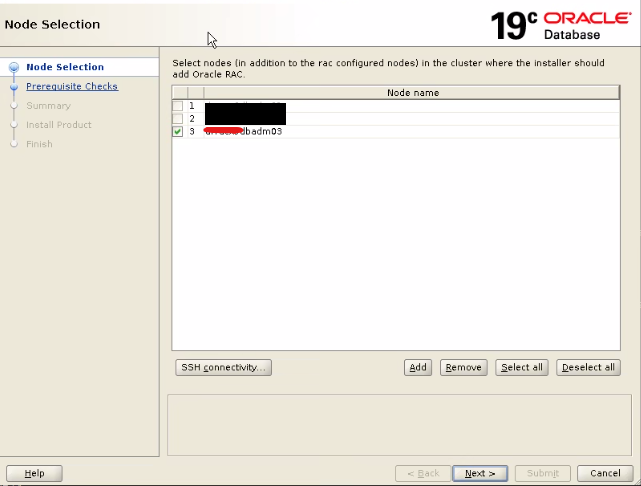
19. Database Home Prerequisite Checks
Oracle will now perform prerequisite checks for the Database Home installation.
The installer may identify issues similar to the Grid Infrastructure prerequisite checks.
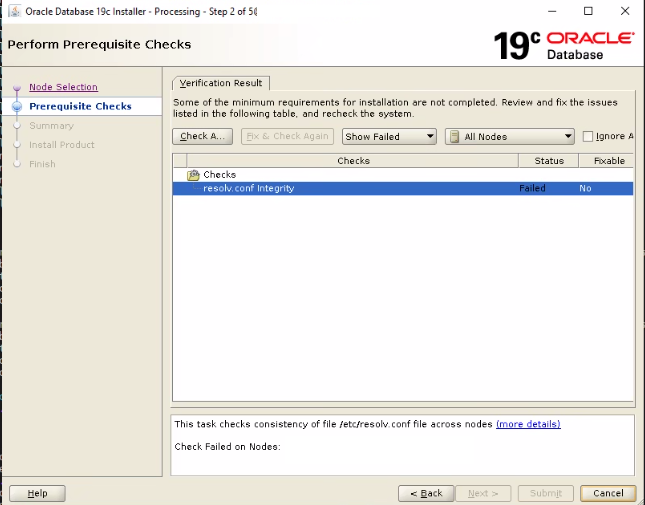
In the provided screenshot, the following check failed:
resolv.conf Integrity
Share
Figure 5 – Oracle Database 19c prerequisite checks
Again, check:
cat /etc/resolv.confon the affected servers.
Compare:
ssh DBHOST01 cat /etc/resolv.confwith:
ssh DBHOST03 cat /etc/resolv.confCorrect the underlying configuration before continuing.
20. Review the Database Home Summary
After the prerequisite checks are complete, Oracle displays the installation summary.
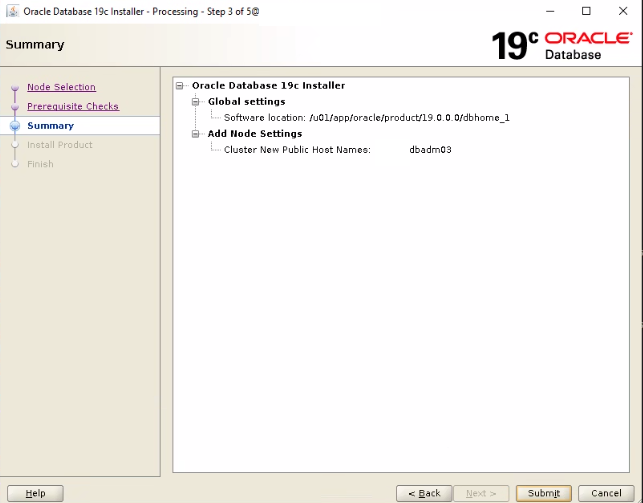
The summary shows the software location and the cluster node information.
For example:
Software Location:
/u01/app/oracle/product/19.0.0/dbhome_1

Cluster New Public Host Name:
DBHOST03
Figure 6 – Oracle Database Home add-node summary
Verify the Oracle Home and target node carefully.
If everything is correct, click:
Submit21. Copy Oracle Database Home to the New Node
Oracle now starts copying the Database Home to the remote node.
The installer displays progress such as:
Prepare Configuration
Copy Files to Remote Nodes
Oracle Addnode Configuration
Instantiate files
Saving cluster inventory
Setup Oracle Base
Execute Root Scripts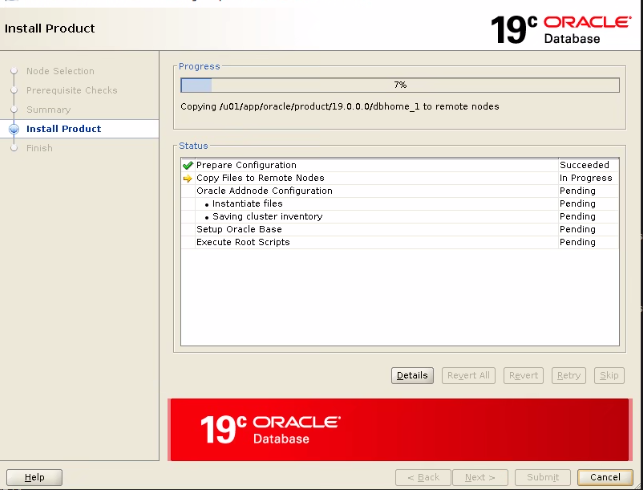
Figure 7 – Oracle Database Home being copied to the new node
This step may take some time because the Oracle Home contains a large number of files.
Do not interrupt the installation while the files are being copied.
22. Execute the Root Configuration Script
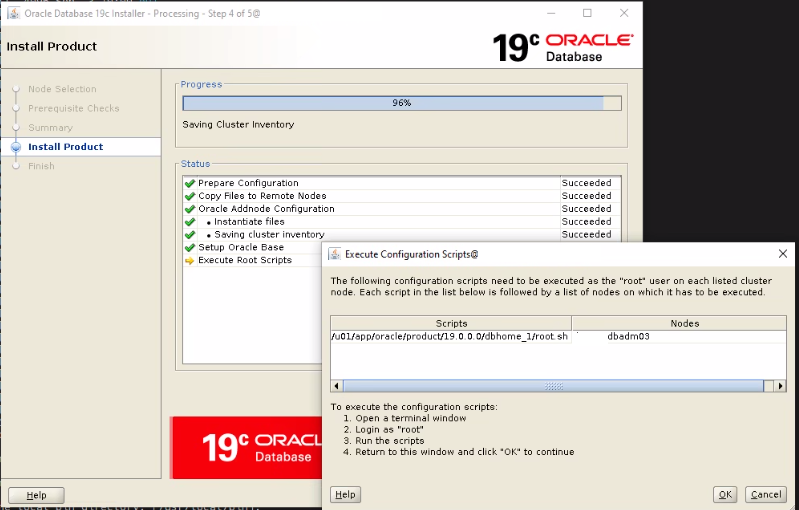
At the end of the Database Home installation, Oracle may request a root script.
The installer displays the script and the node where it should be executed.
Figure 8 – Execute Oracle Database root configuration script
The installer provides instructions:
1. Open a terminal window
2. Login as "root"
3. Run the scripts
4. Return to this window and click "OK"
Open another terminal and switch to root:
su -Then execute the exact script shown by the installer.
For example, the installer may show something similar to:
/u01/app/oracle/product/19.0.0/dbhome_1/root.shThe actual path may be different in your environment.
./root.sh
Performing root user operation.

The following environment variables are set as:
    ORACLE_OWNER= oracle
    ORACLE_HOME=  /u01/app/oracle/product/19.0.0.0/dbhome_1

Enter the full pathname of the local bin directory: [/usr/local/bin]:
The contents of "dbhome" have not changed. No need to overwrite.
The contents of "oraenv" have not changed. No need to overwrite.
The contents of "coraenv" have not changed. No need to overwrite.

Entries will be added to the /etc/oratab file as needed by
Database Configuration Assistant when a database is created
Finished running generic part of root script.
Now product-specific root actions will be performed.
Always use the command displayed by your installer.
After the script finishes successfully, return to the installer and click OK.
23. Wait for All Installation Tasks to Complete
The installer should now continue through the remaining tasks.
You want to see the operations reported as:
SucceededFor example:
Prepare Configuration          Succeeded
Copy Files to Remote Nodes     Succeeded
Oracle Addnode Configuration   Succeeded
Instantiate files              Succeeded
Saving cluster inventory       Succeeded
Setup Oracle Base              Succeeded
Execute Root Scripts           Succeeded
Once these operations complete, the Oracle Database Home has been successfully extended to the new node.
24. Successful Database Home Node Addition
The final installer screen confirms:
The node addition of Oracle Database was successful.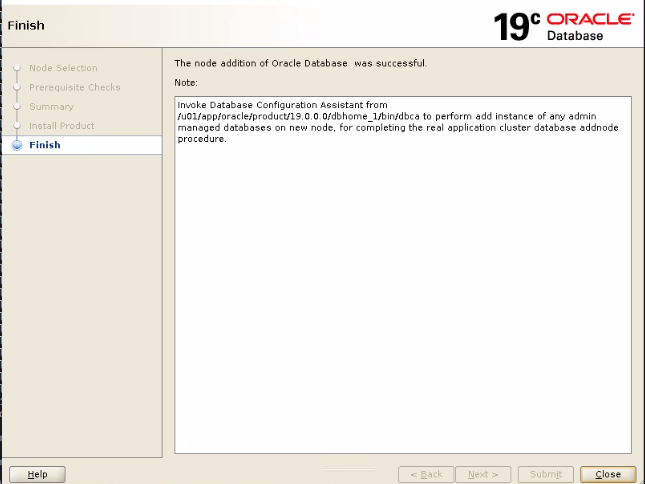
Figure 9 – Oracle Database node addition successfully completed
The installer also provides an important note about using DBCA to add the database instance.
This is an important point:
addnode.shadds the Oracle Database software to the new node. It does not automatically create the database instance.
The next step is DBCA.
25. Verify the Oracle Home on DBHOST03
Log in to the new node as the oracle user.
Check:
echo $ORACLE_HOMEExpected:
/oracle/app/oracle/product/19.3.0/dbhome_1Verify:
ls -ld $ORACLE_HOMECheck the Oracle inventory:
$ORACLE_HOME/OPatch/opatch lsinventoryYou should see the expected Oracle Database version and installed patches.
26. Verify the Oracle Database Version
Run:
$ORACLE_HOME/OPatch/opatch versionYou can also check the Oracle executable:
$ORACLE_HOME/bin/oracle -vThis confirms that the expected Oracle software is installed on the new node.
Part 3 – Add the Database Instance Using DBCA
At this point:
Grid Infrastructure
       |
       +-- DBHOST01
       +-- DBHOST02
       +-- DBHOST03

Oracle Database Home
       |
       +-- DBHOST01
       +-- DBHOST02
       +-- DBHOST03
The remaining step is to add the database instance.
27. Start DBCA
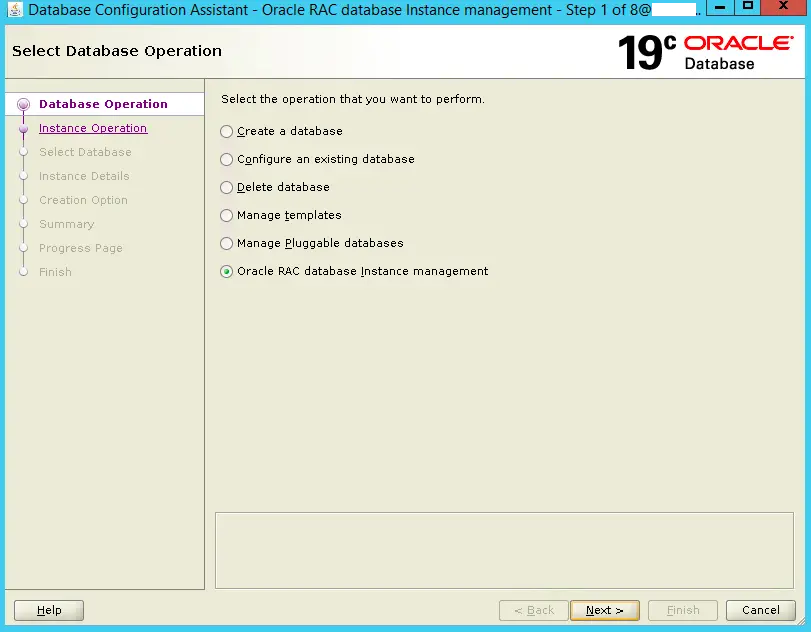
As the oracle user:
dbcaSelect:
Oracle Real Application Clusters databaseThen select the database instance management option.
Choose:
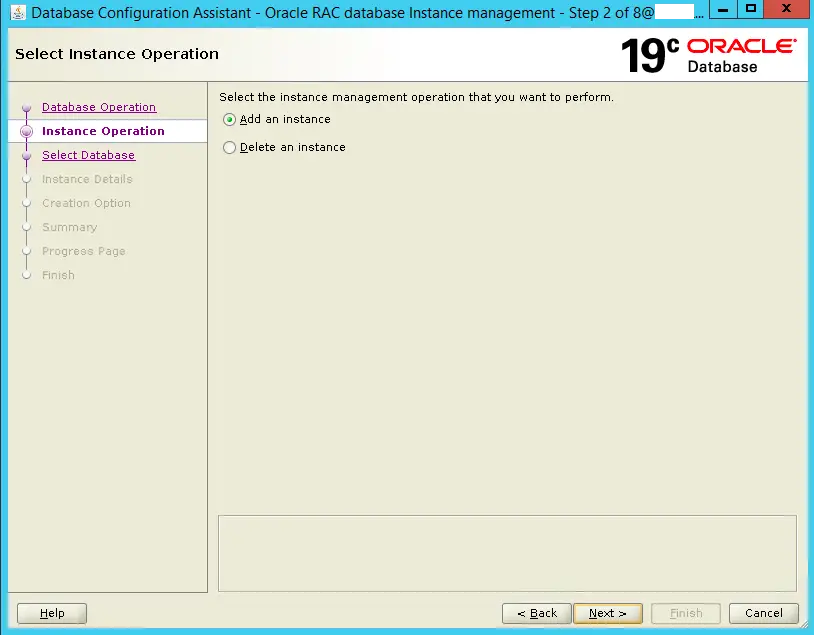
Add an instanceSelect the existing RAC database.
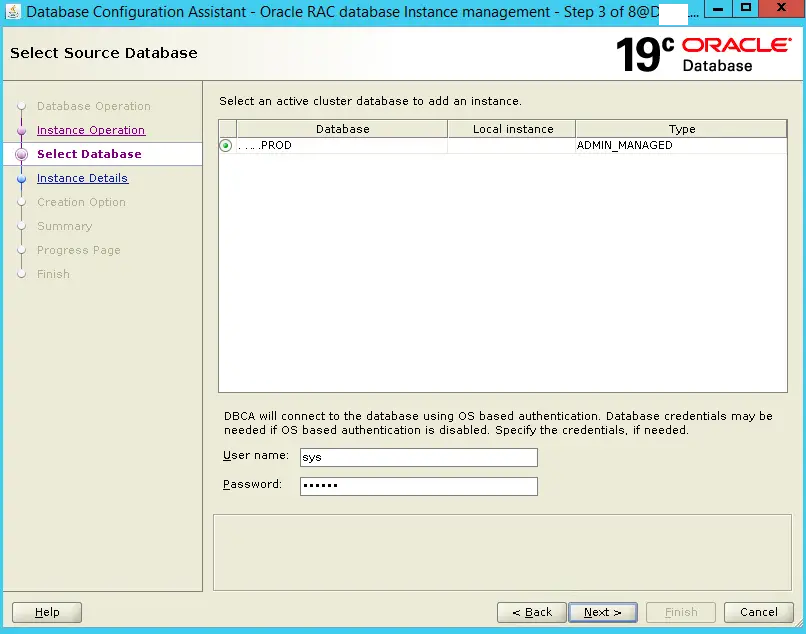
For example:
Database:
PROD
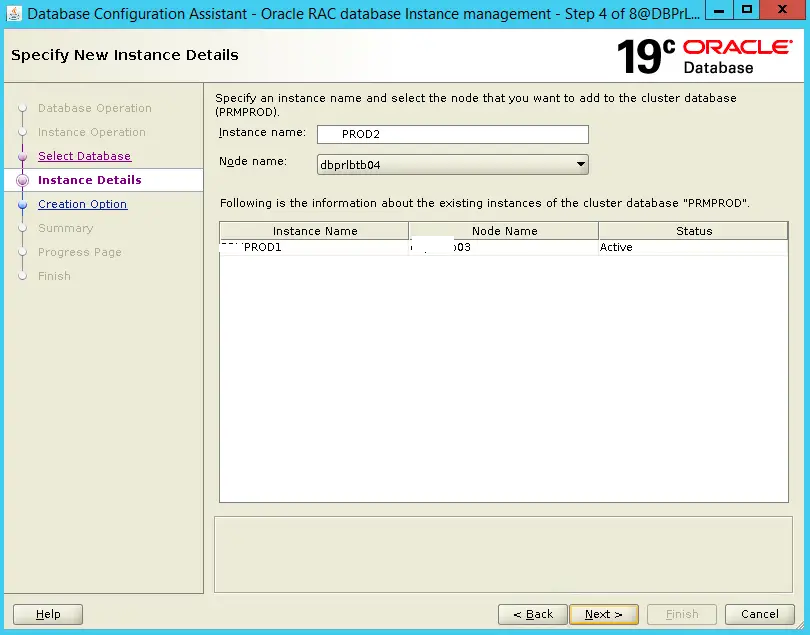
Then select:
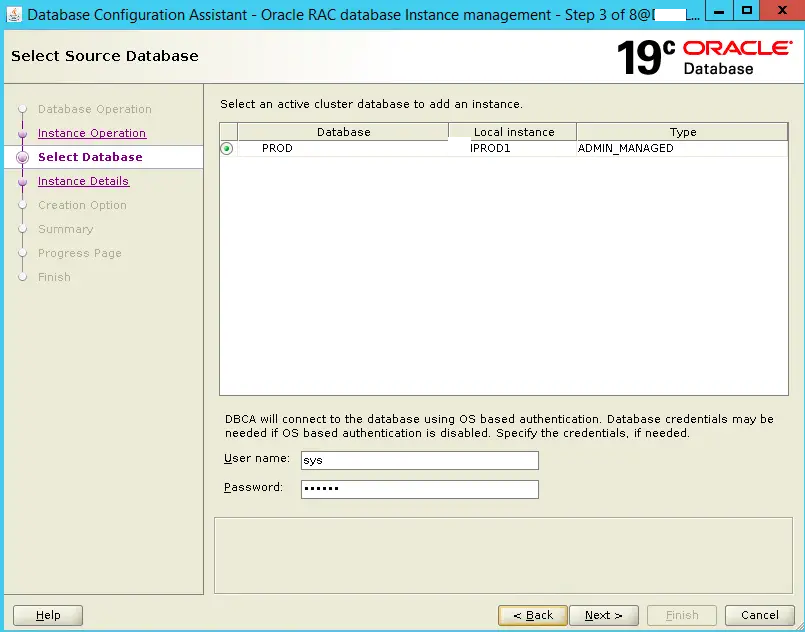
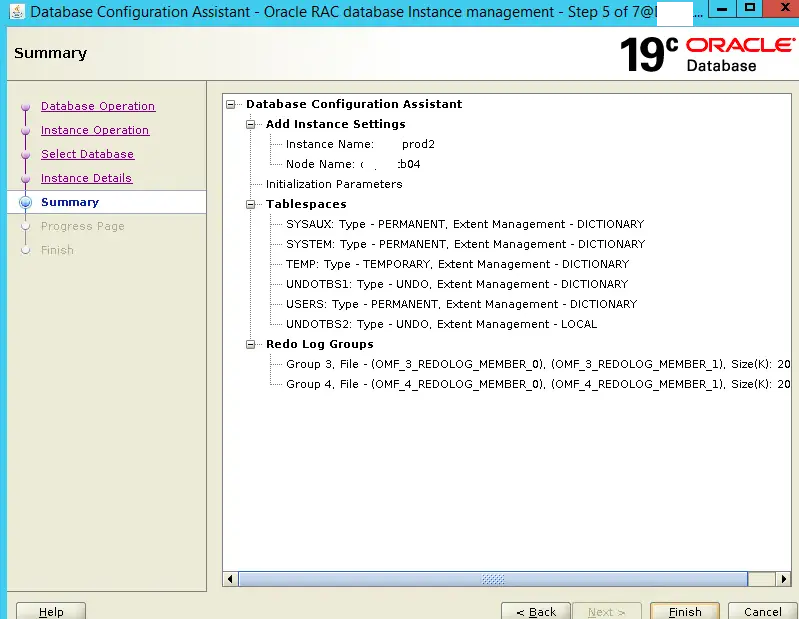
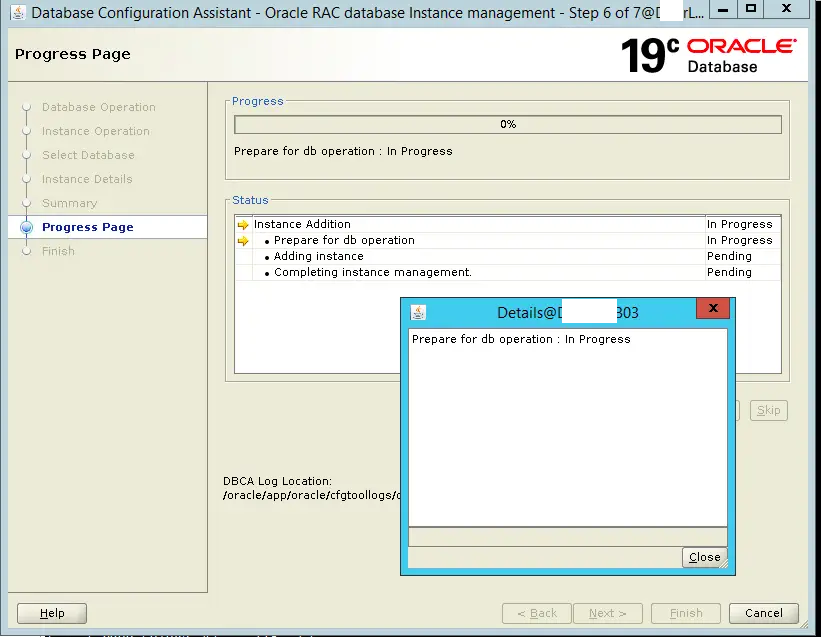
DBHOST03DBCA will configure the new database instance on the new RAC node.
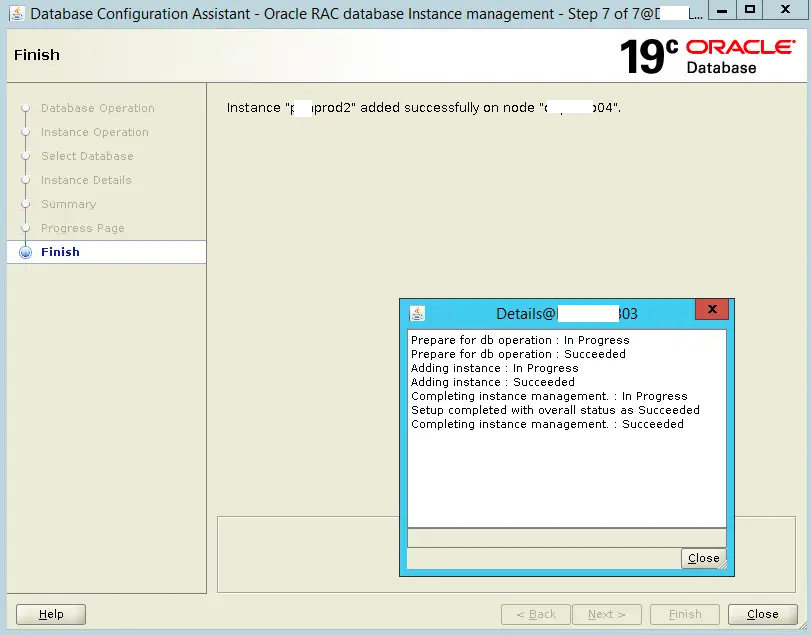
28. Understand the Difference Between addnode.sh and DBCA
This is worth emphasizing because it is a common point of confusion.
gridSetup.sh
Adds the server to:
Oracle Grid Infrastructureaddnode.sh
Extends:
Oracle Database HomeDBCA
Creates/configures:
Database InstanceSo:
gridSetup.sh
     ↓
Grid Infrastructure
     ↓
addnode.sh
     ↓
Oracle Database Home
     ↓
DBCA
     ↓
Database Instance
Completing only gridSetup.sh and addnode.sh does not mean that the database is running on the new node.
29. Verify the Database Configuration
After DBCA completes, check the RAC database configuration.
srvctl config database -d RACDBThen:
srvctl status database -d RACDBExpected output should be similar to:
Instance RACDB1 is running on node DBHOST01
Instance RACDB2 is running on node DBHOST03
30. Check RAC Services
Check the database services:
srvctl status service -d RACDBCheck service configuration:
srvctl config service -d RACDBMake sure the services are configured correctly for the new RAC node.
For example:
APP_SERVICE

Preferred:
    RACDB1
    RACDB2
The actual service configuration will depend on your application requirements.
31. Verify the RAC Instances From SQL
Connect to the database:
sqlplus / as sysdbaRun:
SELECT INST_ID,
       INSTANCE_NAME,
       HOST_NAME,
       STATUS
FROM GV$INSTANCE
ORDER BY INST_ID;
Expected output:
INST_ID  INSTANCE_NAME  HOST_NAME   STATUS
-------  -------------  ----------  -------
1        RACDB1         DBHOST01    OPEN
2        RACDB2         DBHOST03    OPEN
This confirms that the database is running across both RAC nodes.
32. Final RAC Health Check
Once the new instance has been added, perform a complete health check.
Check RAC nodes
olsnodes -nExpected:
DBHOST01        1
DBHOST03        3
Check Clusterware
crsctl check clusterCheck cluster resources
crsctl stat res -tCheck ASM
srvctl status asmCheck listener
srvctl status listenerCheck database
srvctl status database -d RACDBCheck services
srvctl status service -d RACDBCheck instances
SELECT INST_ID,
       INSTANCE_NAME,
       HOST_NAME,
       STATUS
FROM GV$INSTANCE
ORDER BY INST_ID;
33. Final RAC Architecture
After successfully completing all three stages, the environment should look like this:
      |
      +---------------+---------------+
      |               |               |
  DBHOST01        DBHOST02        DBHOST03
   Node 1          Node 2          Node 3
      |               |               |
   RACDB1          RACDB2          RACDB3
      |               |               |
      +---------------+---------------+
                      |
                Shared Storage
Complete Node Addition Flow
Here is the complete process in one place:
Existing RAC
   |
   +-- DBHOST01 (Node 1)
   |
   +-- DBHOST02 (Node 2)
   |
   +-- DBHOST03 (Node 3) ← New
             |
             v
      gridSetup.sh
             |
             v
   Add Node 3 to Grid Infrastructure
             |
             v
        addnode.sh
             |
             v
   Extend Database Home to Node 3
             |
             v
           DBCA
             |
             v
       Create RACDB3
             |
             v
      3-Node Oracle RAC
Common Issues During RAC Node Addition
1. SSH Connectivity Failure
Check:
ssh DBHOST03 hostnameIf authentication fails, verify SSH keys and permissions.
2. resolv.conf Integrity Failure
Check:
cat /etc/resolv.confCompare the file across the RAC nodes.
Also test:
getent hosts DBHOST01
getent hosts DBHOST03
3. Node Does Not Appear in olsnodes
Run:
olsnodes -nIf the new node does not appear, investigate the Grid Infrastructure installation before moving to the Database Home stage.
4. Oracle Home Missing on the New Node
Check:
echo $ORACLE_HOMEThen:
ls -ld $ORACLE_HOMEIf the Oracle Home is missing, review the addnode.sh installation logs.
5. Database Instance Does Not Start
Check:
srvctl status database -d RACDBThen check the cluster resources:
crsctl stat res -tAlso check the database alert log on the new node.
Important Best Practices
Before adding a RAC node, always make sure the existing cluster is healthy.
I recommend following this order:
1. Check existing RAC health
2. Prepare new OS
3. Verify networking
4. Verify SSH
5. Run gridSetup.sh
6. Resolve prerequisite failures
7. Verify Grid Infrastructure
8. Run addnode.sh
9. Verify Oracle Home
10. Run DBCA
11. Verify database instance
12. Verify services
13. Perform final RAC health check
Avoid jumping directly from gridSetup.sh to DBCA without verifying the intermediate layers.
Key Difference Between the Three Tools
| Tool | Purpose |
|---|---|
gridSetup.sh | Add the server to Grid Infrastructure |
addnode.sh | Extend Oracle Database Home |
DBCA | Add/configure the database instance |
The relationship is:
gridSetup.sh
     ↓
Grid Infrastructure
     ↓
addnode.sh
     ↓
Oracle Database Home
     ↓
DBCA
     ↓
Database Instance
Conclusion
Adding a node to Oracle RAC 19c is a multi-stage process, but it becomes much easier to manage when each stage is treated separately.
First, prepare the new server and make sure the network, SSH, OS, and DNS configuration are correct.
Then use:
./gridSetup.shto add the new server to Grid Infrastructure.
Once the Grid Infrastructure node is working, extend the Oracle Database Home:
./addnode.shFinally, use:
dbcato add the database instance to the new RAC node.
The final verification should confirm:
DBHOST01  → RACDB1
DBHOST03  → RACDB2
with both instances OPEN and the required RAC services running correctly.
The most important lesson is to verify every layer before moving to the next one:
OS / Network
      ↓
SSH
      ↓
Grid Infrastructure
      ↓
Oracle Database Home
      ↓
Database Instance
      ↓
Services
      ↓
Final RAC Validation
This approach makes Oracle RAC 19c node addition much easier to troubleshoot and gives you a clear path when something fails during the installation.


