
Introduction
While managing Oracle Database 19c, DBAs may encounter errors related to temporary tablespace datafiles stored in Oracle Automatic Storage Management (ASM). These errors can occur when a temporary tablespace references a datafile that cannot be accessed because its ASM disk group is unavailable, unmounted, or the file is missing.
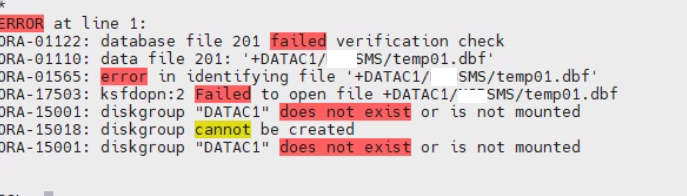
In this scenario, the database reported errors indicating that it could not identify or open the temporary tablespace datafile +DATAC1/SMS/temp01.dbf. The error output also indicated that the ASM disk group DATAC1 did not exist or was not mounted.
The issue was resolved by creating a new temporary tablespace in the available +PRODDATA ASM disk group, changing the database’s default temporary tablespace, and recreating the original temporary tablespace.
This article explains the error, the troubleshooting process, and the solution using Oracle SQL commands.
1. Understanding the Error
The following errors were reported:
What Do These Errors Mean?
ORA-01122: Database file failed verification check
Oracle could not successfully verify the specified database file. In this scenario, the underlying file access problem is associated with the unavailable ASM file.
ORA-01110: Data file identification
This error identifies the database file involved in the problem:
+DATAC1/NSBSMS/temp01.dbfORA-01565: Error in identifying file
Oracle could not identify or access the specified file.
ORA-17503: Failed to open file
Oracle failed to open the ASM file because the requested file was inaccessible.
ORA-15001: Diskgroup does not exist or is not mounted
The ASM disk group DATAC1 was unavailable to the database operation. It might not have been mounted, might not exist in the current ASM configuration, or might be inaccessible for another reason.
Root Cause
The error output indicates that Oracle could not access the temporary tablespace file associated with the DATAC1 ASM disk group.
Possible causes include:
- The ASM disk group is not mounted.
- The ASM disk group is unavailable or has been removed.
- The temporary tablespace references an inaccessible or missing file.
- The ASM configuration or storage availability has changed.
The exact underlying cause should be confirmed by checking the ASM configuration and database metadata.
2. Solution Overview
In this scenario, the issue was resolved by creating a replacement temporary tablespace in the available +PRODDATA ASM disk group.
The steps performed were:
- Create a new temporary tablespace named
TEMP_NEW. - Set
TEMP_NEWas the database’s default temporary tablespace. - Drop the old temporary tablespace named
TEMP. - Recreate
TEMPin+PRODDATA. - Set the recreated
TEMPtablespace as the database’s default temporary tablespace.
This approach avoids relying on the inaccessible +DATAC1 location for the replacement temporary tablespace.
3. Step 1: Check the ASM Disk Group Availability
Before making changes, verify the ASM disk groups available to the database.
Connect to the ASM instance using an account with the required privileges:
sqlplus / as sysasmCheck the disk group status:
SELECT NAME,
       STATE,
       TYPE,
       TOTAL_MB,
       FREE_MB
FROM V$ASM_DISKGROUP
ORDER BY NAME;
Confirm that PRODDATA is available and mounted.
You can also check the database’s existing temporary tablespace configuration:
SELECT TABLESPACE_NAME,
       FILE_NAME,
       STATUS
FROM DBA_TEMP_FILES;
Check the database’s default temporary tablespace:
SELECT PROPERTY_NAME,
       PROPERTY_VALUE
FROM DATABASE_PROPERTIES
WHERE PROPERTY_NAME = 'DEFAULT_TEMP_TABLESPACE';
These checks help determine which temporary tablespace is affected and whether the destination ASM disk group is available.
4. Step 2: Create a New Temporary Tablespace
Create a replacement temporary tablespace named TEMP_NEW in the available +PRODDATA ASM disk group.
Execute the following command as a database user with the necessary privileges:
CREATE TEMPORARY TABLESPACE TEMP_NEW
TEMPFILE '+PRODDATA'
SIZE 1G
AUTOEXTEND ON NEXT 100M MAXSIZE 30G;
Explanation
TEMP_NEW: Name of the new temporary tablespace.TEMPFILE '+PRODDATA': Creates the temporary datafile in thePRODDATAASM disk group.SIZE 1G: Allocates an initial size of 1 GB.AUTOEXTEND ON: Allows the tempfile to grow automatically.NEXT 100M: Specifies the growth increment.MAXSIZE 30G: Sets the maximum tempfile size to 30 GB.
The command completed successfully:
Tablespace created.Important: Ensure that +PRODDATA is mounted and has sufficient available capacity. Confirm that the selected maximum size is appropriate for the database’s workload and storage limits.
5. Step 3: Change the Default Temporary Tablespace
Before dropping the old temporary tablespace, change the database’s default temporary tablespace to TEMP_NEW.
Execute:
ALTER DATABASE DEFAULT TEMPORARY TABLESPACE TEMP_NEW;Expected output:
Database altered.This makes TEMP_NEW the database’s default temporary tablespace.
Changing the default first is important because the database must have a valid default temporary tablespace before the original one is removed.
If the database uses temporary tablespace groups or explicit temporary tablespace assignments for individual users, review those configurations separately.
6. Step 4: Drop the Old Temporary Tablespace
After successfully switching the default temporary tablespace to TEMP_NEW, drop the old temporary tablespace:
DROP TABLESPACE TEMP INCLUDING CONTENTS AND DATAFILES;Expected output:
Tablespace dropped.This removes the old temporary tablespace and its associated contents and datafiles.
Important Considerations
Before executing this command in production:
- Verify that
TEMPis the intended tablespace to remove. - Confirm that
TEMP_NEWis available and operational. - Check whether any users have explicitly assigned
TEMPas their temporary tablespace. - Verify that the old tempfile is not needed for recovery or further investigation.
- Confirm that the command is being executed against the correct database and container.
If the old tempfile is inaccessible because its ASM disk group is unavailable, validate the exact file and tablespace metadata before proceeding. Dropping a tablespace does not repair an underlying ASM disk group problem.
7. Step 5: Recreate the Original Temporary Tablespace
After removing the old temporary tablespace, recreate it using the available ASM disk group.
Execute:
CREATE TEMPORARY TABLESPACE TEMP
TEMPFILE '+PRODDATA'
SIZE 1G
AUTOEXTEND ON NEXT 100M MAXSIZE 30G;
Expected output:
Tablespace created.The original tablespace name, TEMP, is now available again, but its tempfile is created in +PRODDATA rather than the inaccessible +DATAC1 location.
This preserves the familiar temporary tablespace name for database administration and configuration purposes.
8. Step 6: Set the Recreated TEMP Tablespace as the Default
Once the original temporary tablespace has been recreated successfully, set it as the database’s default temporary tablespace:
ALTER DATABASE DEFAULT TEMPORARY TABLESPACE TEMP;Expected output:
Database altered.The database now uses the recreated TEMP tablespace as its default.
The temporary tablespace migration is complete.
9. Step 7: Verify the Configuration
After completing the changes, verify the default temporary tablespace:
SELECT PROPERTY_NAME,
       PROPERTY_VALUE
FROM DATABASE_PROPERTIES
WHERE PROPERTY_NAME = 'DEFAULT_TEMP_TABLESPACE';
Expected result:
PROPERTY_NAME                 PROPERTY_VALUE
----------------------------  --------------
DEFAULT_TEMP_TABLESPACE       TEMP
Check the temporary tablespace configuration:
SELECT TABLESPACE_NAME,
       STATUS,
       CONTENTS
FROM DBA_TABLESPACES
WHERE CONTENTS = 'TEMPORARY';
Check the temporary datafiles:
SELECT TABLESPACE_NAME,
       FILE_NAME,
       BYTES / 1024 / 1024 AS SIZE_MB,
       AUTOEXTENSIBLE,
       MAXBYTES / 1024 / 1024 AS MAX_SIZE_MB
FROM DBA_TEMP_FILES
ORDER BY TABLESPACE_NAME;
Confirm that the recreated TEMP tablespace points to a tempfile in the +PRODDATA ASM disk group.
Also verify that the tablespace has sufficient capacity and that application workloads can allocate temporary space successfully.
10. Complete SQL Command Sequence
The following is the command sequence used to resolve the issue:
-- Step 1: Create a replacement temporary tablespace
CREATE TEMPORARY TABLESPACE TEMP_NEW
TEMPFILE '+PRODDATA'
SIZE 1G
AUTOEXTEND ON NEXT 100M MAXSIZE 30G;

-- Step 2: Change the default temporary tablespace
ALTER DATABASE DEFAULT TEMPORARY TABLESPACE TEMP_NEW;

-- Step 3: Drop the old temporary tablespace
DROP TABLESPACE TEMP INCLUDING CONTENTS AND DATAFILES;

-- Step 4: Recreate the original temporary tablespace
CREATE TEMPORARY TABLESPACE TEMP
TEMPFILE '+PRODDATA'
SIZE 1G
AUTOEXTEND ON NEXT 100M MAXSIZE 30G;

-- Step 5: Set the recreated tablespace as the default
ALTER DATABASE DEFAULT TEMPORARY TABLESPACE TEMP;

-- Step 6: Verify the default temporary tablespace
SELECT PROPERTY_NAME, PROPERTY_VALUE
FROM DATABASE_PROPERTIES
WHERE PROPERTY_NAME = 'DEFAULT_TEMP_TABLESPACE';

-- Step 7: Verify temporary datafiles
SELECT TABLESPACE_NAME, FILE_NAME
FROM DBA_TEMP_FILES;
Note: Execute these commands only after confirming the affected tablespace, ASM disk group availability, and database configuration. The sequence above reflects the demonstrated solution and should be adapted if the database uses temporary tablespace groups or other special configurations.
Conclusion
The Oracle Database 19c errors ORA-01122, ORA-01110, ORA-01565, ORA-17503, and ORA-15001 indicated that Oracle could not access the temporary tablespace file located in the +DATAC1 ASM disk group.
In the demonstrated solution, a new temporary tablespace named TEMP_NEW was created in +PRODDATA and made the default. The old TEMP tablespace was then dropped and recreated in +PRODDATA, after which it was restored as the default temporary tablespace.
This procedure restored the intended temporary tablespace configuration without relying on the inaccessible ASM file location.
However, DBAs should remember that recreating a temporary tablespace does not resolve the underlying ASM disk group availability issue. If DATAC1 is expected to remain in service, its status and storage configuration should be investigated separately.
Always validate the ASM configuration, tempfile metadata, user assignments, and database environment before performing these operations in production.
How to Drop and Recreate Temp Tablespace in Oracle (Step-by-Step Guide)