

Encrypting your data is only half the job. The other half — the part that actually gets skipped in a lot of environments I’ve walked into — is protecting the keys that do the encrypting. If the master key is just sitting in a wallet on the same server as the data, and that server gets compromised, TDE isn’t buying you much. Oracle Key Vault (OKV) is Oracle’s answer to that gap: one centralized place to manage encryption keys, wallets, certificates, and credentials across every database in the shop instead of a wallet file on every box.
This walkthrough covers the initial OKV setup end to end — getting into the console for the first time, recovering admin accounts, standing up the three separate admin roles, and getting an Oracle Database registered as an OKV endpoint.

What Oracle Key Vault Actually Manages
At a high level, OKV centralizes:
- TDE master encryption keys
- Oracle Wallets
- SSL certificates
- SSH keys
- Java keystores
- Passwords and general credentials
Rather than every database server keeping its own independent wallet — which gets unwieldy fast once you’re past a handful of databases — everything lives in one governed repository.
The Lab Setup
For this exercise I’m using two VMs:
| Machine | Purpose |
|---|---|
| Database1 | Runs Oracle Database 19c (ORCLCDB) |
| Oracle Key Vault | Runs the OKV server |
The goal is simple: enroll the database server as an OKV endpoint and get comfortable moving around the OKV admin console, since that’s where you’ll be spending time once this is live in production.
Step 1: Connect to the Database Server
SSH into the database host from the gateway machine:
ssh oracle@database1
oracle@database1
Password: oracle
Once that connects, you’re sitting on the Oracle Database server itself.
Step 2: Open the Oracle Key Vault Console
Fire up Firefox:
firefox &
Point it at:
https://okv.example.com
Since this is a lab and the cert is self-signed, expect a security warning. Click through it:
- Advanced
- Add Exception
- Get Certificate
- Confirm Security Exception
Once you accept the exception, you’ll land on the OKV login page.
Understanding the Login Screen
OKV supports a few different authentication paths, but the one that matters for a first-time setup is System Recovery — it’s what lets an administrator rebuild admin accounts if they’ve been lost, forgotten, or simply never created yet, which is exactly the situation we’re in.
Step 3: Run System Recovery
Click System Recovery and enter the recovery passphrase:
oracle_4u
That passphrase gets set during OKV installation, so if you’re doing this against a real deployment (not a lab), whoever ran the install is the one who should have it on file.
Once authenticated, you’ll land on the Administrator Recovery page.
Step 4: Create the Three Administrative Accounts
OKV wants three separate admin accounts created here, and this separation isn’t cosmetic — it’s the whole point of the security model, which I’ll get to in a second.
Key Administrator
| Field | Value |
|---|---|
| Username | OKV_KEYS_KATE |
| Password | student_1 |
| Full Name | Kate Key Admin |
System Administrator
| Field | Value |
|---|---|
| Username | OKV_SYS_SEAN |
| Password | student_1 |
| Full Name | Sean System Admin |
Audit Manager
| Field | Value |
|---|---|
| Username | OKV_AUD_AUDRY |
| Password | student_1 |
| Full Name | Audrey Audit Manager |
Fill in all three and click Save. OKV creates the accounts and you’re ready to start logging in as each role.
Why the Roles Are Split Up
OKV deliberately splits administrative duty three ways:
| Role | Responsibility |
|---|---|
| System Administrator | Appliance management, users, endpoints |
| Key Administrator | Encryption keys, wallets, certificates |
| Audit Manager | Audit reports and security monitoring |
This is least-privilege in practice — no single account can both manage the keys and also erase the audit trail showing what they did with them. I’ve seen shops try to collapse this down to one all-powerful admin account for convenience, and it defeats most of the reason to run OKV in the first place.
Step 5: Log In as System Administrator
Username: OKV_SYS_SEAN
Password: student_1
First login forces a password change — set it to:
oracle_4u
That drops you into the OKV dashboard.
Poking Around the Dashboard
From here you’ve got quick visibility into:
- Current alerts
- Appliance health
- Endpoint status
- Administrative tasks
- Security notifications
Click into Alerts if you want the full detail behind any warning or system event — worth doing on a regular cadence, not just when something’s already on fire.
Checking the User List
Go to Users and you’ll see the three accounts just created:
- OKV_SYS_SEAN
- OKV_KEYS_KATE
- OKV_AUD_AUDRY
plus whatever preconfigured admin accounts shipped with the appliance. Each one shows its assigned role right there in the list.
Step 6: Log In as Key Administrator
Log out, then log back in as:
Username: OKV_KEYS_KATE
Current Password: student_1
Change it to oracle_4u when prompted.
This is the role that actually touches the cryptographic material day to day — managing wallets, TDE master keys, uploading and downloading wallets, handling certificates, and organizing everything into virtual wallets.
What Wallet Management Looks Like From Here
Once you’re in as Key Admin, you can:
- Upload wallets
- Download wallets
- Rotate encryption keys
- Back up wallets
- Assign wallet access to specific users or endpoints
This is where the centralization pays off — instead of chasing down wallet files across a dozen servers whenever a key needs rotating, it’s all managed from one console.
Step 7: Log In as Audit Manager
Log out again, then in as:
Username: OKV_AUD_AUDRY
Password: student_1
Change it to oracle_4u.
The Audit Manager’s job is watching everything the other two roles do — audit reports, compliance status, user activity, login history, and every administrative operation that touches the vault. If your organization has to answer to an auditor eventually (and most do), this role is the one that makes that conversation painless instead of a scramble.
The Security Model, Visually
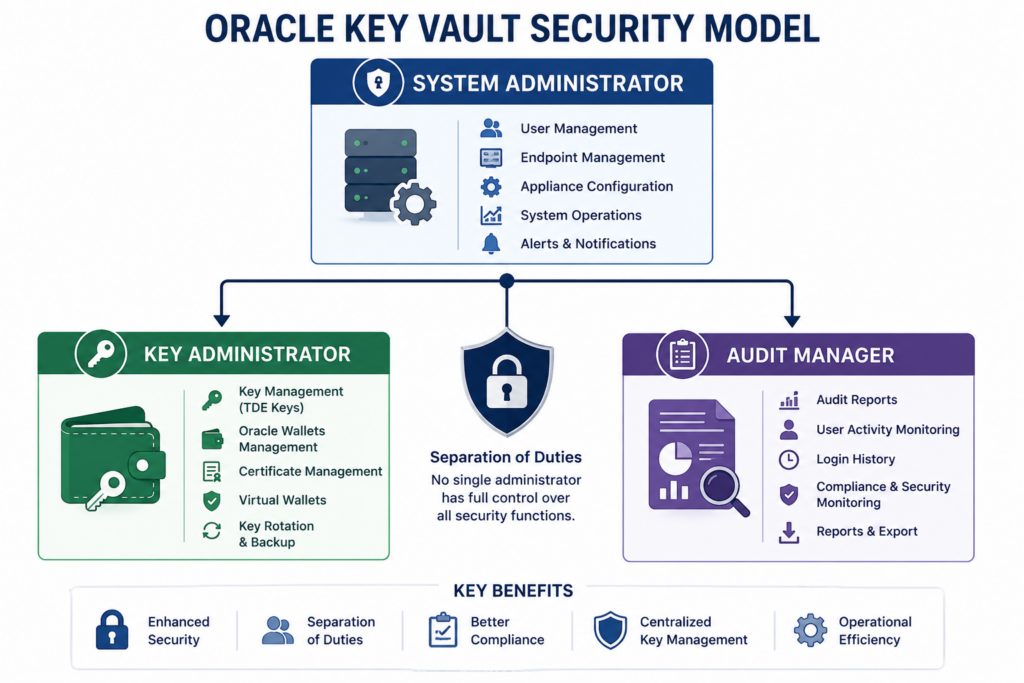
No single administrator sits at the top of all three branches. That’s intentional — it’s what stops one compromised or careless account from having the run of the whole system.
Registering the Database as an Endpoint
With the admin accounts sorted, the next piece is enrolling the Oracle Database server itself as an OKV endpoint. Once it’s registered, the database pulls its encryption keys directly from OKV instead of depending on a locally managed wallet sitting on the same host.
That gets you:
- Centralized key management
- Automatic key distribution
- Simpler TDE administration
- Better compliance posture
- Wallets kept in sync securely
Once the endpoint enrollment is done, the database can lean on OKV for TDE, auto-login wallet handling, certificate storage, credential management, and centralized key rotation — all without a DBA having to manually touch wallet files on that server again.
Best Practices I’d Stick To
- Keep System, Key, and Audit roles as separate accounts — don’t consolidate them for convenience
- Change every default password the moment setup finishes
- Use a strong recovery passphrase and store it somewhere that isn’t a sticky note on a monitor
- Check OKV alerts and audit logs on a regular schedule, not only during incidents
- Register every production database as an endpoint — partial rollout defeats the purpose
- Rotate TDE master keys periodically
- Back up wallets before any key rotation or upgrade
- Use HTTPS with a properly trusted certificate once you’re out of the lab and into production
Wrapping Up
Getting Oracle Key Vault stood up — recovering the admin accounts, splitting duties across System, Key, and Audit roles, and enrolling a database as an endpoint — is really the foundation everything else builds on. Once that’s in place, TDE stops being something managed one wallet at a time and becomes something you administer centrally, consistently, and with a real audit trail behind it. As the number of databases in your environment grows, that difference stops being a nice-to-have and starts being the thing that actually keeps an audit finding off your desk.


